Category Archives: Windows Server

How to get IIS 7.5 web server to pass the BEAST PCI vulnerability compliance scans

If your e-commerce website keeps flunking PCI vulnerability complaince scans with the following error:

BEAST (Browser Exploit Against SSL/TLS) Vulnerability, CVE-2011-3389

and you are running Microsoft Server 2008 R2, I can help you.

If you aren’t on Windows Server 2008 R2, there is no known way to pass this test short of upgrading your server to W2K8R2 and doing the following steps.

This is the exact vulnerability as reported (in our case, by Trustkeeper):

BEAST (Browser Exploit Against SSL/TLS) Vulnerability The SSL protocol encrypts data by using CBC mode with chained initialization vectors. This allows an attacker, which is has gotten access to an HTTPS session via man-in-the-middle (MITM) attacks or other means, to obtain plain text HTTP headers via a blockwise chosen-boundary attack (BCBA) in conjunction with Javascript code that uses the HTML5 WebSocket API, the Java URLConnection API, or the Silverlight WebClient API. This vulnerability is more commonly referred to as Browser Exploit Against SSL/TLS or “BEAST”.

CVE: CVE-2011-3389

NVD: CVE-2011-3389

Bugtraq: 49778

CVSSv2: AV:N/AC:M/Au:N/C:P/I:N/A:N(4.30)

This is the remediation (as stated by Trustkeeper):

Affected users should disable all block-based cipher suites in the server’s SSL configuration and only support RC4 ciphers, which are not vulnerable to fully address this vulnerability. This vulnerability was addressed in TLS version 1.1/1.2, however, support for these newer TLS versions is not widely supported at the time of this writing, making it difficult to disable earlier versions.

Additionally, affected users can also configure SSL to prefer RC4 ciphers over block-based ciphers to limit, but not eliminate, exposure. Affected users that implement prioritization techniques for mitigation as described above should appeal this vulnerability and include details of the SSL configuration.

Here is the evidence (as stated by TrustKeeper):

Service: http
Evidence:
Cipher Suite: SSLv3 : DES-CBC3-SHA
Cipher Suite: SSLv3 : RC4-SHA
Cipher Suite: SSLv3 : RC4-MD5
Cipher Suite: TLSv1 : AES256-SHA
Cipher Suite: TLSv1 : AES128-SHA
Cipher Suite: TLSv1 : DES-CBC3-SHA
Cipher Suite: TLSv1 : RC4-SHA
Cipher Suite: TLSv1 : RC4-MD5

That isn’t much help, of course.

Ok, here is how to solve this.  And you don’t even need REGEDIT!

  1. Make sure your website is on a Windows 2008 R2 server, with a valid SSL certificate.
  2. Download the following FREE – and FANTASTIC program to your web server.
    1. https://www.nartac.com/Products/IISCrypto/Default.aspx
  3. Run the program on your web server.  Please be logged in as full admin, and remote desktop is fine.
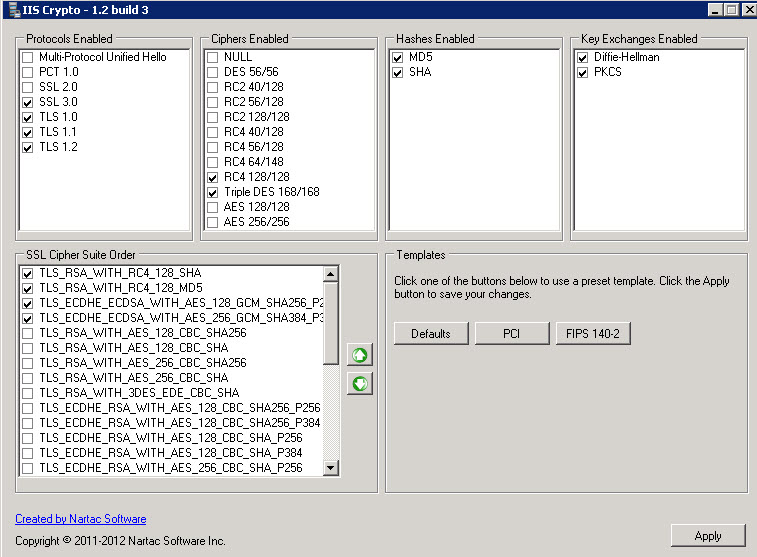
  4. Start by clicking the PCI button, then make all your settings look like below:
    1. pci
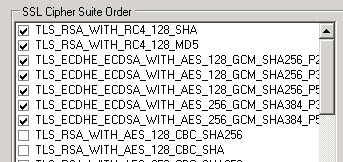
  5. In some cases you might have a few more listing under SSL Cipher Suite order.  Here is a screenshot from a second server (below).  The settings below are also perfectly fine:
    1. pci2
  6. In all cases – MAKE YOUR SETTINGS JUST LIKE ABOVE – and your site should always pass the BEAST test.
    1. IT IS CRITICAL that you have ONLY the CIPHERS selected in the above two screenshots, and the TOPMOST TWO in THIS SPECIFIC ORDER.
  7. apply the changes
  8. Restart the server.
  9. once the server is back up and running, go to the website below:
    1. https://www.ssllabs.com/ssltest/index.html
  10. Allow the test to complete.  The test will tell you if the site passes all the tests and is BEAST compliant, and it will give you a score for your website.  The website we tested scored 89 which is an “A”.

Hopefully this will help shortcut this process for some of you. I literally spent hours working this solution out.


How to migrate MYSQL to a new Windows server

Here is the easiest process that I know of for migrating (and upgrading) from one version of MYSQL running on Windows server, to a new Windows server.

  1. Setup the new Windows server, give it a fixed IP address (we’ll change that later to be at the same IP as the old server).
  2. Run all Windows updates
  3. Install IIS 7.5 (in our example, we were on W2K8 R2 Standard) and take all defaults.
  4. Go to Google and search for MICROSOFT PLATFORM INSTALLER, go to that Microsoft site, and run the installer.  The current version as of this post was 4.0RC
  5. in the MPI, search for PHP and install PHP.  Allow it to take any extras it chooses, hit next and install those items.
  6. Now that PHP is installed, launch the IIS 7.5 manager, stop the default site and setup a new website that we’ll use to park PHPMYADMIN on.
  7. Go download the latest version of PHPMYADMIN.
  8. extract it to your website directory into the /phpmyadmin/ directory.
  9. you should now be able to access the PHPMYADMIN site via http://localhost/phpmyadmin/
  10. Download and install the latest MSI installer download (of the x64 version if you have an x64 server)
  11. Install MYSQL
  12. Run the configuration wizard and complete the standard setup.  In our case we used a dedicated MYSQL server, set a new password for the admin account and pretty much took all defaults.
  13. At this pount we just need to migrate the data over from the old server to the new server.
  14. Make sure you have MYSQL Workbench installed to do this (under windows).  Current version is 5.2.30 CE.
  15. Under “Server Administration” you need to setup one connection for the old (current server) and one for the new one.
  16. Connect to the old server.
  17. Click Data Export.
  18. Export out ALL databases to one SQL file.  This may take some time depending on the speed of your internet connection.
  19. when this is complete, go check the file to make sure it is (relatively) large depending on the number of databases that you exported out.  MAKE SURE you export out the MYSQL database as well as all databases.
  20. Connect to the new server.
  21. Do a DATA IMPORT/RESTORE and load the SQL file you just exported
  22. Start the import.  Again, this may take some time to complete.
  23. When complete, the new machine is now a clone of the old machine.
  24. Shut down the old server.
  25. Change the IP on the new server to the IP of the old server.  Reboot (just to be sure).
  26. Once the new server is rebooted and it is at the “old IP” any of your sites that connect to MYSQL should now be working once again just as if they were connecting to the old server.

I hope this helps anyone who is in need of migrating/upgrading their Windows-based MYSQL install.


DotNetNuke 6 install onto Windows 2008 R2 Server

Here is the proper way to avoid getting the dreaded “System.Security.SecurityException: Request for the permission of type ‘System.Web.AspNetHostingPermission, System, Version=2.0.0.0, Culture=neutral, PublicKeyToken=b77a5c561934e089’ failed.” error while attempting to get DotNetNuke 6.x installed onto Windows Server 2008 R2.

  1. download and extract the DNN installer.  In my case, I downloaded DotNetNuke_Community_06.01.03_Install and extracted it into a temporary directory.
  2. Make sure you add feature .NET Framework 3.5.1 Features, and enable ASP.NET at the same time
  3. In my case, I am installing DNN to the root of a new subdomain, so I created a new folder in my website directory named for the domain name.
  4. Copy over the DNN files into your website directory
  5. Go to the IIS manager and setup a new website and point it to your directory
  6. Make sure you add default.aspx as the default document type
  7. Make sure you create a new dedicated application pool.  In my case I used DNN as the name of the application pool.
  8. on your WWW directory, grant the following permissions.  {machinename}\IUSR (full control), ASPNET (F.C.), Network Service (F.C.)
  9. Using SQL manager, create a new database for the site.  An empty database will suffice.  Create a login for the database.
  10. Update the SQL server connection strings in the web.config file to point to the database server and using your UN/PW from above.
  11. Now try accessing the site you’ve created and you will get this error:
    1. Description: The application attempted to perform an operation not allowed by the security policy.  To grant this application the required permission please contact your system administrator or change the application’s trust level in the configuration file.
      Exception Details: System.Security.SecurityException: Request for the permission of type ‘System.Web.AspNetHostingPermission, System, Version=2.0.0.0, Culture=neutral, PublicKeyToken=b77a5c561934e089’ failed.
    2. Application Error b77a5c561934e089
  12. To solve that, go to the Application pool and edit the Application Pool you created for this site, in my case it is DNN
    1. Click Advanced Settings
    2. Set Managed Pipeline Mode to CLASSIC
    3. Set Identity=Network Service.
    4. Click OK
    5. Click Recycle
    6. Go back to the IIS manager and do a restart of the IIS service on the webserver.
    7. Application Pool Advanced Settings
  13. Try to access your DNN site again now and it should work properly.
  14. Complete the DNN wizard and you should pass all tests (like permissions)

IIS WordPress images 500 error

If you are here you probably are having the dreaded “broken images” problem while running WordPress under IIS.

You may have found this issue by looking at the IIS logfiles for your site and seeing 500 errors logged when it’s supposed to be pushing out images.

I will save you a lot of time.

This is all about fixing permissions so that images/media/files uploaded via WordPress will properly render.

This is the fix for the infamous “500” error that is thrown when your server has wrong file permissions and the visual result is all the images you uploaded are “broken images” and won’t display. Also called HTTP Error 500.50 – URL Rewrite Module Error when you have Detailed errors on.

  1. Don’t sweat it, I will save you HOURS of time on this one.   Thanks to the article I found here after HOURS of tracking this issue down, this problem is caused because PHP first uploads the document to a temporary directory (by default C:\Windows\Temp), and then moves it from that directory to the actual /blog/wp-content/uploads/ subdirectory.  What happens is that because IIS does not have any permissions to your “C:\Windows\Temp” directory, when the file is uploaded there, then moved by PHP, the file inherits NO permissions.  So when IIS trys to serve out that file from your /blog/wp-content/uploads/subdirectory it throws a 500 error and that is actually a permissions error.
  2. The solution:  on the Windows\Temp folder, grant “modify” permissions to both IUSR and {servername}\IIS_IUSRS user accounts.
  3. Now when you upload files via PHP and PHP moves them to the correct directory, the files will have the correct permissions and can be accessed.
  4. Important note #1:  If you already have uploaded files and are getting the dreaded broken images issue, go to the /blog/wp-content/uploads/directory and replace/update the permissions to add access for both user accounts noted above.  That will solve that issue.
  5. Important note #2: as with any change off the defaults for Windows, you do this AT YOUR OWN RISK.  It’s up to you if you want to grant the Windows\Temp directory permissions for those two accounts.  If you don’t PHP won’t be able to upload without the 500 issue (unless you move the PHP temp folder elsewhere and grant those accounts access to the other folder).  Do these changes at your own risk… I cannot and won’t take any responsiblity for your systems.  Please know what you are doing.

UPDATE: 04/29/2011:  One reader commented to me that he is concerned about changing security permissions on the Windows TEMP directory, and he noted that you can also edit the php.ini file and change the location of the “upload_tmp_dir” variable and point it to another location.  It’s up to you how you want to do this, as long as you have the right permissions mentioned above, your WP images and future uploads will work fine.


Trying to install/run ASPDOTNETSTOREFRONT on W2K8R2 Windows 2008 R2 Server

If you happen to get this message when trying to launch ASPDOTNETSTOREFRONT under Windows 2008 R2 Server:

The page you requested has generated an error. Please visit our homepage by clicking this link.

The issue is most likely that you are running a 32 bit version of ASPDOTNETSTOREFRONT on a 64 bit server.

to fix this:

  1. IIS Manager
  2. Application Pools
  3. click on the application pool for the ASPDOTNETSTOREFRONT app
  4. advanced settings
  5. Enable 32-bit applications = TRUE
  6. Click recycle

Retry your application.  It should work now.


Sothink Video Encoder for Adobe Flash under Windows 2008 Server

Need help getting the Sothink Video Encoder for Adobe Flash working under W2K8 or W2K8 R2 server?

Here is how to properly configure your server:

  1. Install the Sothink Video Encoder for Adobe Flash software and register it using your registration key.
  2. In the destination folder for the videos, you will need to grant {machinename}\IUSR full control.
  3. the MyRequest.dll file (for ASP) won’t work properly, so if you are using ASP, you will need to use some other method to upload files to the server.  One good choice is ASPUPLOAD.COM
  4. Presuming you have already setup a site under the IIS 7.5 management tool, you need to change the pool to LOCAL SYSTEM.  Do this by locating the application pool for this site, then click ADVANCED SETTINGS (on the right nav) and under PROCESS MODEL, for Identity, select LOCALSYSTEM
  5. Click OK to close out of the property page above, then click RECYCLE
  6. You will need to grant scripts and executables property to the site.  It’s different under IIS 7 and IIS 7.5 to do this… so on the site home, open HANDLER MAPPINGS, and click “edit feature permissions” and check execute.  Then click OK and exit out.
  7. I would advise at this point to restart IIS on this box by clicking the server name and then RESTART in the right nav.
  8. If you’ve done all the above properly, you should have no problems encoding videos using Sothink Video Encoder for Adobe Flash on a Windows 2008 server.


IIS 7 and IIS 7.5 script map .htm to asp.dll

I recently upgraded a site from a Windows 2003 server to a Windows 2008 R2 Web Server and needed to be able to continue running .htm files through the ASP engine, because many of the pages on the site comingled ASP and HTM.
After spending about 3 hours looking into this, I finally worked out the process (below). I hope this gives some of you a time savings!
  1. Make sure that ASP is installed on IIS 7 or IIS 7.5 (obviously)
  2. Setup your web site
  3. Your ASP files should work normally
  4. to allow your .htm files to run through the ASP engine, do the following
  5. On your IIS 7 or IIS 7.5 server, go into the C:\Windows\System32\inetsrv\config directory and edit the file applicationHost.config (you will need to do this in administrator mode, or do it from a different computer networking over to that server, otherwise Windows will protect that file and won’t allow you to change it.)
  6. Scroll all the way to the bottom and look for the section that corresponds to your web site <location path=”Your Web Site”>
  7. Change/edit the code block to add in the HANDLERS and HTM map below
  8. <location path="Your Web Site">
    <system.webServer>
    <asp appAllowClientDebug="true" scriptErrorSentToBrowser="true" />
    <handlers>
    <add name="htm" path="*.htm" verb="*" modules="IsapiModule" 
           scriptProcessor="%windir%\system32\inetsrv\asp.dll" resourceType="File" />
    </handlers>
    </system.webServer>
    </location>
  9. Save the file.
  10. Restart the web server in the IIS Manager by right clicking the server name.
  11. Test your site. .HTM pages should now work as ASP files by running through the ASP.DLL

WordPress Windows 2008 Web Server R2 IIS 7.5 setup

I thought I would share a few important tips on getting WordPress 3.x to work properly – with PERMALINKS / SEO friendly URL’s.  It’s taken me a lot of trial and error to figure out the finer points, but assuming you can get it installed, these tips should help you get it 100% functional.

  1. to install, use the Microsoft Platform Installer 2.0, and let it do the work of installing PHP, WordPress etc.  IT IS FANTASIC!!! It will automatically setup PHP/FASTCGI for you and it is slick!  You can access the direct link to install WordPress on IIS here http://www.microsoft.com/web/wordpress/
  2. Secondly, I am going to make an assumption you are installing this as a subdirectory on your root site, such as www.mysite.com/blog.  If you are installing this to the root the same directions will basically apply but you’ll need to figure out which setting will need to be adjusted to put WP on the root.
  3. Third, we use a dedicated MySQL 5.x box, so we don’t install MySQL as part of the MPI 2.0 install (from step 1).  If you don’t already have a MySQL server you’ll need to let it install that as well, or make a new empty database on your MySQL box and use that info as part of the install process.  For security and speed reasons, a dedicated server for MySQL is the best choice, but not everyone has the resouces to permit a dedicated server.
  4. Under IIS 7.0 or 7.5, make sure you have downloaded and installed the free URL REWRITE 2.0 add-in for IIS.  This is a free download here: http://www.iis.net/download/urlrewrite
  5. PERMALINKS.  Once you get WP installed and are able to login to the admin interface, it’s pretty simple to get permalinks running.
    1. in the WP admin, go to SETTINGS->Permalinks.  We chose to use the “DAY AND NAME” setting.  Any other setting is your choice.  Pick a setting and click save changes.
    2. make sure you have a web.config file in your /blog/ subdirectory. 
    3. here is what your web.config file should look like – customized just for WP 3.0 in the /blog/ subdirectory (below).  (Download a ZIPPED copy of my file here)
    4. <?xml version=”1.0″ encoding=”UTF-8″?>
      <configuration>
        <system.webServer>
          <httpErrors errorMode=”Custom” />
          <rewrite>
            <rules>
             <rule name=”Main Rule” stopProcessing=”true”>
              <match url=”.*” />
              <conditions logicalGrouping=”MatchAll”>
               <add input=”{REQUEST_FILENAME}” matchType=”IsFile” negate=”true” />
               <add input=”{REQUEST_FILENAME}” matchType=”IsDirectory” negate=”true” />
              </conditions>
             <action type=”Rewrite” url=”index.php” />
            </rule>
         </rules>
          </rewrite>
          <defaultDocument>
            <files>
              <clear />
              <add value=”index.php” />
            </files>
          </defaultDocument>
        </system.webServer>
      </configuration>
    5. Save this into your web.config file – this is all you need for WP running in the /blog/ directory.  Once you replace your file with this one your permalinks should work flawlessly.
  6. Troubleshooting.  One easy way to troubleshoot things with your WP install, is to enable DETAILED errormode.  To do this, edit your web.config file within the /blog/ folder and change just the one line above to this <httpErrors errorMode=”Detailed”/>  Of course when you are all done and going live with WP, change that line back to “Custom”
  7. Fixing permissions so that images/media/files uploaded via WordPress will properly render.  This is the fix for the infamous “500” error that is thrown when your server has wrong file permissions and the visual result is all the images you uploaded are “broken images” and won’t display. Also called HTTP Error 500.50 – URL Rewrite Module Error when you have Detailed errors on.
    1. Don’t sweat it, I will save you HOURS of time on this one.   Thanks to the article I found here after HOURS of tracking this issue down, this problem is caused because PHP first uploads the document to a temporary directory (by default C:\Windows\Temp), and then moves it from that directory to the actual /blog/wp-content/uploads/ subdirectory.  What happens is that because IIS does not have any permissions to your “C:\Windows\Temp” directory, when the file is uploaded there, then moved by PHP, the file inherits NO permissions.  So when IIS trys to serve out that file from your /blog/wp-content/uploads/subdirectory it throws a 500 error and that is actually a permissions error.
    2. The solution:  on the Windows\Temp folder, grant “modify” permissions to both IUSR and {servername}\IIS_IUSRS user accounts. 
    3. Now when you upload files via PHP and PHP moves them to the correct directory, the files will have the correct permissions and can be accessed.
    4. Important note #1:  If you already have uploaded files and are getting the dreaded broken images issue, go to the /blog/wp-content/uploads/directory and replace/update the permissions to add access for both user accounts noted above.  That will solve that issue.
    5. Important note #2: as with any change off the defaults for Windows, you do this AT YOUR OWN RISK.  It’s up to you if you want to grant the Windows\Temp directory permissions for those two accounts.  If you don’t PHP won’t be able to upload without the 500 issue (unless you move the PHP temp folder elsewhere and grant those accounts access to the other folder).  Do these changes at your own risk… I cannot and won’t take any responsiblity for your systems.  Please know what you are doing.
  8. Another site with good info on WordPress/IIS installs is here

Best of luck on your Windows 2008 R2 IIS 7.5 WordPress install. We use it here and it is fantastic!

Server name does not show up under Network

I recently came across this problem where one of our servers would not show up in the “browse list” under the “Network” icon in Windows 7.  I also checked this same issue from other computers Network Neighborhoods and verified it was just this one server “webserver6” which was not showing up.  We are in a standard Windows AD (Active Directory) network here with a DHCP and DNS servers and two domain controllers.  I checked all the settings on those boxes and they all looked fine, so I suspected the issue was solely with that one particular server.

I examined the server (a standard Windows 2008 server box), and all the settings looked fine.  Static IP (yes), correct DNS servers (yes), enable NetBIOS over TCP/IP (yes), so the problem must be somewhere else.

I then checked the services and found that the COMPUTER BROWSER service was disabled.  I set it to automatic and started the service.

Since this particular server is a virutal server under the latest version of Hyper-V.  I shut down the server and checked the settings in the Hyper-V manager.  I noticed that this particular server was set to a “DYNAMIC MAC” address.   I switched that to STATIC.

Rebooted my workstation and “webserver6”.  Wow!  The server now shows up under the Network list.

Here are the steps again in a more formal list:

  1. Check to make sure the server has a static IP
  2. Check to make sure the server is using the correct DNS server (probably your AD domain server)
  3. Make sure NetBIOS over TCP/IP is enabled
  4. Make sure the Computer Browser service is started and set to Automatic
  5. HYPER-V machines:  Check to make sure the network adapter that the server is using is set to a STATIC MAC address.  (Not sure if this one makes any difference, but that type of a server shouldn’t be using a dynamic MAC address anyways).
  6. Reboot the server in question and your local workstation
  7. Server should show up if all the above is OK.

ADDENDUM 12/6/2010:

Another thing to check is your Windows Firewall settings. I had another server that would not show up on the Network list until I turned off the Windows Firewall.  That wasn’t a problem for us because we have a separate firewall that protects our systems.  But you need to use your own judgement and take that action on your own choice.  We aren’t responsible for your systems so I would presume that you know what you are doing and the risks of disabling Windows Firewall.

Classic ASP file upload limit of 200kb in IIS 7

During the process of migrating a site to IIS 7 we came across an issue with Classic ASP file uploads throwing 500 errors when larger than 200kb. There is an EASY fix for this.

In IIS 7, click your site and expand it then click the ASP icon.

Expand the Limits Properties icon, and change the value in the “Maximum Requesting Entity Body Limit” to a value larger than 200000 (which is about 200kb). 2000000 would be roughly 2mb, 20000000 would be 20mb.

Click the APPLY button. That’s it!

1 2 3 4 5