Tag Archives: Microsoft Windows Server

The response is not a valid JSON response – Windows IIS

If you’re I presume you’ve already tried some other techniques to fix the “The response is not a valid JSON response” issue with WordPress running on Windows Server and IIS.

In my case, I am running PHP 8.1.8 and the issue was easy to fix.

For me, the error happened while trying to save content to a Widget.

In the log files I noticed the OPTIONS verb being used and a 405 error.

The fix is simple.  Go to HANDLER MAPPINGS, double click your PHP mapping.

Click REQUEST RESTRICTIONS.

Click VERBS

do one or the other.  Add the word OPTIONS to the current list, OR just click ALL VERBS.

Save changes.

Your “The response is not a valid JSON response” should now go away.


NOTE:  On IIS WordPress setups, you need to make sure you have a HOSTS file mapping for your website to the local IP address for the website (NOT PUBLIC IP, local machine IP).  This is necessary for the various CRON jobs to work.


Cannot browse network neighborhood under Windows 10 Fall Creators update 1709 and newer

Once again, Microsoft has thrown a monkey wrench into the operation of how your network neighborhood (or “Network”) item under Windows 10 works.

I had previously created this blog post which addressed the initial issues with Windows 10 not allowing the Network to show a list of all your local computers.

Well, due to the Fall Creators update and versions 1709 and later, Microsoft has moved even further to stop the use (and functionality) of the Network icon inside windows explorer.

Microsoft has completely disabled (and removed) SMBv1 in Windows 10 (and modern Windows Server 2016) starting with the FALL CREATORS UPDATE build 1709 and later.   This in-effect completely disables the ability for your NETWORK item in Windows Explorer to populate a list of your local network computers.

I manage several small networks and it is EXTREMELY helpful to be able to browse a list of all the local computers.

To fix this issue, go to WINDOWS FEATURES (just use Cortana and type in windows features), expand SMB 1.0/CIFS File Sharing Support

CHECK: SMB 1.0/CIFS CLIENT and SERVER

click OK

it will prompt you to reboot

when you’ve rebooted, go to windows file explorer and click on NETWORK.  you may need to hit the refresh icon, but it should pull the list of all local PC’s and magically your network neighborhood will now work!


**Note: if you try this and it still doesn’t work, make sure you do the registry entry on my prior blog post (link at the top of this post).  You will need to add that registry key and reboot.


Coldfusion 10 and Windows Server – Installation Musings

Here are some various tips and tricks as part of my brain dump for the process to get ColdFusion 10 running under Windows Server 2016.

  1. Run the ColdFusion installer under compatibility mode – Windows 7
  2. you must have the following installed under IIS
    1. CGI, ISAPI (both), ASP.NET
  3. make sure the APPPOOL for the site has 32 bit compatiblity to TRUE under app pool – advanced settings
  4. immediately after installing CF, you need to go download the latest hotfix (version 24 as of June 2017) and install it.  Directions are here
  5. Read this – it’s VERY important.
    1. you must create the two virtual directories CFIDE and JAKARTA and point them to the correct folders.
    2. NOTE: on my system, the default site was SITE ID #1 and the first actual CF site was ID #2.  However, the only way that CF would work was for me to point the jakarta directory to “1” (the default site)…
  6. Get friendly error messages->
    1. CF admin, Settings, UNCHECK “Enable HTTP status codes
  7. debug your website easily… (do #6) and then:
    1. CF admin, Debugging and Logging
      1. CHECK “Enable Robust Exception Information”
      2. CHECK “Enable Request Debugging Output”
      3. Debugging & Logging > Debugging IP Addresses
        1. add your workstation’s IP address to this list
      4. NOTE:  Make sure you TURN OFF these settings before going live on a public site
    2. Refresh your CF pages and a boat load of debugging info should show up at the bottom of each page
  8. Mail configuration is under Settings>Mail, if your website needs it.

Any other questions/comments?  Let me know!

Coldfusion with PostgreSQL – Timeout issue when setting up CF Data source

Upon trying to connect to a remote POSTGRESQL database server — which I can both PING fine and connect to using the Windows POSTGRESQL odbc 32 bit drivers —

you get this error

Connection verification failed for data source: mytest_post
java.sql.SQLException: Timed out trying to establish connection
The root cause was that: java.sql.SQLException: Timed out trying to establish connection

==

Here is the easy fix.  (presumtion of CF 10)

  1. make sure you apply the most current CF hotfix
    1. easy process – read this blog post
  2.  for an “out-of-the-box” setup, (noting that CF 10 is running on JRE 6.x), download the JDBC driver version 4.0 (which is for JRE 6.x)  here
  3.  put that JAR file in the following directory
    1. C:\ColdFusion10\cfusion\lib
    2. remove the old POSTGRESQL JAR file postgresql-9.3-1101.jdbc41.jar
    3. restart the CF services
  4. Go setup the postgreSQL connection and verify it.  Should now give you an “OK”

This was a NIGHTMARE to sort out.  I am hoping this can help someone!


Classic ASP switch to TLS 1.2

I recently came across a failed PCI scan for one of our clients.  This failure was due to TLS 1.0 being enabled on that Windows server.

We ran IISCRYPTO (link) and disabled TLS.

Upon restarting the server, the Classic ASP site threw the following error:

Microsoft OLE DB Provider for ODBC Drivers (0x80004005)
[Microsoft][ODBC SQL Server Driver][DBNETLIB]SSL Security error

That error is because the web server is no longer using TLS 1.0 and the Classic ASP application (web site) is using too old of a driver on the server, to communicate with TLS 1.1 and/or 1.2.

To get around this, go download the latest ODBC driver from Microsoft, which is version 13.1 as of today.  You will most likely need to install the 32-bit version (as most ASP apps run in 32 bit mode).  Link here

Install that driver.

then go to your Windows server, Administrative tools and open the ODBC Data Sources (32-bit)

The 32-bit ODBC Administrator is found here: C:\Windows\SysWOW64\odbcad32.exe

go to the SYSTEM tab

add a new data source

Pick “ODBC DRIVER 13 for SQL Server”… (hit finish)


put in the name (no spaces or punctuation)

server name (or IP address) (NEXT)


authentication (USE SQL server auth, enter the LoginID and PW) (NEXT)


continue, then test the connection (it should work).

go to your Classic ASP application.


You will need to update the connection string to this:

DSN=YourNewSystemDSNName;Uid=YourSQLUsernameHere;Pwd=SQLpassword;

You can now use IISCrypto and disable TLS 1.0

Reboot the server

re-test your Classic ASP app and now you should be up and running on TLS 1.1 or 1.2


Adding DKIM records to Kerio Connect

If you want to implement DKIM (signed email) to your Kerio Connect setup, here’s the easy way.

Start by reading these links

Kerio link 1

Kerio link 2

The following setup is for Kerio Connect 9.x, and Windows Server 201X DNS server

  1. Make sure your email server is properly connected to a good public DNS server, such as Google (8.8.8.8 and 8.8.4.4.)
  2. Go to Kerio Connect, Configuration, Domains.
  3. Click SHOW PUBLIC KEY and copy it.
  4. paste it into notepad.  We’ll need to rework it a bit to be compatible with Windows DNS.  Note:  Windows DNS limits the length of one single string of characters, so we’ll need to split it into several lines.
  5. Reformat it like this.  Break it into even lines, around 100 characters each.  The exact length doesn’t matter.  Just do it evenly, hit enter at each breakpoint.
  6.  NOTE:  make SURE there is a SPACE between the semicolon and the p
    1. as in v=DKIM1; p=xxxx
  7. example properly reformatted
  8. Copy this reformatted string
  9. Go to the domain in your Windows DNS server.  For example, if your domain is mydomain.com go to that domain in the DNS Server management console.
  10. right click, other records, add TXT record
  11. Record name is:  mail._domainkey
  12. after you enter that, you will see the FQDN look like this:
    1. mail._domainkey.mydomain.com
  13. Paste the string from #7 above into the text box, as-is.
  14. Hit ok and save that change.
  15. repeat this for any other domain.  On Kerio Connect, all the domains on the one email server use the exact same DKIM keys.
  16. Now we are going to test the DKIM record to make sure it can be properly read.
    1. go to https://mxtoolbox.com/
    2. type in your domain
    3. hit check MX
    4. when that completes (successfully), change the drop down to “DKIM Lookup”
      1. type in your full DKIM string:
      2. mail._domainkey.mydomain.com.
    5. Run the DKIM Lookup
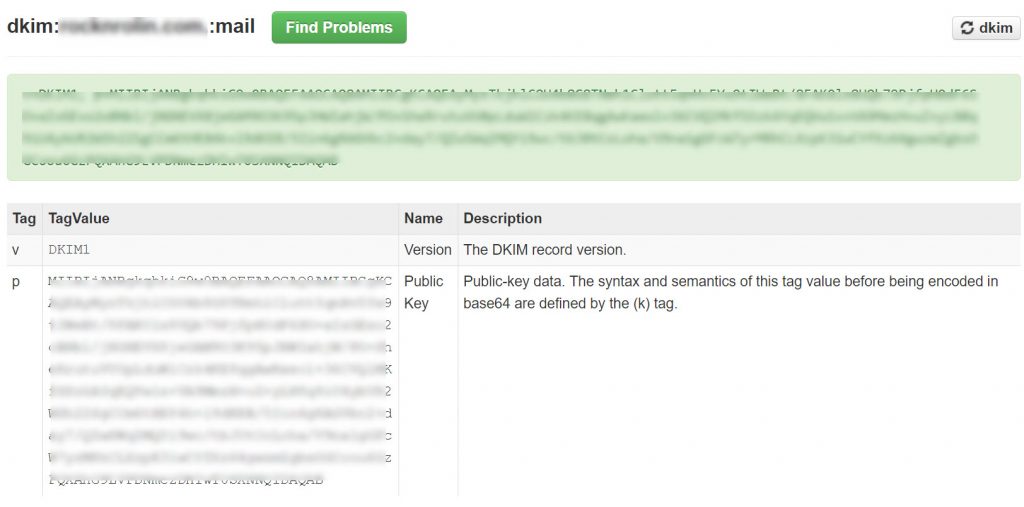
    6. You should see a successful test, and your report should look just like this:
    7. if it doesn’t look like this, then you did something wrong with your TXT record creation, or you forgot to put the entire DKIM key in the lookup.
    8. Since all is well, proceed.
  17. next, go back to Kerio Connect.
  18. while still on the domain, check the checkbox to enable DKIM
  19. If the DNS on your email server is setup properly, and it is communicating properly to your DNS server, you should see the box above.
    1. If you see a message “DKIM public key not found in public DNS”
    2. try restarting KMS
    3. Try going to a command prompt and ipconfig /flushdns
  20. Presuming that you do see the proper message in #18 above, we now need to do a test email to verify everything is working.
  21. Go to http://www.appmaildev.com/en/dkim
  22. click next step
  23. the site will generate an email address
  24. copy this email address and send a blank email to that address FROM AN EMAIL ACCOUNT ON THE DOMAIN you setup with DKIM above.
  25. Wait for the site to receive the email and generate it’s report (a few seconds)
  26. you should see DKIM = PASS


While you’re at it, don’t forget to create SPF and DMARC records for your domain to cover all the bases.


Quick Migration of Windows Server 2008 R2 Hyper-V to Windows Server 2012 or 2016

Here are the proven and tested steps for migrating from Windows Server 2008 R2 to Windows Server 2012 or 2016.  Note:  You cannot IMPORT a VM from 2008 R2 into 2012 or 2016, so you have to do the whole process manually.  That’s the reason for this post.

  1. log into the existing 2008 R2 virtual machine and note the following
    1. memory and CPU config
    2. IP addressing information (you need all the IP information, static IP’s etc.)
  2. Shut down the 2008 R2 virtual machine
  3. copy the VHD from the 2008 R2 virtual machine to the new host.
  4. On the new host open Hyper-V manager
    1. Edit disk
    2. select the VHD
    3. CONVERT to VHDX
    4. this will take a while
  5. When that completes, create a new VM
    1. DO NOT attach the hard drive.  Select “add a HD later”.  (I have seen issues with attaching the hard drive as part of the setup here, so I skip it and do it separate)
    2. Generation 1 VM
    3. set the memory and CPU configs
    4. complete the VM creation
    5. edit the VM and attach the VHDX file as IDE 0 master
  6. Using the Hyper-V remote control interface (by double clicking on a VM)
  7. Start the new VM
  8. boot into windows
  9. while on the desktop, after ~15-60 seconds you might see a “REBOOT” notification after changes are made to the OS.  If you get this notification, go ahead and reboot.  Otherwise, continue on.
  10. at this point in the Hyper-V manager, you need to double click on the VM and remotely control it through the Hyper-V manager
  11. while you are logged into the VM as administrator and at the desktop, insert the Hyper-V integration tools disc and upgrade the Hyper-V tools
  12. reboot when that completes
  13. log in again to the machine through the Hyper-V remote control interface
  14. edit the network adapter properties and set it exactly as it was before.
    1. Note:  During this whole process your OLD NIC will be hidden (because it’s gone now) and you will be given a new NIC and it will be in DHCP mode from the start.
    2. you will need to edit that new NIC and put in the correct static TCP/IP information if applicable to your setup.
    3. ALL OTHER settings (machine name, IIS, DNS, etc.) will retain fine.  Just edit the NIC and config the NIC the same way it was on the old VM


All done!

Migrate Symantec Backup Exec 2015 14.2 to new server with a DIFFERENT name

I have used this procedure to successfully migrate an installation of BUE 2015 ver. 14.2 to a new server, with a different machine name.  If you are moving things from the old machine to the new machine and they both have the same names, see my post here and use that instead.

I used this procedure for a client who was ONLY using local disk based backups, but this will also work for tape/other device backups as well.

First, download this document.  It contains most of the steps, with the additions/changes below.

Using the PDF document from above:

  1. Setup the new server.  Patch it up to date through Windows updates.  Join it to the domain.  Make sure the machine name is correct (what you want it to be going forward)
  2. Install BUE onto the new server.
    1. This is SECTION 3 of the PDF, “Install Backup Exec on the Destination Computer”
  3. Make sure both the old BUE server and the new BUE server have the exact same
    1. Software version, BUE 2015 / 14.2 (etc.)
    2. Patches.
      1. Run live update on both machines and make 100% sure both have the same version and hotfixes
  4. Perform step #1 in the PDF, “Obtain information about the current Backup Exec installation”
  5. Perform step #2 in the PDF, “Move Backup Exec data to a temporary location”
    1. Note:  it’s up to you if you want to copy directly from the old server to the new server.  I directly copied things over the lan from the old machine to the new machine and left the old machine intact.
  6. Skip step #3 (already done above)
  7. Start step #4 “Move Backup Exec data from temporary location to the destination…”  NOTE:  Stop after 4.3.  Do not proceed yet.
    1. Complete steps 4.1, 4.2 and 4.3
  8. In our case, this client was using a disk based backup strategy.  At this point, we shut down the old server, shut down the new server, and installed the 3tb hard drive from the old server into the new server.
    1. we also made sure the DRIVE LETTER was the same on the new server for this drive as it was on the old server (after startup)
  9. On the new server, go to the BUE path:
    1. C:\Program Files\Symantec\Backup Exec\Catalogs
    2. You will see the copied over files from your old server.
    3. You need to make a COPY of the folder name from your old server and copy that folder (and contents) into the same “Catalogs” directory, but renamed for the new BUE server name.
      1. For example, if your catalogs folder contains a folder BACKUPSERVER1 (and within that folder are many files), create a new folder named for the NEW server name (whatever that is) and copy all the FILES and FOLDERS from within the BACKUPSERVER1 folder, to the new folder.
      2. You will now have to folders now, one named for the old machine and one for the new machine, each with identical contents
  10. On the new server, do this procedure:
    open a command prompt as administrator and enter the following pressing the ENTER key after each line:
    
    osql -E -S .\BKUPEXEC
    
    1>use bedb
    
    2>go
    
    1>SELECT partitionname FROM datapartition
    
    2>go
    
    *At this point, the old server-name should be listed
    
    1>UPDATE DataPartition SET PartitionName="new-server-name" WHERE PartitionID =0
    
    2>Go
    
    * # of rows affected should be listed To verify the change took place; run the original commands:
    
    1>SELECT partitionname FROM datapartition
    
    2>Go
    
    *At this point the new server-name should be listed
  11. At this point, RESTART the new server
  12. When it boots back up, login and launch BUE
  13. if all went well you should be ready to go.

Migrate Symantec Backup Exec 2015 14.2 to new server with same name

The process of moving BUE 2015/14.2 to a new server with the exact same name as the old server is pretty straightforward (but very long).

The entire procedure is in this PDF which I have tried and it works fine.

If you are moving to a new server with a different name, please use this post instead.

Notes:

  1. Setup the new server.  Install the same version of BUE, and run all LIVEUPDATES –on both the old and new servers.  Verify that both servers are on the exact same version and updates.
  2. follow the PDF as is
  3. Note:  Before step 4 in the PDF, if you are moving hardware, like a tape storage unit, disk based backups (to a local drive on the old server, etc.), you need to install that hardware prior to step 4.
    1. in our case we were moving a 3tb hard drive of disk based backups.  Prior to step 4, we shutdown both servers.  Removed the hard drive from the old server, moved it to the new server.  Started up the new server and made sure the drive letter for the drive was the SAME as on the old server.
    2. If you are using other hardware, you need to go ahead an install that onto the new server prior to completing step 4.
  4. If all goes well you should be fine.


1 2 3 4