Tag Archives: Classic ASP

Recaptcha V2 under classic ASP

Here’s a quick primer on upgrading your Classic ASP site Recaptcha V1 to V2.

First, go to Google Recaptcha online and generate yourself a v2 pair of keys for your site’s domain.

Next:

On the page with the “FORM” on it on which you want to display the Recaptcha V2.

Add to the HEADER (inside the HEAD TAGS):

<script src='https://www.google.com/recaptcha/api.js'></script>


Replace the existing code which renders your v1 recaptcha with this line:

<div class="g-recaptcha" data-sitekey="put your google public v2 key here" ></div>


on your FORM SUBMIT page (where the v2 form gets submitted to):

Inside ASP tags, place this line:

Response.LCID = 1033 ' USA LCID

It is a required element for the JSON Parser.

Inside the HEAD:

<!--#include file="jsonObject.class.asp" -->


you can get this file from my site HERE

now the processing code to handle the Recaptcha JSON response:


If Request.ServerVariables("REQUEST_METHOD") = "POST" Then
 Dim recaptcha_secret, sendstring, objXML
 
 recaptcha_secret = "your secret key goes here"

 sendstring = "https://www.google.com/recaptcha/api/siteverify?secret=" & recaptcha_secret & "&response=" & Request.form("g-recaptcha-response")

 Set objXML = Server.CreateObject("MSXML2.ServerXMLHTTP")
 objXML.Open "GET", sendstring, False

 objXML.Send
 
 set jsonObj = new JSONobject
 set jsonArr = new jsonArray


 jsonString = objXML.responseText
 
 set outputObj = jsonObj.parse(jsonString)  
 
 
 if jsonObj.value("success") then
  Global_Msg="Captcha GOOD!"
 else
  Global_Msg="Invalid Recaptcha Response."
 end if
 
 Set objXML = Nothing
End If

if Global_Msg<>"Captcha GOOD!" then
%>
invalid RECAPTCHA response.  Hit back and try again.
<%
response.end

end if


For your convenience, here is all the code inside one ZIP file.


Let me know if this helped you!


Classic ASP switch to TLS 1.2

I recently came across a failed PCI scan for one of our clients.  This failure was due to TLS 1.0 being enabled on that Windows server.

We ran IISCRYPTO (link) and disabled TLS.

Upon restarting the server, the Classic ASP site threw the following error:

Microsoft OLE DB Provider for ODBC Drivers (0x80004005)
[Microsoft][ODBC SQL Server Driver][DBNETLIB]SSL Security error

That error is because the web server is no longer using TLS 1.0 and the Classic ASP application (web site) is using too old of a driver on the server, to communicate with TLS 1.1 and/or 1.2.

To get around this, go download the latest ODBC driver from Microsoft, which is version 13.1 as of today.  You will most likely need to install the 32-bit version (as most ASP apps run in 32 bit mode).  Link here

Install that driver.

then go to your Windows server, Administrative tools and open the ODBC Data Sources (32-bit)

The 32-bit ODBC Administrator is found here: C:\Windows\SysWOW64\odbcad32.exe

go to the SYSTEM tab

add a new data source

Pick “ODBC DRIVER 13 for SQL Server”… (hit finish)


put in the name (no spaces or punctuation)

server name (or IP address) (NEXT)


authentication (USE SQL server auth, enter the LoginID and PW) (NEXT)


continue, then test the connection (it should work).

go to your Classic ASP application.


You will need to update the connection string to this:

DSN=YourNewSystemDSNName;Uid=YourSQLUsernameHere;Pwd=SQLpassword;

You can now use IISCrypto and disable TLS 1.0

Reboot the server

re-test your Classic ASP app and now you should be up and running on TLS 1.1 or 1.2


ASPMAKER CKEDITOR fonts and font sizes and font colors…

By default, ASPMAKER 11 (and higher) come with the basic CKEDITOR toolbar.

If you wish the full capabilities of CKEDITOR:

1) deploy out your normal ASPMAKER project folder to the web server

2) go to http://ckeditor.com/addons/plugins/all and use the “CKBUILDER” on the right side to build out your custom build of CKEDITOR (I just took “everything”).

3) save the file

4) extract, and overwrite your existing CKEDITOR file inside the ASPMAKER folder on your server.

5) edit the CONFIG.JS file and add this line    config.allowedContent = true;

that will make sure you can save HTML without certain tags getting stripped out.


ASPMAKER v11 Image Resizer not working under IIS

If you are using ASPMAKER by HKVSTORE to build web admin interfaces, and you’ve arrived at this page, it’s likely because the Image Resizer ASP.NET add-on is not working for you.

Does this look familiar to you?

Warning: ASP.NET 2.0 or later is required but ASP.NET script is not executed properly on this server:

see this screenshot:2014-07-08_15-47-49Here is the solution to the issue.

  1. You need to have a HOSTS file entry on the server that will allow the server to resolve the domain name for the website you are using ASPMAKER and the Image Resizer on.  This is because the ASP.NET resizer uses MSXML2.ServerXMLHTTP to locally fetch and resize the image.  If there is no HOSTS file entry on the local server, there is no way for the resizer to work.
  2. Open the HOSTS file and add an entry like this
  3.  X.X.X.X   your.domain.name
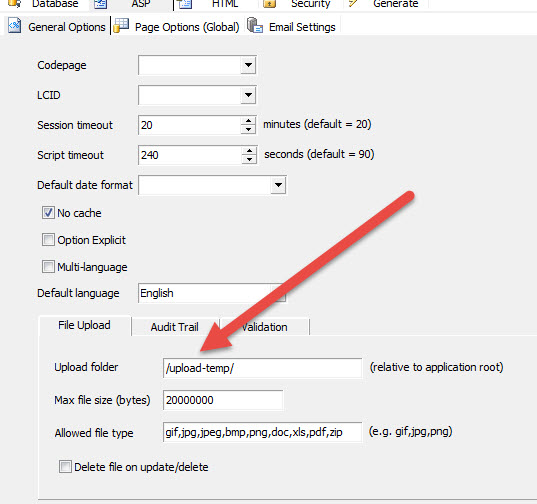
  4.  Make sure the upload folder is set properly in ASPMAKER here:file temp
  5.  This path will be relative to the folder you have deployed the ASPMAKER files to on the server.  For example, if the ASPMAKER files are in the directory /123/ then the upload folder (pictured above) will be /123/upload-temp/
  6. set the permissions properly on the /upload-temp/ folder.  this means adding machinename\IUSR and granting full control.
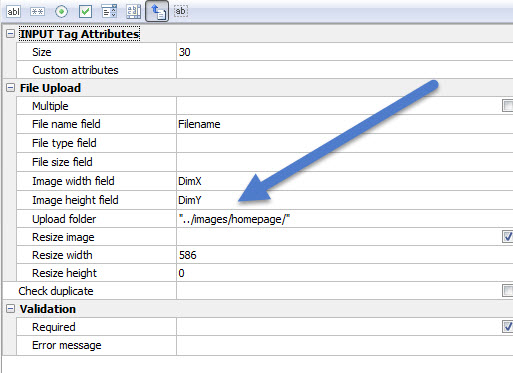
  7. Inside ASPMAKER, make sure the destination folder is correct. Note I had to use “../” to get ASPMAKER to upload to the correct path off the root.  It is NOT necessary to grant this folder any special permissions.correct-path
  8. Make sure the base site itself has a valid application pool assigned.  Here’s what mine looks like (It is not necessary to have an application for the subdirectory where the ASPMAKER app). app
  9. NOTE: depending on your setup, it may be necessary to set the .NET CLR version to v.2.X above.  (I HAD TO USE v.2.X for my setup…)
  10. Adjust the maximum file upload size in ASP.  ASP->Limits Properties ->Maximum Requesting Entity Body Limit.  The default value is 200,000 (200000) which is 200,000 bytes.  I upped mine to 20,000,000 (leave out the commas here).
  11. Launch the ASPMAKER web admin and try uploading an image.  The above should take care of all the issues.

Let me know if this saves you a headache!


Permission denied error dealing with Classic ASP loadpicture

To solve the following error, which is generated by the loadpicture object

Microsoft VBScript runtime error ‘800a0046’
Permission denied: ‘loadpicture’

set myImg = loadpicture(“C:\aaa\asdf.jpg”)

==

The solution is to simply add this permission as full control

servername\IUSR

to the directory in which this object is going to work…

reCAPTCHA in SSL – Changes coming – update your code

Important news for developers using reCAPTCHA on your sites.

If you are currently using http://api.recaptcha.net/challenge?k=XXXX and you need to implement reCAPTCHA on an SSL protected page — you need to switch the links to https://www.google.com/recaptcha/api/challenge?k=XXXYYYZZZ.

Per Google, this change went into effect April 2011.


Change from this (OLD) To this (NEW)
http://api.recaptcha.net/challenge?k=XXXX https://www.google.com/recaptcha/api/challenge?k=XXXYYYZZZ
http://api-verify.recaptcha.net/verify http://www.google.com/recaptcha/api/verify
http://api.recaptcha.net/noscript?k= http://www.google.com/recaptcha/api/noscript?k=


For more information, read this page


Classic ASP file upload limit of 200kb in IIS 7

During the process of migrating a site to IIS 7 we came across an issue with Classic ASP file uploads throwing 500 errors when larger than 200kb. There is an EASY fix for this.

In IIS 7, click your site and expand it then click the ASP icon.

Expand the Limits Properties icon, and change the value in the “Maximum Requesting Entity Body Limit” to a value larger than 200000 (which is about 200kb). 2000000 would be roughly 2mb, 20000000 would be 20mb.

Click the APPLY button. That’s it!