
Adding DKIM records to Kerio Connect
If you want to implement DKIM (signed email) to your Kerio Connect setup, here’s the easy way.
Start by reading these links
The following setup is for Kerio Connect 9.x, and Windows Server 201X DNS server
- Make sure your email server is properly connected to a good public DNS server, such as Google (8.8.8.8 and 8.8.4.4.)
- Go to Kerio Connect, Configuration, Domains.
- Click SHOW PUBLIC KEY and copy it.
- paste it into notepad. We’ll need to rework it a bit to be compatible with Windows DNS. Note: Windows DNS limits the length of one single string of characters, so we’ll need to split it into several lines.
- Reformat it like this. Break it into even lines, around 100 characters each. The exact length doesn’t matter. Just do it evenly, hit enter at each breakpoint.
- NOTE: make SURE there is a SPACE between the semicolon and the p
- as in v=DKIM1; p=xxxx
- example properly reformatted

- Copy this reformatted string
- Go to the domain in your Windows DNS server. For example, if your domain is mydomain.com go to that domain in the DNS Server management console.
- right click, other records, add TXT record
- Record name is: mail._domainkey
- after you enter that, you will see the FQDN look like this:
- mail._domainkey.mydomain.com
- Paste the string from #7 above into the text box, as-is.
- Hit ok and save that change.
- repeat this for any other domain. On Kerio Connect, all the domains on the one email server use the exact same DKIM keys.
- Now we are going to test the DKIM record to make sure it can be properly read.
- go to https://mxtoolbox.com/
- type in your domain
- hit check MX
- when that completes (successfully), change the drop down to “DKIM Lookup”
- type in your full DKIM string:
- mail._domainkey.mydomain.com.
- Run the DKIM Lookup
- You should see a successful test, and your report should look just like this:
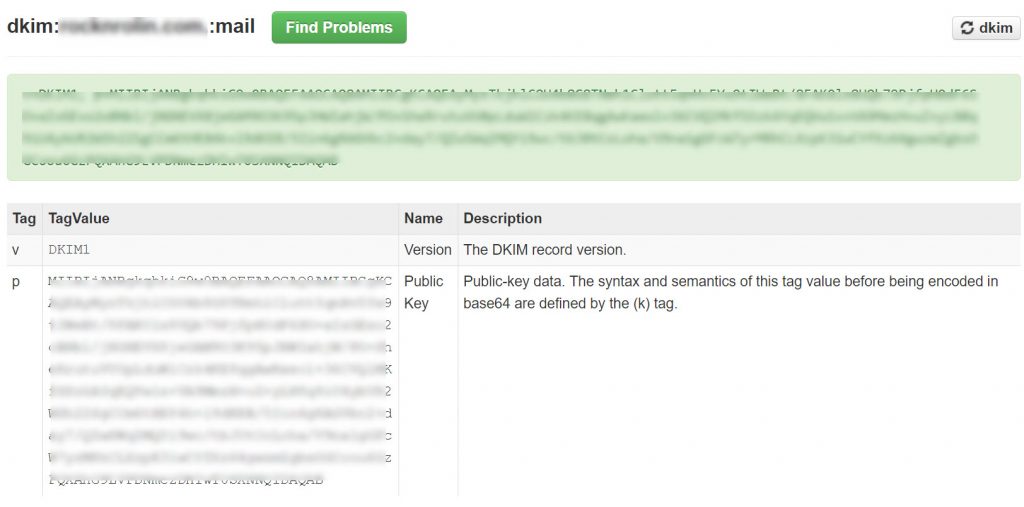
- if it doesn’t look like this, then you did something wrong with your TXT record creation, or you forgot to put the entire DKIM key in the lookup.
- Since all is well, proceed.
- next, go back to Kerio Connect.
- while still on the domain, check the checkbox to enable DKIM
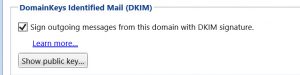
- If the DNS on your email server is setup properly, and it is communicating properly to your DNS server, you should see the box above.
- If you see a message “DKIM public key not found in public DNS”
- try restarting KMS
- Try going to a command prompt and ipconfig /flushdns
- Presuming that you do see the proper message in #18 above, we now need to do a test email to verify everything is working.
- Go to http://www.appmaildev.com/en/dkim
- click next step
- the site will generate an email address
- copy this email address and send a blank email to that address FROM AN EMAIL ACCOUNT ON THE DOMAIN you setup with DKIM above.
- Wait for the site to receive the email and generate it’s report (a few seconds)
- you should see DKIM = PASS
While you’re at it, don’t forget to create SPF and DMARC records for your domain to cover all the bases.