WordPress, PHP and IIS setup of REDIS using Redis Object Cache Free Plugin
Note: This presumes you already have a working REDIS server inside your LAN. If you don’t, please see my coming post on how to set up a REDIS virtual machine on HYPER-V.
- You will need to install the php REDIS extension. I am using IIS 10 and Windows Server 2022, so I went to this page: https://pecl.php.net/package/redis and downloaded 5.3.7 stable (as of 04-2023).
- Extract
- I am on the latest 7.4x build of PHP which is 7.4.33 as of 04-2023. This will supposedly work fine under 8.x but I haven’t tested it inside my environment.
- copy the files pictured below to your PHP EXT folder.
- Add REDIS information into your wp-config.php file
- edit the file
- near the top of the file, add the following
-
// adjust Redis host and port if necessary
define( 'WP_REDIS_HOST', 'x.x.x.x' );
define( 'WP_REDIS_PORT', 6379 );

// change the prefix and database for each site to avoid cache data collisions
define( 'WP_REDIS_PREFIX', 'name-of-your-site' );
define( 'WP_REDIS_DATABASE', 0 ); // 0-15

// reasonable connection and read+write timeouts
define( 'WP_REDIS_TIMEOUT', 1 );
define( 'WP_REDIS_READ_TIMEOUT', 1 );
define( 'WP_REDIS_SCHEME', 'tcp' );
- CHANGE the HOST IP to the LAN IP of your REDIS server
- CHANGE the PREFIX to a unique friendly name of your site
- CHANGE DATABASE (a number between 0 and 15, which needs to be unique and for this website only)
- Save changes
- Edit your PHP.ini file and add the following line
- extension=php_redis.dll
- save
- Go to the WordPress Admin
- Plugins, Add new Plugin
- Search for REDIS
- clock on REDIS OBJECT CACHE, click install
- click Activate
- Look at the REDIS plugin
- SETTINGS->REDIS
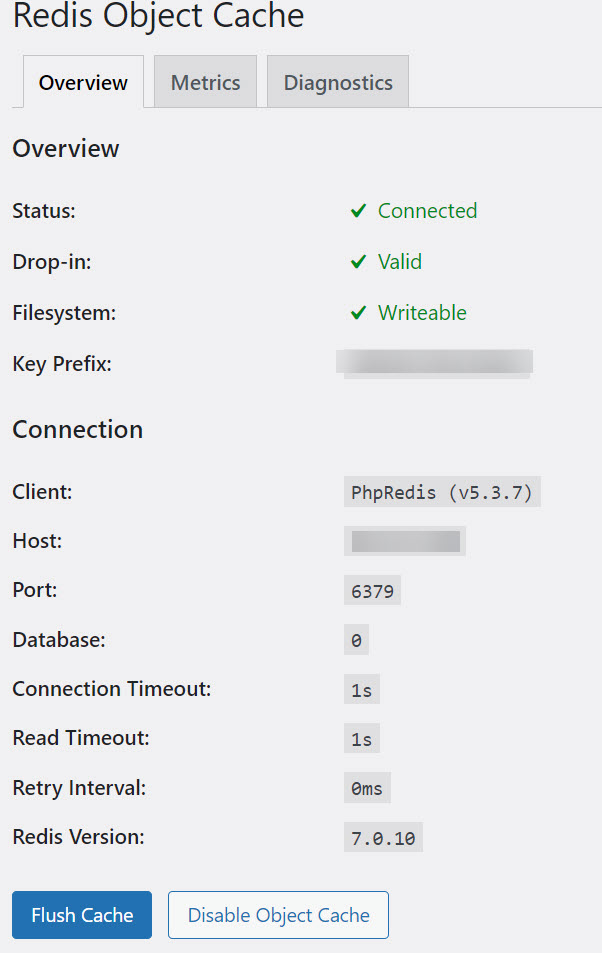
- Hopefully you will see three green checkboxes, which means your REDIS cache is up and running.
- If you don’t have three green checkmarks as above, I am available for consultation on your project. Please reach out to me here.


