Tag Archives: WordPress

WordPress, PHP and IIS setup of REDIS using Redis Object Cache Free Plugin

Note:  This presumes you already have a working REDIS server inside your LAN.  If you don’t, please see my coming post on how to set up a REDIS virtual machine on HYPER-V.


  1. You will need to install the php REDIS extension.  I am using IIS 10 and Windows Server 2022, so I went to this page: https://pecl.php.net/package/redis and downloaded 5.3.7 stable (as of 04-2023).
  2. Extract
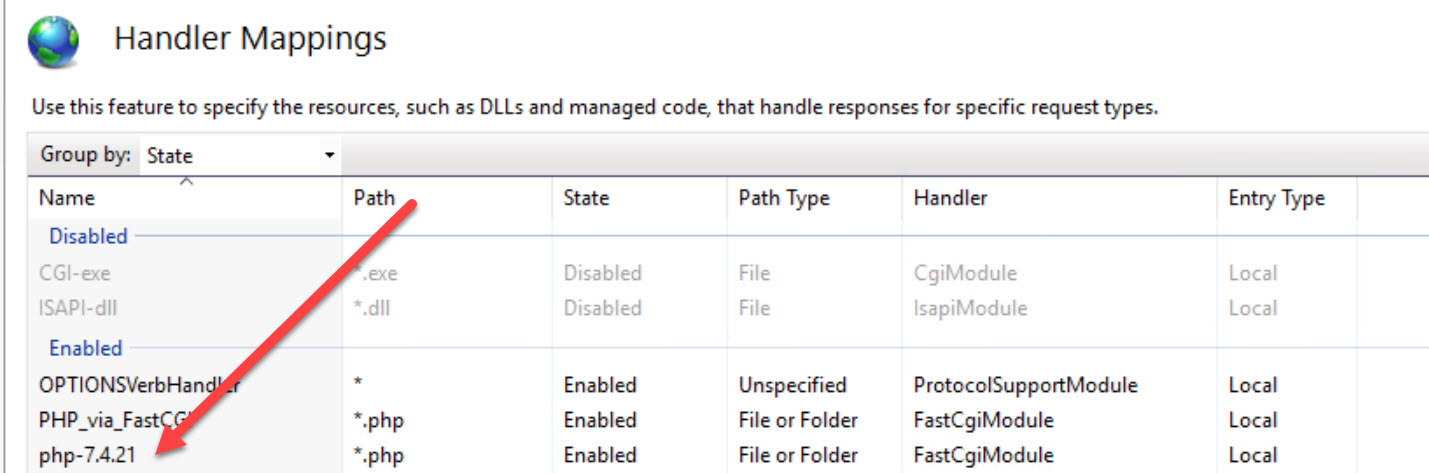
  3. I am on the latest 7.4x build of PHP which is 7.4.33 as of 04-2023.  This will supposedly work fine under 8.x but I haven’t tested it inside my environment.
  4. copy the files pictured below to your PHP EXT folder.
  5. Add REDIS information into your wp-config.php file
    1. edit the file
    2. near the top of the file, add the following
    3. // adjust Redis host and port if necessary 
      define( 'WP_REDIS_HOST', 'x.x.x.x' );
      define( 'WP_REDIS_PORT', 6379 );
      
      // change the prefix and database for each site to avoid cache data collisions
      define( 'WP_REDIS_PREFIX', 'name-of-your-site' );
      define( 'WP_REDIS_DATABASE', 0 ); // 0-15
      
      // reasonable connection and read+write timeouts
      define( 'WP_REDIS_TIMEOUT', 1 );
      define( 'WP_REDIS_READ_TIMEOUT', 1 );
      define( 'WP_REDIS_SCHEME', 'tcp' );
    4. CHANGE the HOST IP to the LAN IP of your REDIS server
    5. CHANGE the PREFIX to a unique friendly name of your site
    6. CHANGE DATABASE (a number between 0 and 15, which needs to be unique and for this website only)
    7. Save changes
  6. Edit your PHP.ini file and add the following line
    1. extension=php_redis.dll
    2. save
  7. Go to the WordPress Admin
  8. Plugins, Add new Plugin
  9. Search for REDIS
  10. clock on REDIS OBJECT CACHE, click install
  11. click Activate
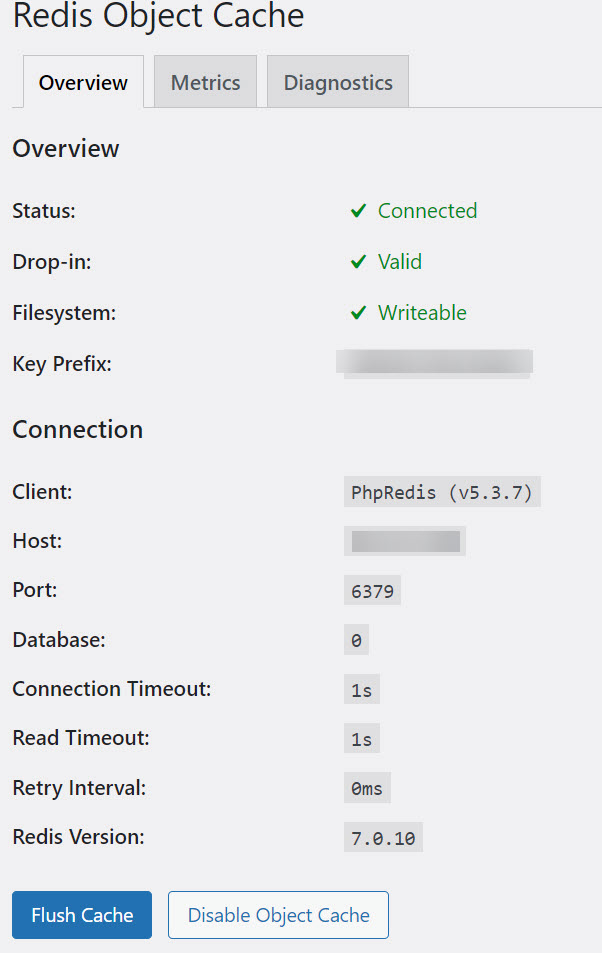
  12.  Look at the REDIS plugin
    1. SETTINGS->REDIS
  13. Hopefully you will see three green checkboxes, which means your REDIS cache is up and running.
  14. If you don’t have three green checkmarks as above, I am available for consultation on your project.  Please reach out to me here.

How to get IMAGICK working under Windows Server IIS

Here is the simple method to get IMAGICK working under Windows Server 2019/2022 and IIS 10.0 and later.


  1.  Presuming using PHP 7.4.X (current version is 7.4.27 as of 2/14/22).  NOTE:  This is not working properly under PHP 8.x
  2. Make sure you’ve downloaded the most current 7.4.X version and installed it on your IIS/PHP Manager, which properly sets up the handler mappings.
  3.  download IMAGICK
    1. https://windows.php.net/downloads/pecl/releases/imagick/
    2. Pick the most current, NON “RC” version.  For me, that was 3.7.0
    3. Download the version for PHP 7.4, NTS, vc15, x64
      1. For me, that was -> php_imagick-3.7.0-7.4-nts-vc15-x64.zip
    4. Make sure you have the Visual C 15 runtime installed.  (Google it and download/install if needed)
  4. Extract the archive above to a temporary directory
  5. copy php_imagick.dll to your PHP\ext directory.
    1. MAKE SURE you are in the correct directory, e.g. for me that was php-7.4.27-nts-Win32-vc15-x64\ext
  6. in the archive directory, SORT BY TYPE.
    1. Copy all CORE_RL*.DLL (28 files)
    2. Copy all FILTER*.DLL  (one)
    3. Copy all IM_MOD_RL (134 files)
    4. copy all these to your PHP version’s ROOT directory.  For me, that was 7.4.27-nts-Win32-vc15-x64  (NOT THE EXT DIRECTORY!)
  7.  Go to PHP manager and click on check PHPINFO().  When that comes up, scroll down and make sure you see a section for IMAGICK.
  8.  Note:  If you are using WordPress, please read this post to make sure you don’t get JSON errors.

WordPress There was an error. The response is not a valid JSON response.

If you are running WordPress on IIS and experiencing this issue, another thing you can check is the FastCGI settings to make sure the OPTIONS verb is allowed.

In my case, I am using a brand new setup of WordPress on a Windows Server 2019 IIS 10.0.  When I went to Appearance, Widgets, made a change and clicked “update” I would get the “There was an error. The response is not a valid JSON response.” message.

I looked at all my other settings including SSL, Permalinks, etc. and they all looked good.

THE FIX

On the site with this particular “There was an error. The response is not a valid JSON response.” issue, the fix was easy.

Go to Handler Mappings for the site in question.

Double click the version of PHP that is setup (under PHP Manager)

Go to REQUEST RESTRICTIONS

VERBS

Make sure either “ALL“, or “One of the following” is selected.  If “One of the following” is selected, use this list:

GET,HEAD,POST,OPTIONS


Save your changes/close the dialog boxes and retry your save operation.

WordPress 4.x auto updates under windows

If you want your WordPress install to do auto-updates (in a Windows Server based hosting setup), you need to do one simple step.


Edit the hosts file.

Put a local IP in there for the domain name of the site.

Save the changes.


Example:

10.5.5.5  www.whatever-the-site-is.com

Re-log into WordPress and go to dashboard-updates and in there it should tell you “future updates will be automatically applied”

Why is all of this needed?  WordPress uses PHP CRON and that is reliant on the server being able to find the local website.  Therefore it is necessary to put a hard-coded IP in the hosts file so the CRON job can “see” the wordpress site.  Without the hosts entry the website will resolve to the external IP of the site, and you will have an unreachable IP issue and auto-update won’t work.

Wp-Recaptcha 4.0 and 4.1 with WordPress ERROR: Global site keys are not supported

If you have upgraded to WP-Recaptcha 4.0 or 4.1 and are now receiving this error message

ERROR: Global site keys are not supported

There are issues with the 4.0 and 4.1 WP-Recaptcha plugins.

Read here


Solutions:

1) roll back to 3.2.  Download it from me, here
2) change plugin to something else

** DO NOT UPDATE To 4.0 or 4.1 if you are using WP-RECAPTCHA

How to migrate WordPress 3.X from one domain to another

I recently came across this situation on a client site where they wanted to change their domain from something like www.whatever.com to www.whatever-new-site.com and their site runs on WordPress 3.91. This is also applicable if you develop a site on a testing url like “testing.whateverdomain.com” and you want to change the site to run off “www.whateverdomain.com” when it goes live. After a lot of research and trial & error, here is the easiest approach to handle this.

  1. go to plugins and download and install Velvet Blues Update URLs 3.2.2
  2. go to TOOLS -> Update URLs
  3. enter the OLD DOMAIN and the NEW DOMAIN
  4. check all the checkboxes that apply (I have always checked all 6 checkboxes and never had any issues)
  5. click on UPDATE URLs NOW
  6. go to settings -> general and update the domain info in there.  Save the changes.
  7. At this point you need to adjust your web server settings to begin serving and responding to the site on the new domain name.
  8. You can now access the site from the new domain name and all should be fine!


WordPress filling up tables with wpsc_anonymous when WP e-Commerce plugin is installed

We recently came across a problem where a client site of ours had over 10,000 odd user accounts that were in their wp_users table.

All these users were prefixed by an underscore, like _ajasj3h1

All of these accounts had associated data in the wp_usermeta table, and one significant piece of data was that each group of records had “wpsc_anonymous” as part of the records in the wp_usermeta table.

This particular site is running PHP 5.5.11, running the latest MYSQL, running 3.8.13.4 version of WP e-Commerce and otherwise have no problems.  One additional factor was this site was upgraded from an older version of WP E-Commerce.

After much investigation, I found that these records are temporary records that the WP E-Commerce plugin uses to track users in the shopping cart.  These records are created by ANYONE – or ANY BOT on the site.

This client site was adding records at the rate of about 6 new users per minute.

==

WP E-Commerce is supposed to have a predefined CRON job which fires hourly, and deletes all records older than 12 hours.

This job is titled

wpsc_hourly_cron_task

However this job was not working properly as the temporary records were not deleting.

==

Lastly the fix for this turns out that the wp-config.php file was missing the following line:

define(‘WPSC_CUSTOMER_DATA_EXPIRATION’, 4 * 3600 );

that is required as part of the 3.8.13.4 version update.

Add that line of code to your wp-config.php file around line 50, below the other “Define” entries and restart the webserver engine.

this hourly job should now execute properly.

BY THE WAY -> I set mine to 4*3600 (or clear out records older than 4 hours).  You can set yours to whatever value you’d like.

*****

One more thing – don’t forget to edit your HOSTS file on that server and make sure you have an entry for your domain name, in that hosts file.  CRON jobs need to execute on the domain name the site is running on, and unless you have a hosts file entry, it might not work.

Problem with PHP mailer sending mail – Result: delayed, Status: 4.1.1 452 4.1.1 requested action aborted: try again later – GL/GL

If you see this type of message logged in your outbound mail logs, and your clients are unable to get email delivered to their domain, then I may have the s0lution for you.

In our particular scenario, we have a PHP site running WordPress and the email server is located with IPOWER.  So the website needs to be able to send email from our data center into the IPOWER data center, but in our case the emails were getting bounced due to this error below.  (VERY NON-DESCRIPT!).

Result: delayed, Status: 4.1.1 452 4.1.1 absc@asdasdasd.com requested action aborted: try again later – GL/GL

in your BOUNCE BACK emails, you may find something like this:

X-PHP-Originating-Script: 0:class-phpmailer.php

X-Mailer: PHPMailer 5.1 (phpmailer.sourceforge.net)

In our case, the recipient domain was hosted at IPOWER web.  To solve this issue, we logged into the IPOWER control panel, went to spam settings:

http://www.ipower.com/controlpanel/spamfilter.bml

and went to the WHITELIST and whitelisted our email server’s IP address.  Saved the changes and re-tried sending the email on the PHP (wordpress) site.

Worked immediately.


IIS WordPress images 500 error

If you are here you probably are having the dreaded “broken images” problem while running WordPress under IIS.

You may have found this issue by looking at the IIS logfiles for your site and seeing 500 errors logged when it’s supposed to be pushing out images.

I will save you a lot of time.

This is all about fixing permissions so that images/media/files uploaded via WordPress will properly render.

This is the fix for the infamous “500” error that is thrown when your server has wrong file permissions and the visual result is all the images you uploaded are “broken images” and won’t display. Also called HTTP Error 500.50 – URL Rewrite Module Error when you have Detailed errors on.

  1. Don’t sweat it, I will save you HOURS of time on this one.   Thanks to the article I found here after HOURS of tracking this issue down, this problem is caused because PHP first uploads the document to a temporary directory (by default C:\Windows\Temp), and then moves it from that directory to the actual /blog/wp-content/uploads/ subdirectory.  What happens is that because IIS does not have any permissions to your “C:\Windows\Temp” directory, when the file is uploaded there, then moved by PHP, the file inherits NO permissions.  So when IIS trys to serve out that file from your /blog/wp-content/uploads/subdirectory it throws a 500 error and that is actually a permissions error.
  2. The solution:  on the Windows\Temp folder, grant “modify” permissions to both IUSR and {servername}\IIS_IUSRS user accounts.
  3. Now when you upload files via PHP and PHP moves them to the correct directory, the files will have the correct permissions and can be accessed.
  4. Important note #1:  If you already have uploaded files and are getting the dreaded broken images issue, go to the /blog/wp-content/uploads/directory and replace/update the permissions to add access for both user accounts noted above.  That will solve that issue.
  5. Important note #2: as with any change off the defaults for Windows, you do this AT YOUR OWN RISK.  It’s up to you if you want to grant the Windows\Temp directory permissions for those two accounts.  If you don’t PHP won’t be able to upload without the 500 issue (unless you move the PHP temp folder elsewhere and grant those accounts access to the other folder).  Do these changes at your own risk… I cannot and won’t take any responsiblity for your systems.  Please know what you are doing.

UPDATE: 04/29/2011:  One reader commented to me that he is concerned about changing security permissions on the Windows TEMP directory, and he noted that you can also edit the php.ini file and change the location of the “upload_tmp_dir” variable and point it to another location.  It’s up to you how you want to do this, as long as you have the right permissions mentioned above, your WP images and future uploads will work fine.


WordPress Windows 2008 Web Server R2 IIS 7.5 setup

I thought I would share a few important tips on getting WordPress 3.x to work properly – with PERMALINKS / SEO friendly URL’s.  It’s taken me a lot of trial and error to figure out the finer points, but assuming you can get it installed, these tips should help you get it 100% functional.

  1. to install, use the Microsoft Platform Installer 2.0, and let it do the work of installing PHP, WordPress etc.  IT IS FANTASIC!!! It will automatically setup PHP/FASTCGI for you and it is slick!  You can access the direct link to install WordPress on IIS here http://www.microsoft.com/web/wordpress/
  2. Secondly, I am going to make an assumption you are installing this as a subdirectory on your root site, such as www.mysite.com/blog.  If you are installing this to the root the same directions will basically apply but you’ll need to figure out which setting will need to be adjusted to put WP on the root.
  3. Third, we use a dedicated MySQL 5.x box, so we don’t install MySQL as part of the MPI 2.0 install (from step 1).  If you don’t already have a MySQL server you’ll need to let it install that as well, or make a new empty database on your MySQL box and use that info as part of the install process.  For security and speed reasons, a dedicated server for MySQL is the best choice, but not everyone has the resouces to permit a dedicated server.
  4. Under IIS 7.0 or 7.5, make sure you have downloaded and installed the free URL REWRITE 2.0 add-in for IIS.  This is a free download here: http://www.iis.net/download/urlrewrite
  5. PERMALINKS.  Once you get WP installed and are able to login to the admin interface, it’s pretty simple to get permalinks running.
    1. in the WP admin, go to SETTINGS->Permalinks.  We chose to use the “DAY AND NAME” setting.  Any other setting is your choice.  Pick a setting and click save changes.
    2. make sure you have a web.config file in your /blog/ subdirectory. 
    3. here is what your web.config file should look like – customized just for WP 3.0 in the /blog/ subdirectory (below).  (Download a ZIPPED copy of my file here)
    4. <?xml version=”1.0″ encoding=”UTF-8″?>
      <configuration>
        <system.webServer>
          <httpErrors errorMode=”Custom” />
          <rewrite>
            <rules>
             <rule name=”Main Rule” stopProcessing=”true”>
              <match url=”.*” />
              <conditions logicalGrouping=”MatchAll”>
               <add input=”{REQUEST_FILENAME}” matchType=”IsFile” negate=”true” />
               <add input=”{REQUEST_FILENAME}” matchType=”IsDirectory” negate=”true” />
              </conditions>
             <action type=”Rewrite” url=”index.php” />
            </rule>
         </rules>
          </rewrite>
          <defaultDocument>
            <files>
              <clear />
              <add value=”index.php” />
            </files>
          </defaultDocument>
        </system.webServer>
      </configuration>
    5. Save this into your web.config file – this is all you need for WP running in the /blog/ directory.  Once you replace your file with this one your permalinks should work flawlessly.
  6. Troubleshooting.  One easy way to troubleshoot things with your WP install, is to enable DETAILED errormode.  To do this, edit your web.config file within the /blog/ folder and change just the one line above to this <httpErrors errorMode=”Detailed”/>  Of course when you are all done and going live with WP, change that line back to “Custom”
  7. Fixing permissions so that images/media/files uploaded via WordPress will properly render.  This is the fix for the infamous “500” error that is thrown when your server has wrong file permissions and the visual result is all the images you uploaded are “broken images” and won’t display. Also called HTTP Error 500.50 – URL Rewrite Module Error when you have Detailed errors on.
    1. Don’t sweat it, I will save you HOURS of time on this one.   Thanks to the article I found here after HOURS of tracking this issue down, this problem is caused because PHP first uploads the document to a temporary directory (by default C:\Windows\Temp), and then moves it from that directory to the actual /blog/wp-content/uploads/ subdirectory.  What happens is that because IIS does not have any permissions to your “C:\Windows\Temp” directory, when the file is uploaded there, then moved by PHP, the file inherits NO permissions.  So when IIS trys to serve out that file from your /blog/wp-content/uploads/subdirectory it throws a 500 error and that is actually a permissions error.
    2. The solution:  on the Windows\Temp folder, grant “modify” permissions to both IUSR and {servername}\IIS_IUSRS user accounts. 
    3. Now when you upload files via PHP and PHP moves them to the correct directory, the files will have the correct permissions and can be accessed.
    4. Important note #1:  If you already have uploaded files and are getting the dreaded broken images issue, go to the /blog/wp-content/uploads/directory and replace/update the permissions to add access for both user accounts noted above.  That will solve that issue.
    5. Important note #2: as with any change off the defaults for Windows, you do this AT YOUR OWN RISK.  It’s up to you if you want to grant the Windows\Temp directory permissions for those two accounts.  If you don’t PHP won’t be able to upload without the 500 issue (unless you move the PHP temp folder elsewhere and grant those accounts access to the other folder).  Do these changes at your own risk… I cannot and won’t take any responsiblity for your systems.  Please know what you are doing.
  8. Another site with good info on WordPress/IIS installs is here

Best of luck on your Windows 2008 R2 IIS 7.5 WordPress install. We use it here and it is fantastic!