Tag Archives: Windows 7

1080p HDTV as second monitor display blinks on and off while watching video

I have a second monitor which is a Philips 1080p 40 inch TV (that I switch the HDMI inputs to alternate between cable and a second monitor).

When I play streaming video from YouTube on the monitor, the display blinks on and off continuously.  This does NOT happen when using the Philips for TEXT displays (outlook, explorer, etc.)

The fix is easy.

First, make sure your second monitor (HDTV) is in “PC” mode. (This is not the fix in itself).

Secondly, I have the most current NVIDIA drivers installed.

Go to NVIDIA CONTROL PANEL (right click on an empty desktop)

Click ADJUST DESKTOP COLOR SETTINGS

click on your secondary monitor name (in my case, PHILIPS)

You will see a dropdown box appear.

Set “content reported to the desktop” to “Desktop Programs”.


That’s it.

Your secondary monitor should now be rock stable while watching videos.


let me know if this helped you!

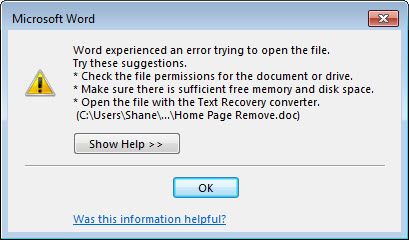
Cannot open MS Word attachment from Outlook “Word experienced an error trying to open the file”

This is a new one for me, and I believe it may have popped up after the recent Windows Update:

9-10-2013 3-01-48 PM

“Word experienced an error trying to open the file”.

Now if I SAVE that same file out of outlook (or copy and paste it to a drive), and then open from there – it opens fine.

Here is the solution:

  • Open Word 2010, 2013 or 2016
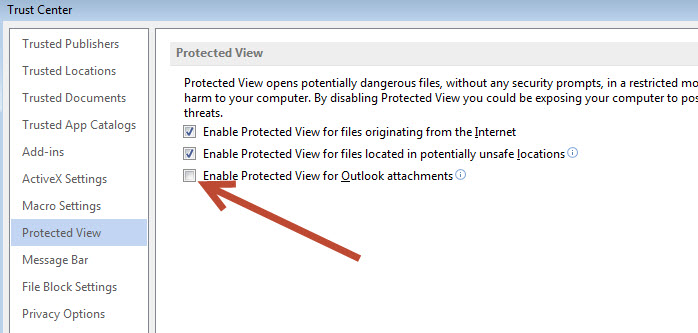
  • Go to File | Options | Trust Center | Trust Center Settings | Protected View
  • Un-check  the “Enable Protected View for Outlook Attachments” checkbox

9-10-2013 3-06-21 PM

Click ok/save that setting.

Go back to outlook and your word document should now open fine.


UPDATE 6/20/16:

I have double checked this and it does work fine for Word 2016 as well.

All computers do not show up under Network Neighborhood across subnets Windows 2008 Server and Windows 2012 Server

THE ISSUE – NETWORK DOES NOT SHOW ALL COMPUTERS FROM MULTIPLE SUBNETS


**NOTE:  10/11/16 Please see this new blog post which addresses a new issue that has happened since June 2016.  Both of these posts will help you resolve this cross-subnet browsing issue.

I recently ran into the situation where my PDC failed and after promoting a second DC to PDC all the computers in both my branches would not show up under the Windows 7 network.

What would happen is that the computers from branch 1 would all show up under branch 1 on that network, and the computers from branch 2 would only show up on branch 2’s network.

Both networks are in the same domain and are connected via a Point to Point firewall VPN tunnel, and both offices are on different local internal IP subnets, such as:

branch 1:  192.168.55.X

branch 2: 192.168.56.X

Logins and domain replication is working fine, and even the DNS servers I have set to properly replicate the data between them, but still the “network” list only shows the local subnet not both.

THE SOLUTION

Firstly, you need to determine which machine for sure is the PDC emulator on your network.  On our network we have two Windows 2008 R2 servers.

to do this, follow this procedure:

Using the Windows interface on your windows server

1. Open Active Directory Users and Computers.

2. Right-click the domain node, and then click Operations Masters.

3. On the PDC tab, under Operations masters, view the operations masters that will serve as the PDC emulator.


Secondly, to complete the solution (snipped from the website linked below…)

4. You can either set the Computer Browser service to Automatic on the DC holding the PDC role, or move the PDC role to another DC that has the Computer Browser service started.  So using the info gleaned from above, log in to the PDC computer, go to SERVICES and START the computer browser service, and set it to AUTOMATIC.

You will need File and Printer sharing On in the Network and Sharing Center, otherwise the Computer Browser service will fail to start since the required ports will not be open.  In a multiple subnet environment, make sure WINS is configured properly so that you have the proper NetBIOS name resolution.  After making the corrections, the computers holding the master browser roles will begin to populate the browse list for the entire network.

NOTE:  In my situation with two subnets it was NOT necessary to run WINS to have a proper solution.

Lastly, wait anywhere from 30-60 minutes and the computers from both subnets (or more) should all now show up under “NETWORK” on your Windows network.


(some information courtesy of this blog)

NVIDIA Geforce 480 core clock drop to 405mhz v270.61 v275.33 CUDA

We participate in the BOINC CUDA project to use idle CPU and GPU time for scientific research purposes.

We recently updated to the newest NVIDIA drivers for Windows 7 x64 which are version 270.61.

After doing this we noticed the core clock on our NVIDIA Geforce 480 would drop from a standard or overclocked speed, down to 405mhz.  The core clock would stick there and the only way we can get it back is to reboot that machine.  Then after a few minutes again running the BOINC app, the core clock would drop to 405mhz again.  (We can see this because we use the MSI Afterburner 2.1 app, which has a nice real-time graph that shows current clock, memory and GPU utilizations among other things and also allows you to overclock the card.)

It turns out that there is some new “feature” (or bug) in the NVIDIA v. 207.61 drivers that is causing this issue.

Our solution was to uninstall the 270.61 drivers, restart and then install v266.58 drivers (which are the ones that preceeded 270.61).

After a reboot and more testing the core clock speed stay at the factory default speed (700mhz) or at our designated overclocked speed, without ever dropping down to 405mhz.

Apparently this is a widespread issue and users playing 3D based games also experience this issue as dropped frame or sluggish framerates while gaming… those users should also think about reverting to 266.58 until NVIDIA gets this sorted out.

We’ll have more information after we test the next version of NVIDIA’s drivers.


UPDATE 06/22/2011:  The same “clock drop” is also experienced on the most current NVIDIA 275.33 drivers.  Don’t use those if you plan on using CUDA.

ASUS G73 G73jh ATI 5870 GSOD Grey Screen of Death – FIX

One of the computers in our office is an ASUS G73jh which is a powerful laptop we use for testing sites and on-location visits to clients. We usually keep the very latest Windows 7 updates and ATI video card drivers (11.4) on the machine. Recently we noticed the machine locking up after a few minutes running 3D graphics. The only recovery is to hold down the power button and power cycle the computer. The issue was easily replicated using FURMARK or BURN IN TEST. After much research we determined this is the infamous GSOD or “Grey Screen of Death”.

This is what it looks like:

ATI 5870 GSOD Grey Screen of Death

ATI 5870 GSOD Grey Screen of Death

We tried everything to eliminate this issue that we could think of, even uninstalling the current video card drivers and going back to the ones on the ASUS site which are from 2009. Nothing would cure this issue, so we RMA’d the laptop back to ASUS. A week later we get the laptop back with “all tests passed, no problems” and the machine had been wiped back to the factory OS defaults for Windows 7 Home Premium.

At that point I reloaded the FURMARK and BURN IN TEST applications on the laptop, and guess what – it did not go into GSOD when running 3D. Now I immediately thought this is a driver issue with the video card, because I was trying to use the latest ATI Cataylist drivers, and this wiped laptop had a clean set of factory drivers. Not wanting to keep 2+ year old drivers on my laptop (which was purchased mid 2010), I set out to try and get to the bottom of the issue.

I found two forum sites with hundreds of pages of user posts on this exact issue. First one Here Second one here

The issue is that the video BIOS on the onboard 5870 video card is old and is not compatible with the latest ATI drivers, so what needs to happen is you have to do is flash update your video card and then install the latest video drivers from ATI (in my case they were version 11.4) from the ATI SITE here.

Here is the path I would recommend:

  1. download the modified, fixed video BIOS for the ATI 5870 from this post here
  2. Make sure your G73 has the latest system BIOS (current version is 213), if not, update your laptop to the latest system BIOS FIRST
  3. Extract the video BIOS files to a bootable USB stick and follow the directions on this page to flash the modified updated video bios
  4. At this point your G73 should have the latest video BIOS and system BIOS
  5. Boot the laptop. If you are not currently running the ATI Catalyst driver version 11.4, you should go and download the latest AMD Mobility Catalyst Driver from the ATI site. (current version is 11.4 as of today’s date).
  6. install the latest drivers and reboot, and your GSOD situation should be history.

Note: if you still experience some other form of glitching with your video card drivers on the G73, use this procedure to completely wipe the ATI drivers, then re-install the latest ones. Try using this procedure below to get a completely fresh install of the ATI drivers.

ATI DRIVER CLEAN START GUIDE

(Modified by The Amixa Web Guru. Original one by steviejones133)

  1. Uninstall the current AMD Mobility Catalyst Drivers by going to the control panel, uninstall programs and select everything. Remove. Do not use the EXPRESS removal. Use the one where you pick ALL the items to uninstall.
  2. Check in Device Manager that you are back to Standard VGA Drivers.
  3. If not back at VGA, uninstall/remove devices manually via device manager. This should get back to VGA.
  4. Reboot into safe mode (press F8 when you are at the BIOS to get to the Windows boot menu and pick SAFE MODE)
  5. Run Driver Sweeper in safe mode for Ati Display only (run as administrator by right clicking the icon – required) and CLEAN any ATI fragments.
  6. Quit Driver Sweeper.
  7. Re-run Driver Sweeper a second time (also as administrator), pick ATI again and let it scan once more to make sure all ATI fragments are gone
  8. Run CCleaner for both clean up and registry in safe mode.
  9. Repeat step 8.
  10. Restart normally to windows – the laptop will look bad due using only standard VGA drivers
  11. Re-run driver sweeper (admin)
  12. Re-run CCleaner
  13. At this point, all ATI driver fragments are gone.
  14. Go to the ATI site and download the latest AMD Mobility Catalyst Drivers
  15. Install the latest ATI drivers. Do not choose CUSTOM. Choose EXPRESS and let it complete.

The device, \Device\Ide\iaStor0, did not respond within the timeout period

This is a brand new issue that I just came across while working on my new workstation, which has a 120gb OCZ Vertex 3 SATA 6.0 SSD drive as the primary boot drive into port #1 of the SATA 6.0 channel, running on a ASUS Maximus Extreme IV rev B3 motherboard running Windows 7 x64 Ultimate w/SP1.  The symptom is your PC freezing for around 30 seconds or more and then resuming normal operation.  I was getting these freezes throughout the first few days using this configuration.

The errors would also show up in the SYSTEM event log, called iaStor event ID 9.

The Solution:

In the BIOS, first make sure you are in AHCI mode.  Then choose HOT PLUG=ENABLED for your SSD boot drive (which should be on port #1 of the SATA 6.0 controller).

Save changes and boot up and your problems will be history.


Server name does not show up under Network

I recently came across this problem where one of our servers would not show up in the “browse list” under the “Network” icon in Windows 7.  I also checked this same issue from other computers Network Neighborhoods and verified it was just this one server “webserver6” which was not showing up.  We are in a standard Windows AD (Active Directory) network here with a DHCP and DNS servers and two domain controllers.  I checked all the settings on those boxes and they all looked fine, so I suspected the issue was solely with that one particular server.

I examined the server (a standard Windows 2008 server box), and all the settings looked fine.  Static IP (yes), correct DNS servers (yes), enable NetBIOS over TCP/IP (yes), so the problem must be somewhere else.

I then checked the services and found that the COMPUTER BROWSER service was disabled.  I set it to automatic and started the service.

Since this particular server is a virutal server under the latest version of Hyper-V.  I shut down the server and checked the settings in the Hyper-V manager.  I noticed that this particular server was set to a “DYNAMIC MAC” address.   I switched that to STATIC.

Rebooted my workstation and “webserver6”.  Wow!  The server now shows up under the Network list.

Here are the steps again in a more formal list:

  1. Check to make sure the server has a static IP
  2. Check to make sure the server is using the correct DNS server (probably your AD domain server)
  3. Make sure NetBIOS over TCP/IP is enabled
  4. Make sure the Computer Browser service is started and set to Automatic
  5. HYPER-V machines:  Check to make sure the network adapter that the server is using is set to a STATIC MAC address.  (Not sure if this one makes any difference, but that type of a server shouldn’t be using a dynamic MAC address anyways).
  6. Reboot the server in question and your local workstation
  7. Server should show up if all the above is OK.

ADDENDUM 12/6/2010:

Another thing to check is your Windows Firewall settings. I had another server that would not show up on the Network list until I turned off the Windows Firewall.  That wasn’t a problem for us because we have a separate firewall that protects our systems.  But you need to use your own judgement and take that action on your own choice.  We aren’t responsible for your systems so I would presume that you know what you are doing and the risks of disabling Windows Firewall.

Windows 7 to Windows XP “Access is denied” home office LAN networking issues

Are you having problems getting your home office LAN, with varying computers between Windows 7 and Windows XP to properly share files?

Here are a few quick tips & tricks to solve your issues (these are at a high level, so if you don’t understand these, ask a friend to assist you). These tips presume you are on a HOME or SMALL OFFICE LAN setup. DO NOT DO THESE if your machines are joined into a Windows domain.

  1. on the Windows 7 machine(s) disable homegroups
  2. on the Windows 7 machine(s), set a workgroup name, like your last name, for example “JOHNSON” (omit the quotes of course)
  3. on the Windows XP machine(s), set the SAME workgroup name as above
  4. Make sure each machine has a friendly computer name with no punctuation. Names like FRANK, workstation1, mypc, are good. Names like Ted’s Computer, My Windows 7 machine, etc. are bad and wont’ work. If necessary, update each computer’s network name to one without any spaces or punctuation like the example just listed. All of these network changes (WORKGROUP name change and computer name change may require reboots to each PC).
  5. on both machines, create a local user(s) with the same username and password. PASSWORD ARE REQUIRED to make this work. Presuming you have one account on the older XP machine that you are currently using, to the USERS area, assign a password, log out and log back into the XP maching using that username and password. On the Windows 7 machine, go to the users area and setup the SAME USER and password.
  6. no other changes including firewall changes should be needed.
  7. if you are the only person (or if there is only one person and one user account) using each computer on the LAN, you can setup “automatic login” on both machines. Google “automatic login” for directions, so that you don’t have to login each time you boot, on each machine.
  8. create a share on each computer. It’s up to you if you want to allow read only or full access to each share. Make sure you “add users” and add all the user(s) that you created above to the permitted user list for the share.

If you’ve done all the above, and have logged out and logged back into the newly password protected accounts, you should be able browse the network, map a network drive, etc.

to do this open up Windows Explorer (the file manager, not Internet Explorer!). Expand out the network, Microsoft Windows network, your network name and you should see your computer names showing up.

Alternatively in the address bar type in

\\mypc1\ and hit enter and see if the SHARES show up. Right click on a share and “MAP NETWORK DRIVE” to allow a drive letter to show up on your Windows Explorer.

Getting your old Logitech webcam videos working on Windows 7 x64

So, do you have old AVI videos from an old USB or Parallel Logitech web cam? I did, and I happened across them recently – but they won’t play in Windows 7 because the CODEC’s cannot be found.

These videos dated to around 1998 and I wanted to watch them, however I could not figure out how to get the video working under Windows 7 x64 due to the obvious codec issues. After much research, I found out that the correct codecs to play my videos – specifically the Intel Indeo IV41 codec – are indeed present in Windows 7, but they are not hooked into the registry.

(NOTE – ONLY FOR Windows 7 x64). You’ll need a different solution for x86 Windows 7. ** use at your own risk, of course.

Download This File, unzip and DOUBLE CLICK to load the settings into your registry. A reboot may be needed.

When you are done, double click on the AVI files from your old Logitech webcam and the videos should play fine!

I hope this saves some of you time – it took me a few hours to track this down.