Tag Archives: SSL

WordPress and Google Fonts HTTP and HTTPS error messages and resolutions…

If you are trying to deal with the dreaded insecure messages when trying to use Google Fonts on WordPress based sites, here are a few things to try. Within the specific theme folder you are using, edit the functions.php file. You want to examine the file and search/look for “googleapis”.  That should help you find the correct area of the code. In my example site (below), notice how the url is referenced as “//fonts.googleapis.com” and not as “http://fonts…”.

Make sure your theme is using just “//fonts.googleapis…” and is not hard coded to HTTP or HTTPS

// Retrieve Font URL to register default Google Fonts
function courage_google_fonts_url() {
    
 $font_families = array('Lato', 'Fjalla One');
 $query_args = array(
  'family' => urlencode( implode( '|', $font_families ) ),
  'subset' => urlencode( 'latin,latin-ext' ),
 );
 $fonts_url = add_query_arg( $query_args, '//fonts.googleapis.com/css' );
    return apply_filters( 'courage_google_fonts_url', $fonts_url );
}


If you make these changes and this does not help, or if you cannot locate similar code in the functions file – and you’re still getting the SSL warning messages on your site, then you’re probably at the mercy of a specific plugin, or issue with your particular theme.

Try shifting the site to a basic theme like 2015 (for a few minutes for testing…) and see if the site works fine in http/https modes with the google fonts.  If it DOES, then the issue is your theme.  Contact the theme developer or look hard through the theme code and determine where the googleapis call is.

If the theme does not seem to be the issue, then it’s probably a plugin that’s causing your issues.  If you feel brave, disable the plugins and start testing one after another to try and localize which plugin is causing the issue.  (Disable all of them. Test the site.  See if the fonts work without issue.  Enable one plugin.  Test again, enable another plugin, more testing, etc.)

Hope that helps a bit!

iPhone iPad “cannot verify server identity” SSL issue and resolution

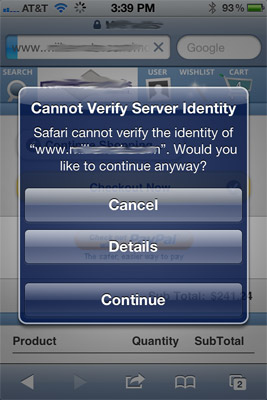
We recently came across an issue with one of our client sites that runs under ASPDOTNETSTOREFRONT where the site would appear function properly on normal desktop browsers (IE 9, FF, Safari, Chrome), but when the mobile site would run on an iPhone or iPad, and the mobile site would go into SSL mode, it would result in the following error message pop-up:

“Cannot verify server identity” – Safari cannot verify the identity of (your domain goes here).

The issue is that the supplementary Intermediate SSL certificates, in our case, from GoDaddy, are/were not installed correctly on the server.

To resolve this issue, re-download (if needed) the SSL file which includes your SSL cert and the intermediate SSL certs.

To Install an SSL in Microsoft IIS 5 & 6

  1. To install the Intermediate certificate, click Start , and then click Run….
  2. Type mmc, and then click OK. The Microsoft Management Console (Console 1) opens.
  3. From the File menu, click Add/Remove Snap-in… .
  4. In the Add/Remove Snap-in window, click Add.
  5. In the Add Standalone Snap-in window, select Certificates, and then click Add.
  6. In the Certificates snap-in window, select Computer Account, and then click Next.
  7. In the Select Computer window, select Local Computer, then click Finish.
  8. In the Add Standalone Snap-in window, click Close.
  9. In the Add/Remove Snap-ins window, click OK.
  10. In the Console 1 window, click + to expand the Certificates folder.
  11. Right-click Intermediate Certification Authorities, mouse-over All Tasks, and then click Import.
  12. In the Certificate Import Wizard, click Next.
  13. Click Browse to find the certificate file.
  14. In the Open window, select *.p7b for the Files of type.
  15. Select the appropriate intermediate certificate file, and then click Open.
  16. In the Certificate Import Wizard window, click Next.
  17. Select Place all certificates in the following store, and then click Browse.
  18. In the Select Certificate Store window, select Intermediate Certification Authorities, and then click OK.
  19. In the Certificate Import Wizard, click Next.
  20. Click Finish.
  21. Click OK.

At this point you need to RESTART IIS.

After you restart IIS, then your mobile browser should function properly.


TS Gateway – the poor man’s GotoMyPC

Want to connect into your business network, but don’t want to spend the $$$ paying for multiple GoToMyPC accounts?  Well, if you have control over your firewall, a static IP, Windows Server 2008 or later on your business server, and enough technical expertise, you can likely use Terminal Services Gateway service (TS Gateway) to connect into your computer (or any modern Windows OS computer on your LAN), for free!

  1. Start by reading the official Microsoft TS Gateway step-by-step guide.  Be aware even for me, a tech geek, that contains a pretty heavy duty dose of tech-babble.
  2. Configure your Windows 2008 server by reading these directions
  3. Configure each remote client (like your laptop) by reading this

Rather than re-hash all the above content, I will point out a few areas in which you may experience problems configuring  TS Gateway.

  • Configure a DNS record for your domain and point it at the office IP address, such as tsgateway.yourdomain.com point to your office IP.  If you don’t know your office IP, look at your firewall.  You will need a static IP or the capability to use a Dynamic IP address tracking service. If you don’t know what I am talking about already, this is not for you- use GoToMyPC!
  • While setting up the server, just create a “self signed” SSL certificate, and make sure you use the domain name you configured above to generate the self signed SSL, such as tsgateway.yourdomain.com
    • You will need to install this self-signed SSL into BOTH the server and client Trusted Root Certification Authorities store (the above links detail this process).
  • After the TS Gateway setup is complete, go check the IIS server BINDINGS for your default site and make sure the SSL certificate from above is properly installed onto your site.
  • These self-signed SSL certs expire after 6 months, so every 6 months you’ll need to generate a new one using the TS Gateway manager, or you can obtain a low cost SSL from GoDaddy or somewhere else that you can use as well. My advice is to just use the free self-signed ones.  If you are using self-signed ones just setup an Outlook recurring calendar event to remind you a week before each 6 month period.
  • Firewall configuration.  This is the most important part of the whole setup.  If the traffic can’t even get into your network, none of the above will work.
    • In general this is a two part process.
      • First, configure your NAT mappings, to map inbound port 443 TCP to your internal server IP address.
      • Second, add a rule to permit HTTPS traffic from anywhere to your internal server IP and HTTPS port 443
    • If you have properly configured your firewall, and imported in both the client and server SSL cert, go to an outside connection with your laptop (like a coffee shop) and go to https://tsgateway.yourdomain.com and see if you get the IIS 7.0 server multi-language single page splash screen.  If yes, then your TS Gateway setup is one step closer to working.
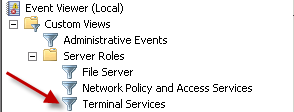
  • Enable all logging via the AUDITING tab.  These events will log to the Event Viewer in the area below.  This is extemely handy for troubleshooting things.

TS Gateway getting knocked offline due to IIS Restart

If you restart your IIS server at anytime, your TS Gateway service will get knocked offline.  As of June 27, 2010 this is a documented issue with Windows Server 2008 and later.

If you see an error in the TS Gateway event log that looks like this:

The TS Gateway service is shutting down. To diagnose possible causes for this problem, verify whether the following services are installed and started: (1) World Wide Web Publishing Service (2) Internet Authentication Service (IAS) (3) RPC/HTTP Load Balancing Service. Also, check Event Viewer for Network Policy Server (NPS) and IIS events that might indicate problems with NPS or IIS.

or if your client computer (laptop) that is trying to connect from the outside, gets an error like this

Remote Desktop Disconnected
----------------------------------------------
This computer can't connect to the remote computer.
Try connecting again. If the problem continues, contact the owner of the remote computer or your network administrator.

You need to go to the service manager and make sure the following services are started:

  • Terminal Services Gateway
  • RPC/HTTP Load Balancing Service

SSL Weak Encryption Algorithms – how to disable them under IIS

Chances are if you are reading this you’ve failed a “Trustkeeper Scan” – with “Low severity” – due to having weak SSL encryption algorithms enabled on IIS.

It’s pretty easy to solve this, but if you read the microsoft KB article it looks pretty complicated.

Launch regedit and go to this key:

HKEY_LOCAL_MACHINE\SYSTEM\CurrentControlSet\Control\SecurityProviders\SCHANNEL\Ciphers

You basically want to disable everything that has less than 128 bit encryption.  On one of my servers, the ones with red arrows below need to be disabled:

CLICK FOR LARGER IMAGE

CLICK FOR LARGER IMAGE

So on each one of these, you want to “Right click”, add a DWORD, name it “Enabled” and set the Hex value to 00000000  (eight zeros).

Repeat for each one that has less than 128 bit length, and then restart your server.

You probably also need to reschedule a security scan so that your changes can be verified, and as always, please double check your SSL protected site with at least two different web browsers and make sure you can get into SSL mode with them both on your site.

Disabling SSLv2 support in IIS

If you have undergone a “Trustkeeper Scan” and failed due to your Microsoft web server using SSLv2, then read on.

NOTE: PLEASE READ THIS POST IN OUR BLOG HERE.  It is TWO YEARS NEWER and simplifies most of the tasks regarding SSL settings.


SSLv2 is considered a “medium” security risk and will cause your scan to FAIL, so therefore to be PCI-DSS compliant (for credit card companies), you need to disable it via the registry on your Windows server running IIS 3 or later.

The easiest way to do this is to read this KB article from Microsoft.

In a nutshell, you need to go to this registry key

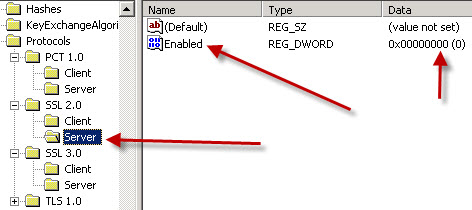
HKey_Local_Machine\System\CurrentControlSet\Control\SecurityProviders\SCHANNEL\Protocols

Then locate the SSL 2.0 key

  • Click on the “Server” node.
  • On the Edit menu, click Add Value.
  • In the Data Type list, click DWORD.
  • In the Value Name box, type Enabled, and then click OKNote: If this value is present, just double-click the value to edit its current value.
  • Type 00000000 in Binary Editor to set the value of the new key equal to “0”.
  • Click OK. Restart the computer
  • if applicable, reschedule the security scan