Category Archives: IIS Tips & Tricks

WordPress, PHP and IIS setup of REDIS using Redis Object Cache Free Plugin

Note:  This presumes you already have a working REDIS server inside your LAN.  If you don’t, please see my coming post on how to set up a REDIS virtual machine on HYPER-V.


  1. You will need to install the php REDIS extension.  I am using IIS 10 and Windows Server 2022, so I went to this page: https://pecl.php.net/package/redis and downloaded 5.3.7 stable (as of 04-2023).
  2. Extract
  3. I am on the latest 7.4x build of PHP which is 7.4.33 as of 04-2023.  This will supposedly work fine under 8.x but I haven’t tested it inside my environment.
  4. copy the files pictured below to your PHP EXT folder.
  5. Add REDIS information into your wp-config.php file
    1. edit the file
    2. near the top of the file, add the following
    3. // adjust Redis host and port if necessary 
      define( 'WP_REDIS_HOST', 'x.x.x.x' );
      define( 'WP_REDIS_PORT', 6379 );
      
      // change the prefix and database for each site to avoid cache data collisions
      define( 'WP_REDIS_PREFIX', 'name-of-your-site' );
      define( 'WP_REDIS_DATABASE', 0 ); // 0-15
      
      // reasonable connection and read+write timeouts
      define( 'WP_REDIS_TIMEOUT', 1 );
      define( 'WP_REDIS_READ_TIMEOUT', 1 );
      define( 'WP_REDIS_SCHEME', 'tcp' );
    4. CHANGE the HOST IP to the LAN IP of your REDIS server
    5. CHANGE the PREFIX to a unique friendly name of your site
    6. CHANGE DATABASE (a number between 0 and 15, which needs to be unique and for this website only)
    7. Save changes
  6. Edit your PHP.ini file and add the following line
    1. extension=php_redis.dll
    2. save
  7. Go to the WordPress Admin
  8. Plugins, Add new Plugin
  9. Search for REDIS
  10. clock on REDIS OBJECT CACHE, click install
  11. click Activate
  12.  Look at the REDIS plugin
    1. SETTINGS->REDIS
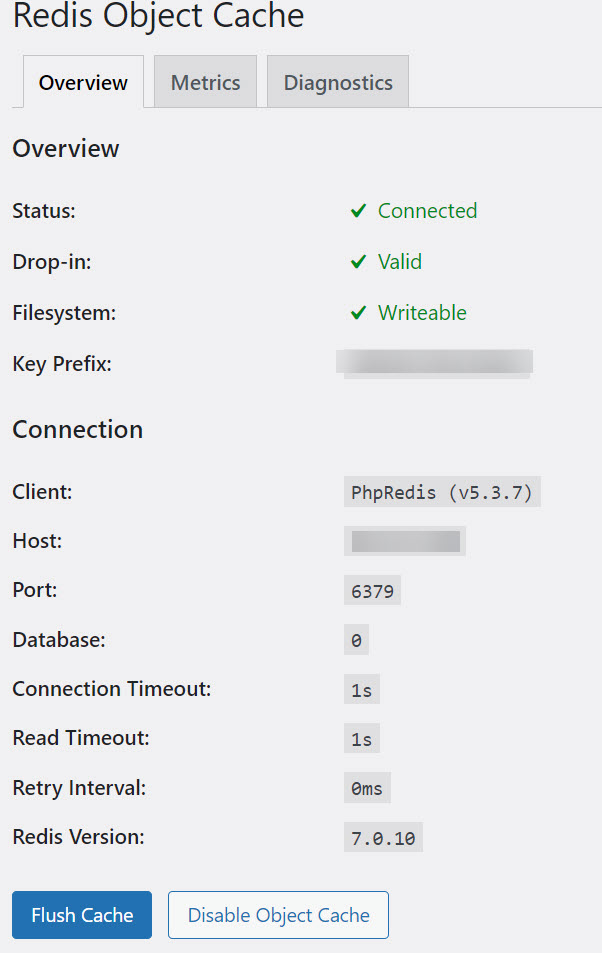
  13. Hopefully you will see three green checkboxes, which means your REDIS cache is up and running.
  14. If you don’t have three green checkmarks as above, I am available for consultation on your project.  Please reach out to me here.

The response is not a valid JSON response – Windows IIS

If you’re I presume you’ve already tried some other techniques to fix the “The response is not a valid JSON response” issue with WordPress running on Windows Server and IIS.

In my case, I am running PHP 8.1.8 and the issue was easy to fix.

For me, the error happened while trying to save content to a Widget.

In the log files I noticed the OPTIONS verb being used and a 405 error.

The fix is simple.  Go to HANDLER MAPPINGS, double click your PHP mapping.

Click REQUEST RESTRICTIONS.

Click VERBS

do one or the other.  Add the word OPTIONS to the current list, OR just click ALL VERBS.

Save changes.

Your “The response is not a valid JSON response” should now go away.


NOTE:  On IIS WordPress setups, you need to make sure you have a HOSTS file mapping for your website to the local IP address for the website (NOT PUBLIC IP, local machine IP).  This is necessary for the various CRON jobs to work.


How to get IMAGICK working under Windows Server IIS

Here is the simple method to get IMAGICK working under Windows Server 2019/2022 and IIS 10.0 and later.


  1.  Presuming using PHP 7.4.X (current version is 7.4.27 as of 2/14/22).  NOTE:  This is not working properly under PHP 8.x
  2. Make sure you’ve downloaded the most current 7.4.X version and installed it on your IIS/PHP Manager, which properly sets up the handler mappings.
  3.  download IMAGICK
    1. https://windows.php.net/downloads/pecl/releases/imagick/
    2. Pick the most current, NON “RC” version.  For me, that was 3.7.0
    3. Download the version for PHP 7.4, NTS, vc15, x64
      1. For me, that was -> php_imagick-3.7.0-7.4-nts-vc15-x64.zip
    4. Make sure you have the Visual C 15 runtime installed.  (Google it and download/install if needed)
  4. Extract the archive above to a temporary directory
  5. copy php_imagick.dll to your PHP\ext directory.
    1. MAKE SURE you are in the correct directory, e.g. for me that was php-7.4.27-nts-Win32-vc15-x64\ext
  6. in the archive directory, SORT BY TYPE.
    1. Copy all CORE_RL*.DLL (28 files)
    2. Copy all FILTER*.DLL  (one)
    3. Copy all IM_MOD_RL (134 files)
    4. copy all these to your PHP version’s ROOT directory.  For me, that was 7.4.27-nts-Win32-vc15-x64  (NOT THE EXT DIRECTORY!)
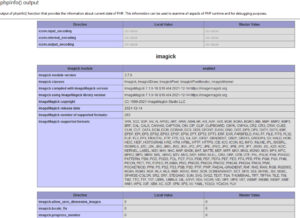
  7.  Go to PHP manager and click on check PHPINFO().  When that comes up, scroll down and make sure you see a section for IMAGICK.
  8.  Note:  If you are using WordPress, please read this post to make sure you don’t get JSON errors.

WordPress There was an error. The response is not a valid JSON response.

If you are running WordPress on IIS and experiencing this issue, another thing you can check is the FastCGI settings to make sure the OPTIONS verb is allowed.

In my case, I am using a brand new setup of WordPress on a Windows Server 2019 IIS 10.0.  When I went to Appearance, Widgets, made a change and clicked “update” I would get the “There was an error. The response is not a valid JSON response.” message.

I looked at all my other settings including SSL, Permalinks, etc. and they all looked good.

THE FIX

On the site with this particular “There was an error. The response is not a valid JSON response.” issue, the fix was easy.

Go to Handler Mappings for the site in question.

Double click the version of PHP that is setup (under PHP Manager)

Go to REQUEST RESTRICTIONS

VERBS

Make sure either “ALL“, or “One of the following” is selected.  If “One of the following” is selected, use this list:

GET,HEAD,POST,OPTIONS


Save your changes/close the dialog boxes and retry your save operation.

How to configure IIS to allow access to apple-developer-merchantid-domain-association

Also know as how to configure IIS to permit access to files with NO extension.

In this case we need to create a file in this location:

https://(my-website-domain)/.well-known/apple-developer-merchantid-domain-association


  1. Create a directory in your website called “well known”
  2. Create a virtual directory in the IIS manager, alias is .well-known and point it to the directory above.
  3. Place the file from Apple — apple-developer-merchantid-domain-association into the “well known” real directory
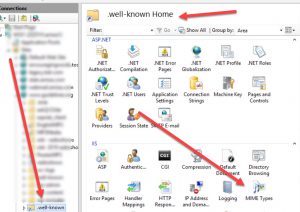
  4. Back in the IIS Manager… click on the .well-known virtual directory
  5. Screenshot:
  6. Click on MIME TYPES
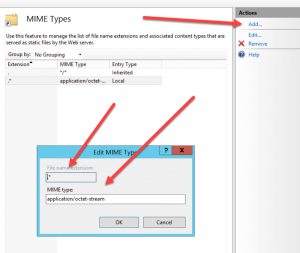
  7. Add a new mime type. Extension .* and Mime type = application/octet-stream
  8. Hit OK
  9. Go test the file from a web browser.  It should now work and you can now have Apple verify your site.

webDNA Error: You are not allowed to change the price

If you are here for this:

Error: You are not allowed to change the price

under webDNA:

How to fix:

1) look at the error text files. It will tell you which script is throwing the error.
2) edit that script and search for “password”. Find the webdna password. it will look like this: password=whatevermypasswordis
3) go to the webDNA control panel. ISP Sandbox.
4) locate the sandbox in question and click the small ADMIN button
5) login (generally with sbadmin/sbadmin)
6) preferences “Price Change Password”. Set the password equal to what you found in #2 above.
7) save
8) retry your page, it should work now.

Classic ASP switch to TLS 1.2

I recently came across a failed PCI scan for one of our clients.  This failure was due to TLS 1.0 being enabled on that Windows server.

We ran IISCRYPTO (link) and disabled TLS.

Upon restarting the server, the Classic ASP site threw the following error:

Microsoft OLE DB Provider for ODBC Drivers (0x80004005)
[Microsoft][ODBC SQL Server Driver][DBNETLIB]SSL Security error

That error is because the web server is no longer using TLS 1.0 and the Classic ASP application (web site) is using too old of a driver on the server, to communicate with TLS 1.1 and/or 1.2.

To get around this, go download the latest ODBC driver from Microsoft, which is version 13.1 as of today.  You will most likely need to install the 32-bit version (as most ASP apps run in 32 bit mode).  Link here

Install that driver.

then go to your Windows server, Administrative tools and open the ODBC Data Sources (32-bit)

The 32-bit ODBC Administrator is found here: C:\Windows\SysWOW64\odbcad32.exe

go to the SYSTEM tab

add a new data source

Pick “ODBC DRIVER 13 for SQL Server”… (hit finish)


put in the name (no spaces or punctuation)

server name (or IP address) (NEXT)


authentication (USE SQL server auth, enter the LoginID and PW) (NEXT)


continue, then test the connection (it should work).

go to your Classic ASP application.


You will need to update the connection string to this:

DSN=YourNewSystemDSNName;Uid=YourSQLUsernameHere;Pwd=SQLpassword;

You can now use IISCrypto and disable TLS 1.0

Reboot the server

re-test your Classic ASP app and now you should be up and running on TLS 1.1 or 1.2


WordPress 4.x auto updates under windows

If you want your WordPress install to do auto-updates (in a Windows Server based hosting setup), you need to do one simple step.


Edit the hosts file.

Put a local IP in there for the domain name of the site.

Save the changes.


Example:

10.5.5.5  www.whatever-the-site-is.com

Re-log into WordPress and go to dashboard-updates and in there it should tell you “future updates will be automatically applied”

Why is all of this needed?  WordPress uses PHP CRON and that is reliant on the server being able to find the local website.  Therefore it is necessary to put a hard-coded IP in the hosts file so the CRON job can “see” the wordpress site.  Without the hosts entry the website will resolve to the external IP of the site, and you will have an unreachable IP issue and auto-update won’t work.

Proper FTP setup via IIS using Passive FTP

Since PASSIVE FTP seems to be a relative standard (that I experience), and since most clients don’t understand or want to use “ACTIVE” FTP, here is the easy way to configure your firewall and FTP software on an IIS machine to permit PASSIVE FTP.

Firewall Setup

You’ll need two rules and one “one to one” NAT mapping (this may vary a bit due to your firewall software).

The one to one NAT mapping needs to map the external IP address to the internal IP of the server.  Such as “66.33.123.21” mapped to “10.1.1.21”

One rule to allow the world into TCP port 21, mapped to the specific server in question.  (Allow * from ANY to 10.1.1.21 TCP port 21).

Second rule, specifically for PASSIVE FTP.  Allow * from ANY to 10.1.1.21 on ports range 50000 to 50100.

FTP Server Setup

We normally use Filezilla Server (latest version, of course).

Add a user and setup the standard settings.

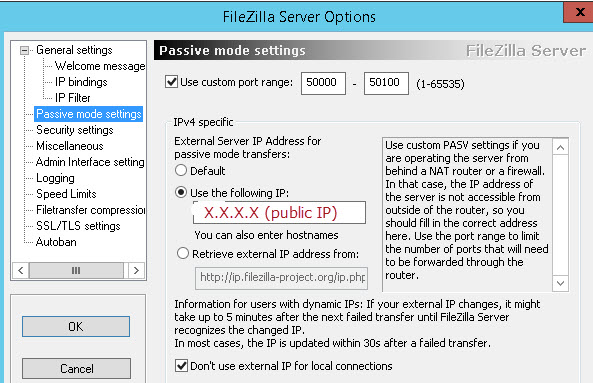
Passive settings are as follows (below).

Most importantly, the “X.X.X.X” area below is your PUBLIC IP that is mapped through your firewall.

Click OK and save the settings.

FTP1


FTP Client Settings

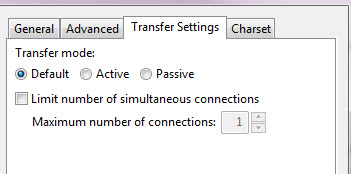
Nothing fancy here, just check to make sure the settings look like this:

FTP2

Throttling bandwidth on an IIS based site

If you need to throttle (or limit) the amount of bandwidth a specific site on Microsoft Server — this is for you.  This should work with any Microsoft Server OS from 2008 to present. Open IIS. Go to the specific site in question (in the tree to left expand and click on the specific site name).

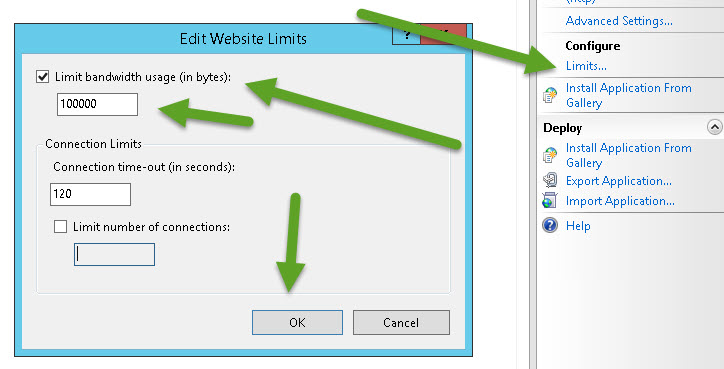
on the right side panel, click Configure — Limits.

Check “limit bandwidth usage” and type in a number.

Click OK.

limits

1 2 3