Category Archives: IIS Tips & Tricks

How to stop attacks on your site via IIS

Often we see hack-bots or other automated hacking tools crawling our sites and hammering various pages looking for vulnerabilities.  There is an easy way to put a stop to this through Microsoft IIS 7.0 (and later).

Make sure you have the “IP Address and Domain Restrictions” module loaded in IIS (if not, install it.)

Launch it and add a DENY entry.

If the attacker is coming from AAA.BBB.CCC.49, I usually put a range block in there from

AAA.BBB.CCC.0 to AAA.BBB.CCC.254

At that point I usually restart the server because I’ve noticed that these blocks do not tend to take effect until (at minimum) the whole IIS process is restarted.  Restarting the box works for me.

Attacks blocked…

eXtplorer does not allow login under PHP 5.6 and IIS Windows Server

Have you deployed out eXtplorer and received this error:

PHP Deprecated:  Non-static method PEAR::isError() should not be called statically, assuming $this from incompatible context in X:\XXXXXX\WWW.AAAAA.com\www\libraries\JSON.php on line 828

it’s an easy fix.

edit the file

X:\XXXXXX\WWW.AAAAA.com\www\libraries\pear.php

edit line 247

change this:

function isError($data, $code = null)

to this:

static function isError($data, $code = null)

How to prep a Windows 2012 R2 Update 1 server for PHP / WordPress

1) Presuming you have already loaded the OS onto the machine (whether virtual or physical)
2) Join the machine to your business domain
3) windows updates
4) reboot
5) windows updates (again until no more updates)
6) configure role -> Web server and under Application Development, pick .NET Extensibility 3.5
7) once that is complete, run windows updates again
8) probably you’ll need to reboot
9) check windows updates ONE MORE TIME
10) install the Web Platform Installer (version 5.0 as of this post), from here: http://www.microsoft.com/web/downloads/platform.aspx
11) after the WPI is installed, run it and choose the following: PHP 5.6.0 (or later), Windows Cache Extension 1.3 for PHP 5.6, PHP Manager for IIS
12) install those programs, when complete, open the IIS manager
13) verify that you see the following: URL Rewrite, PHP Manager under the main server features panel
14) download the latest version of PHP. (for me, it was 5.6.3)
15) unzip and move it to a new folder under “Program Files (x86)”\PHP\ called v5.6.3 (you should see v5.6 in there).
16) Make a folder called PHP-TEMP on the C:\ root
17) Give it the following permissions, IUSR and IIS_IUSRS to full control
18) Go to the PHP manager and register the new version
19) in the PHP manager, go to Manage all Settings and update the following:
Error Log -> PHP-TEMP directory
Memory_limit = 512mb
Post_Max_size = 10M
upload_max_filesize = 10M
upload_tmp_dir -> PHP-TEMP directory
SMTP->your internal email server IP
session.save_path -> PHP-TEMP directory
==
20) stop the default site
21) create your new site
22) make sure a static IP is assigned to the server for step 21
23) make sure firewall rules are in place to permit traffic to that IP
24) move or deploy the new wordpress site
25) adjust IIS settings-> Logging location and daily roll over, URL Rewrite rules for domain name and wordpress
26) you should have a web.config file from a previous (working) wordpress install. Use that for the above two things.

>more to come<

ASPMAKER v11 Image Resizer not working under IIS

If you are using ASPMAKER by HKVSTORE to build web admin interfaces, and you’ve arrived at this page, it’s likely because the Image Resizer ASP.NET add-on is not working for you.

Does this look familiar to you?

Warning: ASP.NET 2.0 or later is required but ASP.NET script is not executed properly on this server:

see this screenshot:2014-07-08_15-47-49Here is the solution to the issue.

  1. You need to have a HOSTS file entry on the server that will allow the server to resolve the domain name for the website you are using ASPMAKER and the Image Resizer on.  This is because the ASP.NET resizer uses MSXML2.ServerXMLHTTP to locally fetch and resize the image.  If there is no HOSTS file entry on the local server, there is no way for the resizer to work.
  2. Open the HOSTS file and add an entry like this
  3.  X.X.X.X   your.domain.name
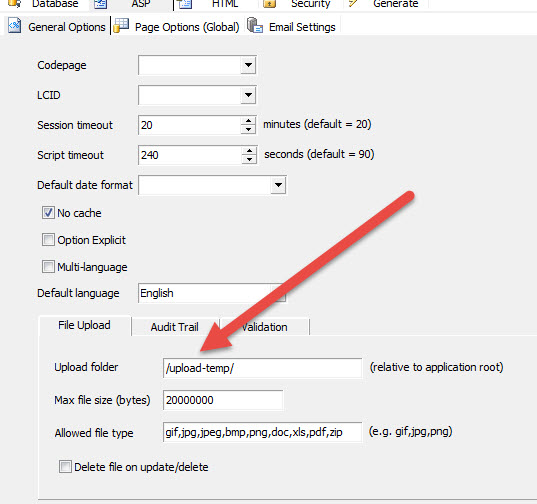
  4.  Make sure the upload folder is set properly in ASPMAKER here:file temp
  5.  This path will be relative to the folder you have deployed the ASPMAKER files to on the server.  For example, if the ASPMAKER files are in the directory /123/ then the upload folder (pictured above) will be /123/upload-temp/
  6. set the permissions properly on the /upload-temp/ folder.  this means adding machinename\IUSR and granting full control.
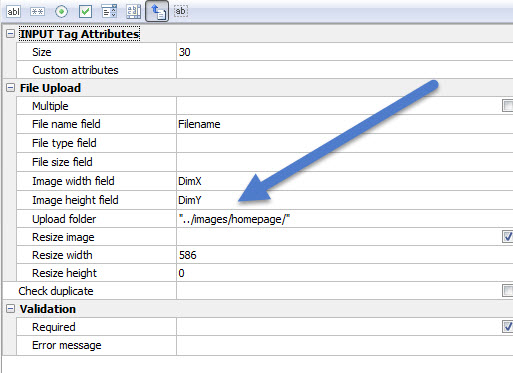
  7. Inside ASPMAKER, make sure the destination folder is correct. Note I had to use “../” to get ASPMAKER to upload to the correct path off the root.  It is NOT necessary to grant this folder any special permissions.correct-path
  8. Make sure the base site itself has a valid application pool assigned.  Here’s what mine looks like (It is not necessary to have an application for the subdirectory where the ASPMAKER app). app
  9. NOTE: depending on your setup, it may be necessary to set the .NET CLR version to v.2.X above.  (I HAD TO USE v.2.X for my setup…)
  10. Adjust the maximum file upload size in ASP.  ASP->Limits Properties ->Maximum Requesting Entity Body Limit.  The default value is 200,000 (200000) which is 200,000 bytes.  I upped mine to 20,000,000 (leave out the commas here).
  11. Launch the ASPMAKER web admin and try uploading an image.  The above should take care of all the issues.

Let me know if this saves you a headache!


Permission denied error dealing with Classic ASP loadpicture

To solve the following error, which is generated by the loadpicture object

Microsoft VBScript runtime error ‘800a0046’
Permission denied: ‘loadpicture’

set myImg = loadpicture(“C:\aaa\asdf.jpg”)

==

The solution is to simply add this permission as full control

servername\IUSR

to the directory in which this object is going to work…

How to migrate WordPress 3.X from one domain to another

I recently came across this situation on a client site where they wanted to change their domain from something like www.whatever.com to www.whatever-new-site.com and their site runs on WordPress 3.91. This is also applicable if you develop a site on a testing url like “testing.whateverdomain.com” and you want to change the site to run off “www.whateverdomain.com” when it goes live. After a lot of research and trial & error, here is the easiest approach to handle this.

  1. go to plugins and download and install Velvet Blues Update URLs 3.2.2
  2. go to TOOLS -> Update URLs
  3. enter the OLD DOMAIN and the NEW DOMAIN
  4. check all the checkboxes that apply (I have always checked all 6 checkboxes and never had any issues)
  5. click on UPDATE URLs NOW
  6. go to settings -> general and update the domain info in there.  Save the changes.
  7. At this point you need to adjust your web server settings to begin serving and responding to the site on the new domain name.
  8. You can now access the site from the new domain name and all should be fine!


Slow rendering or display of CKFINDER directories

Have you installed CKFINDER (maybe on Classic ASP) and have a problem with very slow directory displays while the circular “wait” animation plays and eventually displays the directory?

Easy fix:

Within the config.asp file (located in the CKFINDER directory) while using the Classic ASP version of CKFINDER…

comment out this line

Images.Add “component”, “Auto”

just put an apostrophe in front of it like this (below)

‘ Images.Add “component”, “Auto”

Save your changes.  Refresh and reload CKFINDER and the directories should display instantly.


Problem with PHP mailer sending mail – Result: delayed, Status: 4.1.1 452 4.1.1 requested action aborted: try again later – GL/GL

If you see this type of message logged in your outbound mail logs, and your clients are unable to get email delivered to their domain, then I may have the s0lution for you.

In our particular scenario, we have a PHP site running WordPress and the email server is located with IPOWER.  So the website needs to be able to send email from our data center into the IPOWER data center, but in our case the emails were getting bounced due to this error below.  (VERY NON-DESCRIPT!).

Result: delayed, Status: 4.1.1 452 4.1.1 absc@asdasdasd.com requested action aborted: try again later – GL/GL

in your BOUNCE BACK emails, you may find something like this:

X-PHP-Originating-Script: 0:class-phpmailer.php

X-Mailer: PHPMailer 5.1 (phpmailer.sourceforge.net)

In our case, the recipient domain was hosted at IPOWER web.  To solve this issue, we logged into the IPOWER control panel, went to spam settings:

http://www.ipower.com/controlpanel/spamfilter.bml

and went to the WHITELIST and whitelisted our email server’s IP address.  Saved the changes and re-tried sending the email on the PHP (wordpress) site.

Worked immediately.


How to get IIS 7.5 web server to pass the BEAST PCI vulnerability compliance scans

If your e-commerce website keeps flunking PCI vulnerability complaince scans with the following error:

BEAST (Browser Exploit Against SSL/TLS) Vulnerability, CVE-2011-3389

and you are running Microsoft Server 2008 R2, I can help you.

If you aren’t on Windows Server 2008 R2, there is no known way to pass this test short of upgrading your server to W2K8R2 and doing the following steps.

This is the exact vulnerability as reported (in our case, by Trustkeeper):

BEAST (Browser Exploit Against SSL/TLS) Vulnerability The SSL protocol encrypts data by using CBC mode with chained initialization vectors. This allows an attacker, which is has gotten access to an HTTPS session via man-in-the-middle (MITM) attacks or other means, to obtain plain text HTTP headers via a blockwise chosen-boundary attack (BCBA) in conjunction with Javascript code that uses the HTML5 WebSocket API, the Java URLConnection API, or the Silverlight WebClient API. This vulnerability is more commonly referred to as Browser Exploit Against SSL/TLS or “BEAST”.

CVE: CVE-2011-3389

NVD: CVE-2011-3389

Bugtraq: 49778

CVSSv2: AV:N/AC:M/Au:N/C:P/I:N/A:N(4.30)

This is the remediation (as stated by Trustkeeper):

Affected users should disable all block-based cipher suites in the server’s SSL configuration and only support RC4 ciphers, which are not vulnerable to fully address this vulnerability. This vulnerability was addressed in TLS version 1.1/1.2, however, support for these newer TLS versions is not widely supported at the time of this writing, making it difficult to disable earlier versions.

Additionally, affected users can also configure SSL to prefer RC4 ciphers over block-based ciphers to limit, but not eliminate, exposure. Affected users that implement prioritization techniques for mitigation as described above should appeal this vulnerability and include details of the SSL configuration.

Here is the evidence (as stated by TrustKeeper):

Service: http
Evidence:
Cipher Suite: SSLv3 : DES-CBC3-SHA
Cipher Suite: SSLv3 : RC4-SHA
Cipher Suite: SSLv3 : RC4-MD5
Cipher Suite: TLSv1 : AES256-SHA
Cipher Suite: TLSv1 : AES128-SHA
Cipher Suite: TLSv1 : DES-CBC3-SHA
Cipher Suite: TLSv1 : RC4-SHA
Cipher Suite: TLSv1 : RC4-MD5

That isn’t much help, of course.

Ok, here is how to solve this.  And you don’t even need REGEDIT!

  1. Make sure your website is on a Windows 2008 R2 server, with a valid SSL certificate.
  2. Download the following FREE – and FANTASTIC program to your web server.
    1. https://www.nartac.com/Products/IISCrypto/Default.aspx
  3. Run the program on your web server.  Please be logged in as full admin, and remote desktop is fine.
  4. Start by clicking the PCI button, then make all your settings look like below:
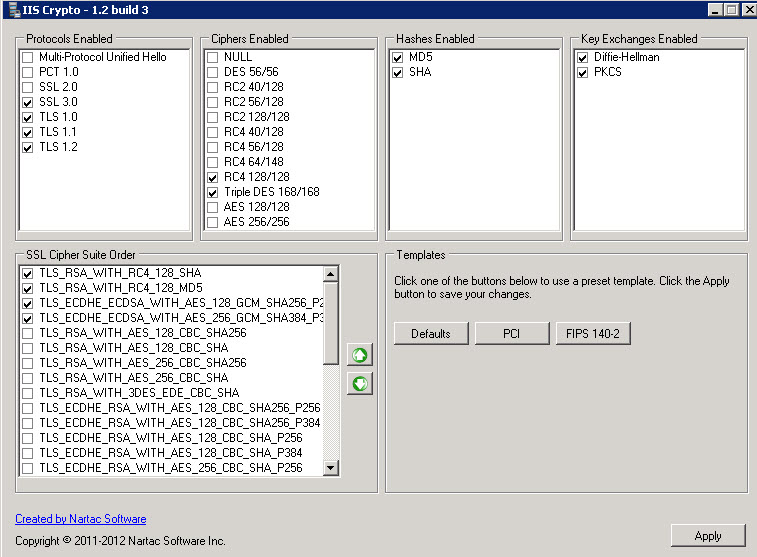
    1. pci
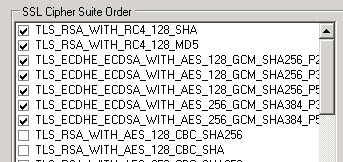
  5. In some cases you might have a few more listing under SSL Cipher Suite order.  Here is a screenshot from a second server (below).  The settings below are also perfectly fine:
    1. pci2
  6. In all cases – MAKE YOUR SETTINGS JUST LIKE ABOVE – and your site should always pass the BEAST test.
    1. IT IS CRITICAL that you have ONLY the CIPHERS selected in the above two screenshots, and the TOPMOST TWO in THIS SPECIFIC ORDER.
  7. apply the changes
  8. Restart the server.
  9. once the server is back up and running, go to the website below:
    1. https://www.ssllabs.com/ssltest/index.html
  10. Allow the test to complete.  The test will tell you if the site passes all the tests and is BEAST compliant, and it will give you a score for your website.  The website we tested scored 89 which is an “A”.

Hopefully this will help shortcut this process for some of you. I literally spent hours working this solution out.


iPhone iPad “cannot verify server identity” SSL issue and resolution

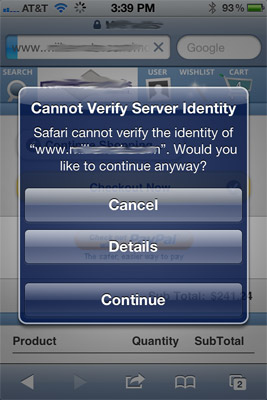
We recently came across an issue with one of our client sites that runs under ASPDOTNETSTOREFRONT where the site would appear function properly on normal desktop browsers (IE 9, FF, Safari, Chrome), but when the mobile site would run on an iPhone or iPad, and the mobile site would go into SSL mode, it would result in the following error message pop-up:

“Cannot verify server identity” – Safari cannot verify the identity of (your domain goes here).

The issue is that the supplementary Intermediate SSL certificates, in our case, from GoDaddy, are/were not installed correctly on the server.

To resolve this issue, re-download (if needed) the SSL file which includes your SSL cert and the intermediate SSL certs.

To Install an SSL in Microsoft IIS 5 & 6

  1. To install the Intermediate certificate, click Start , and then click Run….
  2. Type mmc, and then click OK. The Microsoft Management Console (Console 1) opens.
  3. From the File menu, click Add/Remove Snap-in… .
  4. In the Add/Remove Snap-in window, click Add.
  5. In the Add Standalone Snap-in window, select Certificates, and then click Add.
  6. In the Certificates snap-in window, select Computer Account, and then click Next.
  7. In the Select Computer window, select Local Computer, then click Finish.
  8. In the Add Standalone Snap-in window, click Close.
  9. In the Add/Remove Snap-ins window, click OK.
  10. In the Console 1 window, click + to expand the Certificates folder.
  11. Right-click Intermediate Certification Authorities, mouse-over All Tasks, and then click Import.
  12. In the Certificate Import Wizard, click Next.
  13. Click Browse to find the certificate file.
  14. In the Open window, select *.p7b for the Files of type.
  15. Select the appropriate intermediate certificate file, and then click Open.
  16. In the Certificate Import Wizard window, click Next.
  17. Select Place all certificates in the following store, and then click Browse.
  18. In the Select Certificate Store window, select Intermediate Certification Authorities, and then click OK.
  19. In the Certificate Import Wizard, click Next.
  20. Click Finish.
  21. Click OK.

At this point you need to RESTART IIS.

After you restart IIS, then your mobile browser should function properly.


1 2 3