Category Archives: Random Bits

How to use the SINTECH XBOX SERIES X S NVME ADAPTER

I recently purchased one of the SINTECH Xbox Series X/S NVME adapters in an attempt to use a less expensive alternative for NVME storage on my XBOX.

This is the item:

XBOX NVME ADAPTER

It took about 10 days for the adapter to transit to the USA.

You will also need a specific NVME 2030 hard drive.

WD CH SN530 (1tb unformatted, ~867gb formatted).  I bought mine on eBay for $110 w/free shipping.

Here is the correct procedure to get the NVME to work.

  1. insert the WD CH SN530 into your NVME PC.
  2. using a “real” partition management software (or via windows command line), delete ALL partitions from the drive.  My factory drive had a small partition then a large partition.  The small partition did not show up under Windows Disk management, thus why I had to use partition software to delete the partitions.
  3. Convert the disk to MBR.
    1. in windows disk management, right click the drive name (in the far left column), and choose convert disk to MBR.
  4. Format the disk NFTS
  5. remove the NVME from your PC
  6. insert into the SINTECH adapter.
  7. plug the adapter board into your XBOX
  8. the drive will recognize.  Format it as a game storage device (NOT MEDIA).
  9. Have fun!

How to get OPEN NAT with Xbox or Xbox One and PFSENSE firewall

Here is my quick & easy guide to getting OPEN NAT inside your network for multiple XBOX’s and inside a PFSENSE FIREWALLED network.

  1. all Xboxes must be configured with a STATIC IP.
    1. under the Xbox Settings, Network, Advanced settings, I use MANUAL IP address setting.
      1. put a static IP inside the range of your network.
      2. as an example:
        1. IP: 192.168.100.20
        2. Subnet: 255.255.255.0
        3. Gateway: 192.168.100.1
        4. DNS: Point it at your PFSENSE box.  192.168.100.1
        5. Secondary DNS: Use Google:  8.8.8.8
      3. Alternate PORT:  not needed // leave at default
      4. clear any alternate MAC addresses.
    2. Save these settings and SHUT DOWN your XBOX.
    3. Pull the plug
  2. Go log into your PFSENSE firewall
  3. I am using a beta version of PFSENSE 2.5.0.a.20200401.1515
  4. You should try to be using as current a version as possible to avoid any issues with outdated PFSENSE code.
  5. Inside PFSENSE, go to Services/ UPnP & NAT-PMP
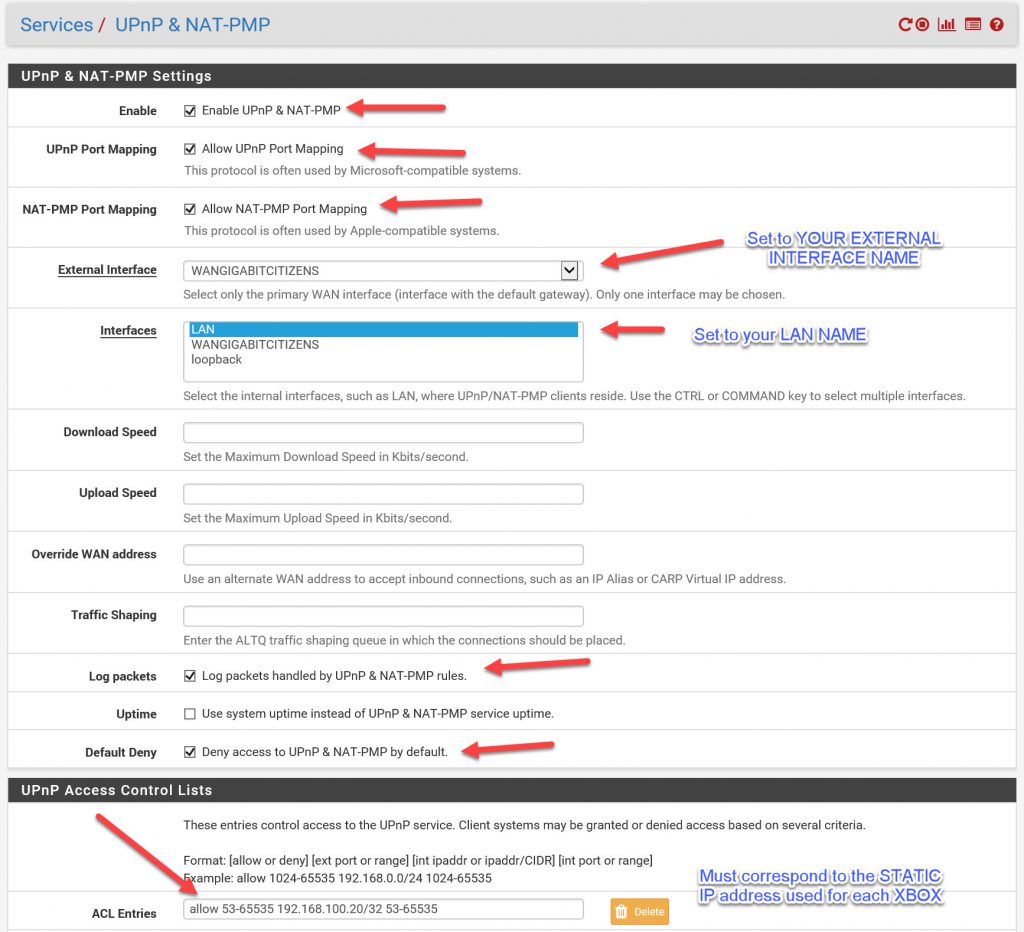
    1. Setup your settings like this (click image for larger version):
      Notes:

      1. under ACL ENTRIES, each XBOX’s STATIC IP address must be on it’s own line here.  If you have multiple XBOX’s, create one line entry for each XBOX and edit the IP ADDRESS
      2. HIT SAVE to save your settings here.
  6. Go to Firewall / NAT / Outbound
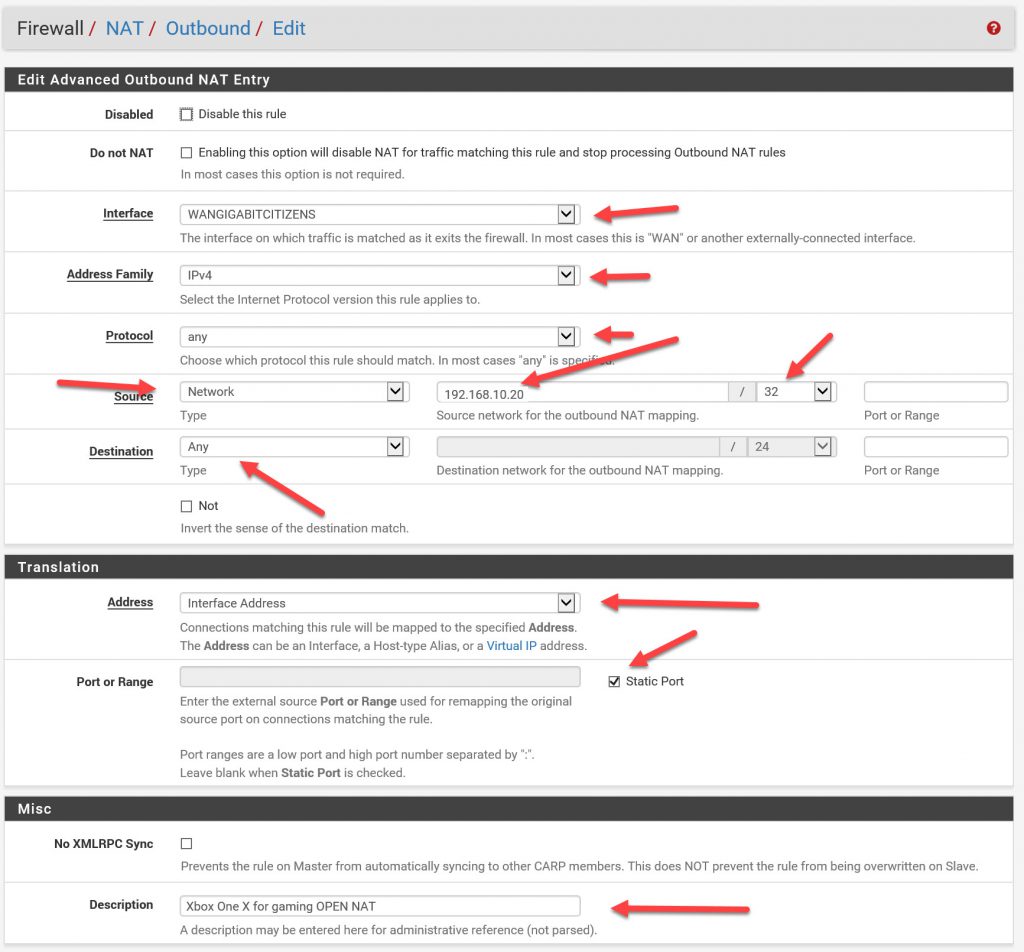
    1. Make sure that the MODE is set to Hybrid Outbound NAT rule generation.
    2. Add a mapping (see below, click for larger image)
    3. NOTES:
      1. under SOURCE, you must put the IP address for your XBOX here.
      2. Repeat and add mappings for EACH XBOX (and IP ADDRESS) inside your LAN
      3. SAVE CHANGES
  7. Plug the power back into your Xbox
  8. Power it on
  9. Once it is booted, go to NETWORK / SETTINGS.
  10. RE-RUN NAT TYPE test
  11. RE-RUN MULTIPLAYER test
  12. you should now have “OPEN” NAT


Automatically Empty Google Drive Trash

Want to empty your Google Drive Trash automatically?  I finally have the solution for you.

  1. Make sure you use GOOGLE CHROME web browser for best results.
  2. Open Chrome and go to www.google.com
  3. Make sure you are signed into your Google account.  If not, sign in.
  4. You should OBVIOUSLY have Google Drive account up and running since that’s why you’re here, right?
  5. Go here https://script.google.com/home
  6. Click NEW PROJECT.
  7. Clear out the default code that appears in the next window.
  8. Paste in this code (exactly)
    function createTimeDrivenTriggers() {
      ScriptApp.newTrigger('emptyThrash')
          .timeBased()
          .everyHours(1)
          .create();
    }
    function emptyThrash()
    {
    Drive.Files.emptyTrash();
    }
    
  9. Click the Save Icon
  10. Enter a name such as “Automatically Empty Google Drive Trash”
  11. Click the “Resources -> Advanced Google Services” menu within the Code editor
  12.  Scroll down and turn “Drive API” to “ON”
  13. You should see a message “These services must also be enabled in the Google Cloud Platform API Dashboard”.  Click that link.
  14. NOTE:  If you DO NOT see the message above, click this direct link
  15. Click “ENABLE APIS AND SERVICES”
  16. Locate “Google Drive API” and click it.
  17. Click Enable
  18. Go back to your browser window with the “Advanced Google Services” window still open.
  19. Click OK
  20. Click the “Run” icon within the project editor
  21. You should see “Authorization Required”.  Click Review Permissions
  22. Choose your google account (this links up the script with the proper account).
  23. You will see “This app isn’t verified”.  Click Advanced. Click Go to XXXX Project (unsafe).
  24. Click ALLOW
  25. Save your project again.
  26. Go to “Run->Run Function->createTimeDrivenTriggers”
  27. Hit the “Timer” icon.
  28. You should see your project listed under “Triggers”
  29. Your job is now scheduled to run every 1 hour and empty your trash!


This process was crafted by deciphering the following two pages:

https://stackoverflow.com/questions/32749289/automatically-delete-file-from-google-drive-trash

https://stackoverflow.com/questions/25749906/permanently-delete-file-from-google-drive/32749203

Recaptcha V2 under classic ASP

Here’s a quick primer on upgrading your Classic ASP site Recaptcha V1 to V2.

First, go to Google Recaptcha online and generate yourself a v2 pair of keys for your site’s domain.

Next:

On the page with the “FORM” on it on which you want to display the Recaptcha V2.

Add to the HEADER (inside the HEAD TAGS):

<script src='https://www.google.com/recaptcha/api.js'></script>


Replace the existing code which renders your v1 recaptcha with this line:

<div class="g-recaptcha" data-sitekey="put your google public v2 key here" ></div>


on your FORM SUBMIT page (where the v2 form gets submitted to):

Inside ASP tags, place this line:

Response.LCID = 1033 ' USA LCID

It is a required element for the JSON Parser.

Inside the HEAD:

<!--#include file="jsonObject.class.asp" -->


you can get this file from my site HERE

now the processing code to handle the Recaptcha JSON response:


If Request.ServerVariables("REQUEST_METHOD") = "POST" Then
 Dim recaptcha_secret, sendstring, objXML
 
 recaptcha_secret = "your secret key goes here"

 sendstring = "https://www.google.com/recaptcha/api/siteverify?secret=" & recaptcha_secret & "&response=" & Request.form("g-recaptcha-response")

 Set objXML = Server.CreateObject("MSXML2.ServerXMLHTTP")
 objXML.Open "GET", sendstring, False

 objXML.Send
 
 set jsonObj = new JSONobject
 set jsonArr = new jsonArray


 jsonString = objXML.responseText
 
 set outputObj = jsonObj.parse(jsonString)  
 
 
 if jsonObj.value("success") then
  Global_Msg="Captcha GOOD!"
 else
  Global_Msg="Invalid Recaptcha Response."
 end if
 
 Set objXML = Nothing
End If

if Global_Msg<>"Captcha GOOD!" then
%>
invalid RECAPTCHA response.  Hit back and try again.
<%
response.end

end if


For your convenience, here is all the code inside one ZIP file.


Let me know if this helped you!


Cannot browse network neighborhood under Windows 10 Fall Creators update 1709 and newer

Once again, Microsoft has thrown a monkey wrench into the operation of how your network neighborhood (or “Network”) item under Windows 10 works.

I had previously created this blog post which addressed the initial issues with Windows 10 not allowing the Network to show a list of all your local computers.

Well, due to the Fall Creators update and versions 1709 and later, Microsoft has moved even further to stop the use (and functionality) of the Network icon inside windows explorer.

Microsoft has completely disabled (and removed) SMBv1 in Windows 10 (and modern Windows Server 2016) starting with the FALL CREATORS UPDATE build 1709 and later.   This in-effect completely disables the ability for your NETWORK item in Windows Explorer to populate a list of your local network computers.

I manage several small networks and it is EXTREMELY helpful to be able to browse a list of all the local computers.

To fix this issue, go to WINDOWS FEATURES (just use Cortana and type in windows features), expand SMB 1.0/CIFS File Sharing Support

CHECK: SMB 1.0/CIFS CLIENT and SERVER

click OK

it will prompt you to reboot

when you’ve rebooted, go to windows file explorer and click on NETWORK.  you may need to hit the refresh icon, but it should pull the list of all local PC’s and magically your network neighborhood will now work!


**Note: if you try this and it still doesn’t work, make sure you do the registry entry on my prior blog post (link at the top of this post).  You will need to add that registry key and reboot.


1080p HDTV as second monitor display blinks on and off while watching video

I have a second monitor which is a Philips 1080p 40 inch TV (that I switch the HDMI inputs to alternate between cable and a second monitor).

When I play streaming video from YouTube on the monitor, the display blinks on and off continuously.  This does NOT happen when using the Philips for TEXT displays (outlook, explorer, etc.)

The fix is easy.

First, make sure your second monitor (HDTV) is in “PC” mode. (This is not the fix in itself).

Secondly, I have the most current NVIDIA drivers installed.

Go to NVIDIA CONTROL PANEL (right click on an empty desktop)

Click ADJUST DESKTOP COLOR SETTINGS

click on your secondary monitor name (in my case, PHILIPS)

You will see a dropdown box appear.

Set “content reported to the desktop” to “Desktop Programs”.


That’s it.

Your secondary monitor should now be rock stable while watching videos.


let me know if this helped you!

Adding DKIM records to Kerio Connect

If you want to implement DKIM (signed email) to your Kerio Connect setup, here’s the easy way.

Start by reading these links

Kerio link 1

Kerio link 2

The following setup is for Kerio Connect 9.x, and Windows Server 201X DNS server

  1. Make sure your email server is properly connected to a good public DNS server, such as Google (8.8.8.8 and 8.8.4.4.)
  2. Go to Kerio Connect, Configuration, Domains.
  3. Click SHOW PUBLIC KEY and copy it.
  4. paste it into notepad.  We’ll need to rework it a bit to be compatible with Windows DNS.  Note:  Windows DNS limits the length of one single string of characters, so we’ll need to split it into several lines.
  5. Reformat it like this.  Break it into even lines, around 100 characters each.  The exact length doesn’t matter.  Just do it evenly, hit enter at each breakpoint.
  6.  NOTE:  make SURE there is a SPACE between the semicolon and the p
    1. as in v=DKIM1; p=xxxx
  7. example properly reformatted
  8. Copy this reformatted string
  9. Go to the domain in your Windows DNS server.  For example, if your domain is mydomain.com go to that domain in the DNS Server management console.
  10. right click, other records, add TXT record
  11. Record name is:  mail._domainkey
  12. after you enter that, you will see the FQDN look like this:
    1. mail._domainkey.mydomain.com
  13. Paste the string from #7 above into the text box, as-is.
  14. Hit ok and save that change.
  15. repeat this for any other domain.  On Kerio Connect, all the domains on the one email server use the exact same DKIM keys.
  16. Now we are going to test the DKIM record to make sure it can be properly read.
    1. go to https://mxtoolbox.com/
    2. type in your domain
    3. hit check MX
    4. when that completes (successfully), change the drop down to “DKIM Lookup”
      1. type in your full DKIM string:
      2. mail._domainkey.mydomain.com.
    5. Run the DKIM Lookup
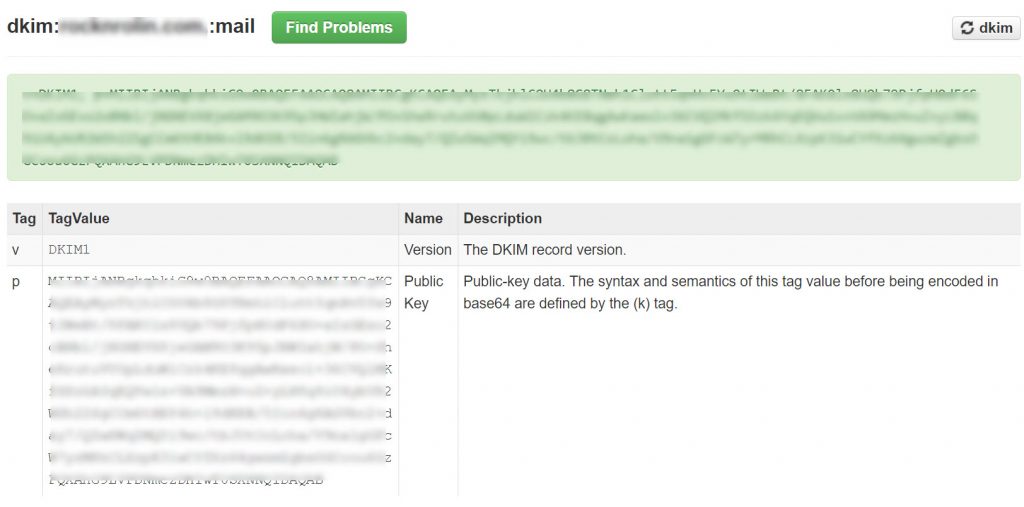
    6. You should see a successful test, and your report should look just like this:
    7. if it doesn’t look like this, then you did something wrong with your TXT record creation, or you forgot to put the entire DKIM key in the lookup.
    8. Since all is well, proceed.
  17. next, go back to Kerio Connect.
  18. while still on the domain, check the checkbox to enable DKIM
  19. If the DNS on your email server is setup properly, and it is communicating properly to your DNS server, you should see the box above.
    1. If you see a message “DKIM public key not found in public DNS”
    2. try restarting KMS
    3. Try going to a command prompt and ipconfig /flushdns
  20. Presuming that you do see the proper message in #18 above, we now need to do a test email to verify everything is working.
  21. Go to http://www.appmaildev.com/en/dkim
  22. click next step
  23. the site will generate an email address
  24. copy this email address and send a blank email to that address FROM AN EMAIL ACCOUNT ON THE DOMAIN you setup with DKIM above.
  25. Wait for the site to receive the email and generate it’s report (a few seconds)
  26. you should see DKIM = PASS


While you’re at it, don’t forget to create SPF and DMARC records for your domain to cover all the bases.


Proper DNS configuration for iPhone and Exchange Autodiscover

In order to get Autodiscover to work properly on your iPhone when doing an “Exchange” setup, you need the correct DNS records.

**note: I am assuming you already have a proper SSL cert on your email server, have the correct ports opened (80, 443m 587) and you KNOW your email server is working properly.  You’ll also need a standard MX record that points at your server.


Additional DNS records needed to make autodiscover work on an iPhone:

Create an SRV record with the following settings (on each domain you want autodiscover to work)

Service:  _autodiscover

Protocol: _tcp

domain: your domain (this should be prefilled under windows server when setting up the SRV record)

Priority: 0

Weight: 5

Port: 443

Target:  the mx record name for your server, for example, mail.yourdomain.com  (this MUST match the MX record name)


One more record needed:

Create an A record called autodiscover and point it to the same IP as your MX record IP address.


** at this point you are at the mercy of the public DNS servers expiring their cache and catching the new records.


iPhone Setup

on your iPhone, add email account, pick Exchange

type in the email address and password.  description (whatever you want here)

hit Next

At this point, one of two things may happen:

  1. you may get a server warning message.  if you do, click CONTINUE
    1. when you do that you (should) go right to the “Exchange” screen in #2 below.
  2. you may go directly to the “Exchange” screen with radio boxes for mail, contacts etc.

If you get the dreaded “server name” screen instead, this means your phone is not picking up the most current DNS settings.

Try it again later…

These settings have been tested and confirmed, so it does work – but like I said you have to wait for the DNS settings to get updated by whatever DNS server you are using.  If you have your TTL set very high (hours or a day) you may have to wait a day for this to work.


TEST YOUR AUTODISCOVER SETUP:

https://testconnectivity.microsoft.com

go to the above URL and run the “Outlook Autodiscover” test.

You’ll need to enter in an actual mailbox account username and password, but it will fully test your setup and verify that autodiscover is properly setup.


Quick Migration of Windows Server 2008 R2 Hyper-V to Windows Server 2012 or 2016

Here are the proven and tested steps for migrating from Windows Server 2008 R2 to Windows Server 2012 or 2016.  Note:  You cannot IMPORT a VM from 2008 R2 into 2012 or 2016, so you have to do the whole process manually.  That’s the reason for this post.

  1. log into the existing 2008 R2 virtual machine and note the following
    1. memory and CPU config
    2. IP addressing information (you need all the IP information, static IP’s etc.)
  2. Shut down the 2008 R2 virtual machine
  3. copy the VHD from the 2008 R2 virtual machine to the new host.
  4. On the new host open Hyper-V manager
    1. Edit disk
    2. select the VHD
    3. CONVERT to VHDX
    4. this will take a while
  5. When that completes, create a new VM
    1. DO NOT attach the hard drive.  Select “add a HD later”.  (I have seen issues with attaching the hard drive as part of the setup here, so I skip it and do it separate)
    2. Generation 1 VM
    3. set the memory and CPU configs
    4. complete the VM creation
    5. edit the VM and attach the VHDX file as IDE 0 master
  6. Using the Hyper-V remote control interface (by double clicking on a VM)
  7. Start the new VM
  8. boot into windows
  9. while on the desktop, after ~15-60 seconds you might see a “REBOOT” notification after changes are made to the OS.  If you get this notification, go ahead and reboot.  Otherwise, continue on.
  10. at this point in the Hyper-V manager, you need to double click on the VM and remotely control it through the Hyper-V manager
  11. while you are logged into the VM as administrator and at the desktop, insert the Hyper-V integration tools disc and upgrade the Hyper-V tools
  12. reboot when that completes
  13. log in again to the machine through the Hyper-V remote control interface
  14. edit the network adapter properties and set it exactly as it was before.
    1. Note:  During this whole process your OLD NIC will be hidden (because it’s gone now) and you will be given a new NIC and it will be in DHCP mode from the start.
    2. you will need to edit that new NIC and put in the correct static TCP/IP information if applicable to your setup.
    3. ALL OTHER settings (machine name, IIS, DNS, etc.) will retain fine.  Just edit the NIC and config the NIC the same way it was on the old VM


All done!

1 2 3 4