Category Archives: Random Bits

reCAPTCHA in SSL – Changes coming – update your code

Important news for developers using reCAPTCHA on your sites.

If you are currently using http://api.recaptcha.net/challenge?k=XXXX and you need to implement reCAPTCHA on an SSL protected page — you need to switch the links to https://www.google.com/recaptcha/api/challenge?k=XXXYYYZZZ.

Per Google, this change went into effect April 2011.


Change from this (OLD) To this (NEW)
http://api.recaptcha.net/challenge?k=XXXX https://www.google.com/recaptcha/api/challenge?k=XXXYYYZZZ
http://api-verify.recaptcha.net/verify http://www.google.com/recaptcha/api/verify
http://api.recaptcha.net/noscript?k= http://www.google.com/recaptcha/api/noscript?k=


For more information, read this page


The device, \Device\Ide\iaStor0, did not respond within the timeout period

This is a brand new issue that I just came across while working on my new workstation, which has a 120gb OCZ Vertex 3 SATA 6.0 SSD drive as the primary boot drive into port #1 of the SATA 6.0 channel, running on a ASUS Maximus Extreme IV rev B3 motherboard running Windows 7 x64 Ultimate w/SP1.  The symptom is your PC freezing for around 30 seconds or more and then resuming normal operation.  I was getting these freezes throughout the first few days using this configuration.

The errors would also show up in the SYSTEM event log, called iaStor event ID 9.

The Solution:

In the BIOS, first make sure you are in AHCI mode.  Then choose HOT PLUG=ENABLED for your SSD boot drive (which should be on port #1 of the SATA 6.0 controller).

Save changes and boot up and your problems will be history.


Navigation bar missing from web site made in Publisher

Recently we were hired to fix two web sites that were designed in Microsoft Publisher and then output as HTML and uploaded to a server for a local business.  The problem is that since IE 8 came out (March 2009), both of these web sites – for anyone using Internet Explorer 8 (even using compatibility mode) – were completely missing the VERTICAL left hand navigation bars that were on each site.  When we tried the site under Firefox, Chrome or Safari, the site worked fine.  This is still a major problem because still a majority of users use IE for browsing and to them the site will be broken.

After spending several hours reseaching this topic as well as experimenting with the HTML code that is generated by Microsoft Publisher (absolutely BLOATED and HORRIBLE) – I figured out the solution to the issue.  Now keep in mind this is like putting a band-aid on the Hoover Dam to plug a leak, this should only be used to “hold over” the site until you get a “real” site designed by a company like Amixa.  I highly suggest you use this to only fix the site in the interim until you get that new site built.  Any site using Publisher is likely to suffer from horrible HTML bloat and horrible (or no) image optimization, so get off that site as soon as posssible so as not to drag down your SEO rankings any further.

Here is how to fix the issue.  (I will show you how to fix one page.  You can do the others yourself.)

  1. You will need Publisher installed onto your workstation  In my case I have the latest Publisher 2010.
  2. Download a full copy of the site to your computer.
  3. Make a backup copy into another directory.  We will only perform these fixes to the COPY.  Never erase the original in case you need to go back to it.
  4. Launch Publisher
  5. Go to file menu and OPEN up the HTM page (I am starting with the homepage, called index.htm)
  6. The page should open up perfectly and look “as it does”
  7. Locate the navigation element that is missing when you view the site under IE.  In our case it was a vertical element on the left side of the site.
  8. Hover your cursor over the upper left border of the navigation element.  When you do this the border should change into a “white and blue” striped edge.
    1. Publisher navigation border when you hover
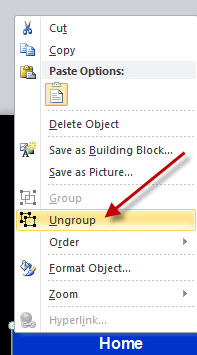
  9. Then carefully RIGHT CLICK and select UNGROUP
  10. As soon as you do that the navigation element will change into a bunch of individual elements with “dots”
  11. Go to file, Save As, select Web Page, Filtered.  Save the file OVER TOP of the original one.
  12. You will see that each time you complete this process for each page Publisher will generate it’s own image folder.  That’s ok.  We’re only using this as a temporary fix anyways.  Upload all the revised HTML pages and their image folders to the server.
  13. It’s not perfect but the site will work on all browsers again and buy you some time until the site is rebuilt.

Server name does not show up under Network

I recently came across this problem where one of our servers would not show up in the “browse list” under the “Network” icon in Windows 7.  I also checked this same issue from other computers Network Neighborhoods and verified it was just this one server “webserver6” which was not showing up.  We are in a standard Windows AD (Active Directory) network here with a DHCP and DNS servers and two domain controllers.  I checked all the settings on those boxes and they all looked fine, so I suspected the issue was solely with that one particular server.

I examined the server (a standard Windows 2008 server box), and all the settings looked fine.  Static IP (yes), correct DNS servers (yes), enable NetBIOS over TCP/IP (yes), so the problem must be somewhere else.

I then checked the services and found that the COMPUTER BROWSER service was disabled.  I set it to automatic and started the service.

Since this particular server is a virutal server under the latest version of Hyper-V.  I shut down the server and checked the settings in the Hyper-V manager.  I noticed that this particular server was set to a “DYNAMIC MAC” address.   I switched that to STATIC.

Rebooted my workstation and “webserver6”.  Wow!  The server now shows up under the Network list.

Here are the steps again in a more formal list:

  1. Check to make sure the server has a static IP
  2. Check to make sure the server is using the correct DNS server (probably your AD domain server)
  3. Make sure NetBIOS over TCP/IP is enabled
  4. Make sure the Computer Browser service is started and set to Automatic
  5. HYPER-V machines:  Check to make sure the network adapter that the server is using is set to a STATIC MAC address.  (Not sure if this one makes any difference, but that type of a server shouldn’t be using a dynamic MAC address anyways).
  6. Reboot the server in question and your local workstation
  7. Server should show up if all the above is OK.

ADDENDUM 12/6/2010:

Another thing to check is your Windows Firewall settings. I had another server that would not show up on the Network list until I turned off the Windows Firewall.  That wasn’t a problem for us because we have a separate firewall that protects our systems.  But you need to use your own judgement and take that action on your own choice.  We aren’t responsible for your systems so I would presume that you know what you are doing and the risks of disabling Windows Firewall.

Windows 7 to Windows XP “Access is denied” home office LAN networking issues

Are you having problems getting your home office LAN, with varying computers between Windows 7 and Windows XP to properly share files?

Here are a few quick tips & tricks to solve your issues (these are at a high level, so if you don’t understand these, ask a friend to assist you). These tips presume you are on a HOME or SMALL OFFICE LAN setup. DO NOT DO THESE if your machines are joined into a Windows domain.

  1. on the Windows 7 machine(s) disable homegroups
  2. on the Windows 7 machine(s), set a workgroup name, like your last name, for example “JOHNSON” (omit the quotes of course)
  3. on the Windows XP machine(s), set the SAME workgroup name as above
  4. Make sure each machine has a friendly computer name with no punctuation. Names like FRANK, workstation1, mypc, are good. Names like Ted’s Computer, My Windows 7 machine, etc. are bad and wont’ work. If necessary, update each computer’s network name to one without any spaces or punctuation like the example just listed. All of these network changes (WORKGROUP name change and computer name change may require reboots to each PC).
  5. on both machines, create a local user(s) with the same username and password. PASSWORD ARE REQUIRED to make this work. Presuming you have one account on the older XP machine that you are currently using, to the USERS area, assign a password, log out and log back into the XP maching using that username and password. On the Windows 7 machine, go to the users area and setup the SAME USER and password.
  6. no other changes including firewall changes should be needed.
  7. if you are the only person (or if there is only one person and one user account) using each computer on the LAN, you can setup “automatic login” on both machines. Google “automatic login” for directions, so that you don’t have to login each time you boot, on each machine.
  8. create a share on each computer. It’s up to you if you want to allow read only or full access to each share. Make sure you “add users” and add all the user(s) that you created above to the permitted user list for the share.

If you’ve done all the above, and have logged out and logged back into the newly password protected accounts, you should be able browse the network, map a network drive, etc.

to do this open up Windows Explorer (the file manager, not Internet Explorer!). Expand out the network, Microsoft Windows network, your network name and you should see your computer names showing up.

Alternatively in the address bar type in

\\mypc1\ and hit enter and see if the SHARES show up. Right click on a share and “MAP NETWORK DRIVE” to allow a drive letter to show up on your Windows Explorer.

New windows in Internet Explorer opening not full screen

Is Internet Explorer driving you nuts by opening up in a smaller window, offset from center on your screen, when it should be opening full-screen?

Yes, this is a really annoying “feature” in IE, and it is not easy to figure out how to get IE to stop opening windows in this small mode. This often happens if you click the “restore down” window and resize the window smaller. From that point on every window you open will be in this new small size.

How to fix this…?

1. Close all existing IE windows
2. Open a single new IE window. Maximize the window and go to any web site like www.google.com
3. Make sure the site loads fully.
4. Click the “Restore down” icon. This is the second button from the right in the top right of the IE window. This will pop the window down to the smaller size.
5. Now grab the window top bar and move it up to top of the screen and grab the bottom right and expand out the window to manually resize it to full size on your monitor.
6. Close this window.
7. Open IE again.
8. RIGHT click any link and “open in new window”. New pages should now open full-size.

Getting your old Logitech webcam videos working on Windows 7 x64

So, do you have old AVI videos from an old USB or Parallel Logitech web cam? I did, and I happened across them recently – but they won’t play in Windows 7 because the CODEC’s cannot be found.

These videos dated to around 1998 and I wanted to watch them, however I could not figure out how to get the video working under Windows 7 x64 due to the obvious codec issues. After much research, I found out that the correct codecs to play my videos – specifically the Intel Indeo IV41 codec – are indeed present in Windows 7, but they are not hooked into the registry.

(NOTE – ONLY FOR Windows 7 x64). You’ll need a different solution for x86 Windows 7. ** use at your own risk, of course.

Download This File, unzip and DOUBLE CLICK to load the settings into your registry. A reboot may be needed.

When you are done, double click on the AVI files from your old Logitech webcam and the videos should play fine!

I hope this saves some of you time – it took me a few hours to track this down.

SSL Weak Encryption Algorithms – how to disable them under IIS

Chances are if you are reading this you’ve failed a “Trustkeeper Scan” – with “Low severity” – due to having weak SSL encryption algorithms enabled on IIS.

It’s pretty easy to solve this, but if you read the microsoft KB article it looks pretty complicated.

Launch regedit and go to this key:

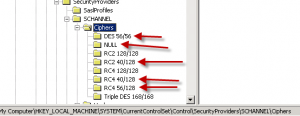
HKEY_LOCAL_MACHINE\SYSTEM\CurrentControlSet\Control\SecurityProviders\SCHANNEL\Ciphers

You basically want to disable everything that has less than 128 bit encryption.  On one of my servers, the ones with red arrows below need to be disabled:

CLICK FOR LARGER IMAGE

CLICK FOR LARGER IMAGE

So on each one of these, you want to “Right click”, add a DWORD, name it “Enabled” and set the Hex value to 00000000  (eight zeros).

Repeat for each one that has less than 128 bit length, and then restart your server.

You probably also need to reschedule a security scan so that your changes can be verified, and as always, please double check your SSL protected site with at least two different web browsers and make sure you can get into SSL mode with them both on your site.

1 2 3 4