Author Archives: The Amixa Web Guru

Wp-Recaptcha 4.0 and 4.1 with WordPress ERROR: Global site keys are not supported

If you have upgraded to WP-Recaptcha 4.0 or 4.1 and are now receiving this error message

ERROR: Global site keys are not supported

There are issues with the 4.0 and 4.1 WP-Recaptcha plugins.

Read here


Solutions:

1) roll back to 3.2.  Download it from me, here
2) change plugin to something else

** DO NOT UPDATE To 4.0 or 4.1 if you are using WP-RECAPTCHA

How to prep a Windows 2012 R2 Update 1 server for PHP / WordPress

1) Presuming you have already loaded the OS onto the machine (whether virtual or physical)
2) Join the machine to your business domain
3) windows updates
4) reboot
5) windows updates (again until no more updates)
6) configure role -> Web server and under Application Development, pick .NET Extensibility 3.5
7) once that is complete, run windows updates again
8) probably you’ll need to reboot
9) check windows updates ONE MORE TIME
10) install the Web Platform Installer (version 5.0 as of this post), from here: http://www.microsoft.com/web/downloads/platform.aspx
11) after the WPI is installed, run it and choose the following: PHP 5.6.0 (or later), Windows Cache Extension 1.3 for PHP 5.6, PHP Manager for IIS
12) install those programs, when complete, open the IIS manager
13) verify that you see the following: URL Rewrite, PHP Manager under the main server features panel
14) download the latest version of PHP. (for me, it was 5.6.3)
15) unzip and move it to a new folder under “Program Files (x86)”\PHP\ called v5.6.3 (you should see v5.6 in there).
16) Make a folder called PHP-TEMP on the C:\ root
17) Give it the following permissions, IUSR and IIS_IUSRS to full control
18) Go to the PHP manager and register the new version
19) in the PHP manager, go to Manage all Settings and update the following:
Error Log -> PHP-TEMP directory
Memory_limit = 512mb
Post_Max_size = 10M
upload_max_filesize = 10M
upload_tmp_dir -> PHP-TEMP directory
SMTP->your internal email server IP
session.save_path -> PHP-TEMP directory
==
20) stop the default site
21) create your new site
22) make sure a static IP is assigned to the server for step 21
23) make sure firewall rules are in place to permit traffic to that IP
24) move or deploy the new wordpress site
25) adjust IIS settings-> Logging location and daily roll over, URL Rewrite rules for domain name and wordpress
26) you should have a web.config file from a previous (working) wordpress install. Use that for the above two things.

>more to come<

ASPMAKER CKEDITOR fonts and font sizes and font colors…

By default, ASPMAKER 11 (and higher) come with the basic CKEDITOR toolbar.

If you wish the full capabilities of CKEDITOR:

1) deploy out your normal ASPMAKER project folder to the web server

2) go to http://ckeditor.com/addons/plugins/all and use the “CKBUILDER” on the right side to build out your custom build of CKEDITOR (I just took “everything”).

3) save the file

4) extract, and overwrite your existing CKEDITOR file inside the ASPMAKER folder on your server.

5) edit the CONFIG.JS file and add this line    config.allowedContent = true;

that will make sure you can save HTML without certain tags getting stripped out.


How do you make an MP3 into a Podcast on iTunes?

very easy… first import your MP3’s into your local song library within iTunes.

Select all the MP3’s you want to reclassify as Podcasts (and use the Podcast app).

Right click and “Get Info”

Go to the OPTIONS tab

select the “Media Kind” drop down and choose “Podcast”

all the selected MP3’s will now be moved over to Podcasts in your library.

You can now choose to sync them to your Apple device and use the Podcast app to listen.

media kind

CKEDITOR 4.2 or later will not allow iframe (or other html tags)

Very easy fix.

Edit the config.js file (inside the CKEDITOR directory)

add

config.allowedContent = true;

before the close bracket tag.

save the change.

Edit the ewcfg11.asp (or slightly different filename depending on your version of ASPMAKER)

set this line to FALSE:

Const EW_REMOVE_XSS = False ‘ True to Remove XSS / False to skip

quit the open web browser (all open instances of that browser).

launch the browser.

retry pasting IFRAME code into SOURCE on CKEDITOR.  Should work now.


ASPMAKER v11 Image Resizer not working under IIS

If you are using ASPMAKER by HKVSTORE to build web admin interfaces, and you’ve arrived at this page, it’s likely because the Image Resizer ASP.NET add-on is not working for you.

Does this look familiar to you?

Warning: ASP.NET 2.0 or later is required but ASP.NET script is not executed properly on this server:

see this screenshot:2014-07-08_15-47-49
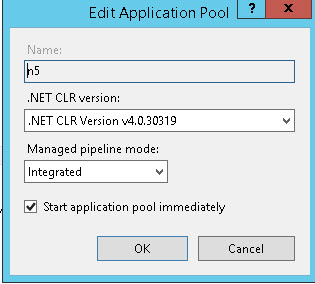
Here is the solution to the issue.

  1. You need to have a HOSTS file entry on the server that will allow the server to resolve the domain name for the website you are using ASPMAKER and the Image Resizer on.  This is because the ASP.NET resizer uses MSXML2.ServerXMLHTTP to locally fetch and resize the image.  If there is no HOSTS file entry on the local server, there is no way for the resizer to work.
  2. Open the HOSTS file and add an entry like this
  3.  X.X.X.X   your.domain.name
  4.  Make sure the upload folder is set properly in ASPMAKER here:file temp
  5.  This path will be relative to the folder you have deployed the ASPMAKER files to on the server.  For example, if the ASPMAKER files are in the directory /123/ then the upload folder (pictured above) will be /123/upload-temp/
  6. set the permissions properly on the /upload-temp/ folder.  this means adding machinename\IUSR and granting full control.
  7. Inside ASPMAKER, make sure the destination folder is correct. Note I had to use “../” to get ASPMAKER to upload to the correct path off the root.  It is NOT necessary to grant this folder any special permissions.correct-path
  8. Make sure the base site itself has a valid application pool assigned.  Here’s what mine looks like (It is not necessary to have an application for the subdirectory where the ASPMAKER app). app
  9. NOTE: depending on your setup, it may be necessary to set the .NET CLR version to v.2.X above.  (I HAD TO USE v.2.X for my setup…)
  10. Adjust the maximum file upload size in ASP.  ASP->Limits Properties ->Maximum Requesting Entity Body Limit.  The default value is 200,000 (200000) which is 200,000 bytes.  I upped mine to 20,000,000 (leave out the commas here).
  11. Launch the ASPMAKER web admin and try uploading an image.  The above should take care of all the issues.

Let me know if this saves you a headache!


Permission denied error dealing with Classic ASP loadpicture

To solve the following error, which is generated by the loadpicture object

Microsoft VBScript runtime error ‘800a0046’
Permission denied: ‘loadpicture’

set myImg = loadpicture(“C:\aaa\asdf.jpg”)

==

The solution is to simply add this permission as full control

servername\IUSR

to the directory in which this object is going to work…

Quick change of Hyper-V UID – for Register in place VM

If you want to quickly create copies of one Hyper-V Virtual Machine, here is an easy process:

1) change the XML UID by editing the XML file within the Exported VM directory.
2) change the name to the new machine name (this is the XXXXX tag)
3) change the global_id
4) change the logical_id (to the new global ID)
5) save the file
6) rename the XML file to match the global ID
7) import – register in place (use the existing unique ID)
8) adjust any settings on the VM
9) start the VM

Inconsistent ping / inconsistent network connectivity on Hyper-V virtual machine

I recently came across this issue on one of my virtual server machines, where I just setup a brand new Windows Server W2K12R2 Update 1 virtual machine. It is currently in DHCP status soon to be set as a static IP.

With the client VM machine running (and while multiple other VM’s are running w/o any problems), I was experiencing the following:
1) inconsistent ping of the VM
2) inability to remote desktop into the machine (sometimes I could connect, sometimes I would not be able to)
3) DNS resolution issues with that VM

Here is my setup:
Windows Server 2012 R2, Update 1. Hyper-V 6.3.9600.xxxxx
Client: Windows Server 2012, R2, Update 1. Standard Server. Virtual Machine version 5, generation 2.

Network: High quality CAT6/Gigabit setup.

Here is what it looks like when I do a continuous ping of the virtual machine:

pings

After doing a LOT of troubleshooting / testing / trial & error, here is the fix:

This new VM has a “DYNAMIC” MAC address.  All the other VM clients on that server have STATIC MAC addresses.

I shut down the VM, adjusted the network settings (under ADVANCED) to a STATIC MAC.

Start the VM.

Login (via remote desktop while sitting on the Hyper-V server itself)

Do a continuous ping, and the issue is fixed!

Next, via Remote desktop into the hyper-v server and controlling the machine that way (not remote desktop connecting into the VM itself…) I switched the machine to a static IP, which was different than the DHCP assigned one.

Reboot machine (for the heck of it)

on my desktop, IPCONFIG /FLUSHDNS

(at this point depending on how your network is configured you may need to wait a bit for the DNS changes (IP change) to catch up so that your ping works…)

then try pinging the IP address (not machine name):  Works

try pinging the machine name: Works  (see above, you may need to wait a bit for your network to catch the DNS changes)

=

The above fix (changing to Static IP) alleviates the need to fiddle with the VM’s Hardware Acceleration settings, such as VMQ (Virtual Machine Queue) or the Enable IPsec task offloading.  On my Hyper-V server both of these are “CHECKED/ON”.


MYSQL import fails with “ERROR 2006 (HY000) at line 44: MySQL server has gone away”

Recently I was attempting to import a large (136mb) SQL backup for a new client.

I first created a database and db user in PHPMYADMIN (most current version).

Then using my Windows workstation, I launched MySQL Workbench 6.1 (my favorite tool for importing/exporting) and tried to do a Server–>Data Import.

Pointed it to the 136mb file and first had a problem:

17:45:03 Restoring Z:\whateverdatabase.sql Running: mysql.exe --defaults-file="c:\users\aaa\appdata\local\temp\tmp8pbfwe.cnf"  --host=192.168.x.x --user=root --port=3306 --default-character-set=utf8 --comments --database=btb-old < "Z:\\whateverdatabase.sql" ERROR 2006 (HY000) at line 44: MySQL server has gone away
Operation failed with exitcode 1
17:45:04 Import of Z:\whateverdatabase.sql has finished with 1 errors

Want an easy solution for this?  It turns out there is a limit in the MySQL database for the size of imports…

Run this SQL statement against the MySQL database:

SET GLOBAL max_allowed_packet=250x1024x1024;

In my case, I picked a size (250mb) (above) that is larger than my SQL import.

Execute that script.

Re-run the import.  Works perfectly!

17:47:42 Restoring Z:\whateverdatabase.sql
Running: mysql.exe --defaults-file="c:\users\aaa\appdata\local\temp\tmpwpesfe.cnf"  --host=192.168.x.x --user=root --port=3306 --default-character-set=utf8 --comments --database=btb-old < "Z:\\whateverdatabase.sql"
17:50:18 Import of Z:\whateverdatabase.sql has finished


1 3 4 5 6 7 10