IOS GAMECENTER WHITE SCREEN FIX – Copyright © 2016 – Shane Rolin / Amixa LLC
In late February, my iPhone 6+ (128gb) with IOS 9.0.2 started to have hiccups when launching into any game which was tied into a GameCenter account. For me, this meant that the following game apps had problems and were not playable:
- Madden 2016
- Dungeon Heroes 5
- NHL Gamecard
- Star Wars Game of Heroes
By March 1, I was no longer able to play ANY GameCenter-tied game. Nor was I able to get into the GameCenter app – it would hang at a white screen, and I could not get into the Settings – >GameCenter area either – same thing, hung at a white screen.
I tried rebooting, doing all sorts of other things like putting it in Airplane mode and trying to go to Settings and signing out of GameCenter – which would fail.
So for about the last 2+ weeks I have been locked out of a number of games.
For example, on Star Wars-Game of Heroes, the game would freeze at the “Loading Cantina” screen.
In NHL GameCard, the game would not log into GameCenter.
In Dungeon Heroes 5, it would hang about 1/8 into the loading bar.
I went to the Apple Support forums and posted. Read tons of posts as well.
Apple told me to wipe the phone and restore it, and upgrade to 9.2.1. That’s ridiculous since I saw plenty of users who were on 9.0.2 through 9.2.1 and they all had this issue, so the problem is NOT tied to 9.0.2. I also read how users upgraded from 9.0.2 to 9.2.1 and the problem still is present.
My phone is jailbroken, but this problem affects all phones, stock and jailbroken.
Well after some poking around I have SOLVED the problem, and now my GameCenter, all games, the GC app and settings are all working.
I decided to poke around inside the IOS file system and see if I could track down where the GameCenter app and/or temporary files were stored. After a lot of looking around and searching the IOS file system, I came across the “GameKit” User Library, which seemed to contain quite a bit of “temporary” files. HMMM… I wonder if eliminating those files would clear up our issue?
Here is the fix (you must have a jailbroken phone)
- I am not responsible for your phone, so if you screw this up, it’s on you, and not my fault.
- Back up your phone in iTunes first
- You will need access to the RAW file system on your phone. You can do this via several methods:
- Install OpenSSH and SSH into your phone from a computer
- iFunBox
- iFile or any other app that gives you FULL file system access to the machine.
- Go to the following path
- /private/var/mobile/Library/GameKit
- you can also get there via
- User -> Library -> GameKit
- Back up your entire GameKit directory to your local PC. Should only take a few seconds. (this is easy if you are using SSH or iFunBox). This backup is just in case something really goes wrong. You’ll probably wind up deleting these backup folders once you get your phone working.
- on your phone, delete any loose files inside the root of the GameKit directory. here is what mine looked like:

- Next, go inside the “DelayedRequests” folder. I had 65 folders (and many other files and within each of these). Mine looked like this:
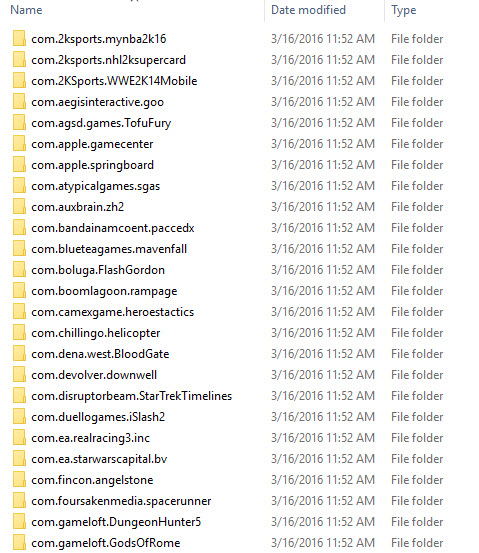
- select all those folders inside “DelayedRequests” and delete them all.
- Now your entire “GameKit” folder should contain only the “DelayedRequests” folder and nothing else at all (just an empty folder and one directory, no other files).
- At this point I reset my iPhone HOME+POWER and let it reboot.
- After reboot, logged in and went to the GameCenter app. WORKS!
- Went to the GameCenter Settings app – WORKS!
- Launched all the games above – WORKS!
So what this means to me is that there is some corruption of data in these files inside the “GameKit” and/or “DelayedRequests” folders.
Wiping them out of Gamekit does NOT wipe your saves or anything else, it just clears out this cache of files and lets your phone start building a fresh set.
If this has helped you, please reply and let me know!
IOS GAMECENTER WHITE SCREEN FIX – Copyright © 2016 – Shane Rolin / Amixa LLC