Category Archives: Random Bits

Wp-Recaptcha 4.0 and 4.1 with WordPress ERROR: Global site keys are not supported

If you have upgraded to WP-Recaptcha 4.0 or 4.1 and are now receiving this error message

ERROR: Global site keys are not supported

There are issues with the 4.0 and 4.1 WP-Recaptcha plugins.

Read here


Solutions:

1) roll back to 3.2.  Download it from me, here
2) change plugin to something else

** DO NOT UPDATE To 4.0 or 4.1 if you are using WP-RECAPTCHA

ASPMAKER CKEDITOR fonts and font sizes and font colors…

By default, ASPMAKER 11 (and higher) come with the basic CKEDITOR toolbar.

If you wish the full capabilities of CKEDITOR:

1) deploy out your normal ASPMAKER project folder to the web server

2) go to http://ckeditor.com/addons/plugins/all and use the “CKBUILDER” on the right side to build out your custom build of CKEDITOR (I just took “everything”).

3) save the file

4) extract, and overwrite your existing CKEDITOR file inside the ASPMAKER folder on your server.

5) edit the CONFIG.JS file and add this line    config.allowedContent = true;

that will make sure you can save HTML without certain tags getting stripped out.


How do you make an MP3 into a Podcast on iTunes?

very easy… first import your MP3’s into your local song library within iTunes.

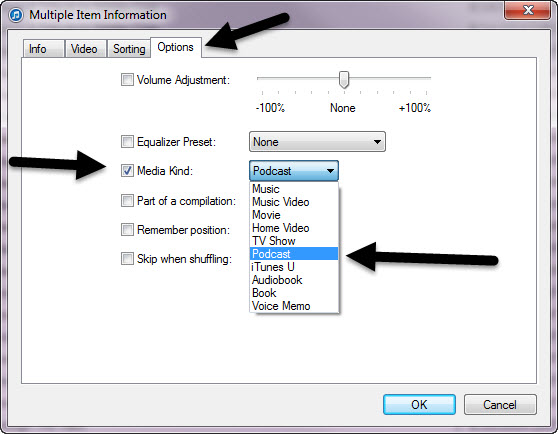
Select all the MP3’s you want to reclassify as Podcasts (and use the Podcast app).

Right click and “Get Info”

Go to the OPTIONS tab

select the “Media Kind” drop down and choose “Podcast”

all the selected MP3’s will now be moved over to Podcasts in your library.

You can now choose to sync them to your Apple device and use the Podcast app to listen.

media kind

CKEDITOR 4.2 or later will not allow iframe (or other html tags)

Very easy fix.

Edit the config.js file (inside the CKEDITOR directory)

add

config.allowedContent = true;

before the close bracket tag.

save the change.

Edit the ewcfg11.asp (or slightly different filename depending on your version of ASPMAKER)

set this line to FALSE:

Const EW_REMOVE_XSS = False ‘ True to Remove XSS / False to skip

quit the open web browser (all open instances of that browser).

launch the browser.

retry pasting IFRAME code into SOURCE on CKEDITOR.  Should work now.


iPhone iPad Find My Friends ME photo picture is missing

Are you having an issue with the FIND MY FRIENDS app not showing your photo?

I am on IOS 7.x and have this problem on two phones.  This is how I solved this issue.

Here are several steps to remedy this:

  1. under Settings->Mail, Contacts, Calendars go to “My Info” (near the bottom) and select a contact you’ve created for yourself under CONTACTS.  If you don’t have a contact, create one.  Take a pic and assign it to the contact.  This probably won’t be the pic that will be used in the FIND MY FRIENDS, but put one there anyway
  2. Go to settings, then select General, select Siri, then click on “my info” and choose yourself from the contact’s list
  3. This should be the final fix.  Go to settings>Facebook and delete the account info (no need to delete app) then sign in again and verify and when you log in to find my friends your face book profile picture should be there. Make sure you’ve selected your info in settings so your own contact shows “me”.
  4. Quit out of all apps, launch FIND MY FRIENDS and see if your picture shows up.

The above solution fixed two of my iPhones which are on IOS 7.X


How to get multiple xbox 360 consoles inside one LAN working properly

We recently added a second xbox 360 into our house and came across the dreaded NAT TYPE “moderate”.  I needed both xbox’s to get to “OPEN” NAT type so that online multiplayer games will function perfectly, but had to invest multiple hours of time into the process to work it all out.

The main factor for me is that I need a firewall that supports both multiple game consoles, as well as the ability to do site-to-site VPN via the firewall.

I tried the following firewall setups:

  1. Watchguard XTM 33-W (latest firmware as of 12-31-2012).  No Go.  Tried multiple configurations, not able to get both XBOX’s to “open”.  This included port mapping, adjusting content filtering, etc.
  2. Monowall.  Latest version as of 12-31-2012.  No go.
  3. Smoothwall Express 3 SP 3.  No go.
  4. pfsense 2.02 – WORKED!
    1. Here is what I did:
      1. Install SATA drive into an Optiplex 745.  Installed two Intel 1000GT desktop adapters.
      2. Download the pfsense LIVE ISO image and burn to a CD.  In my case, the image name was pfSense-LiveCD-2.0.2-RELEASE-i386.iso.gz
      3. Boot the CD and install pfsense to the SATA drive.
      4. Configure pfsense (set the WAN and LAN adapters)
      5. boot pfsense, log into the web admin and make sure the house has internet connectivity.  (it did).
      6. Make sure your xboxes are on DHCP (obtain IP automatically)
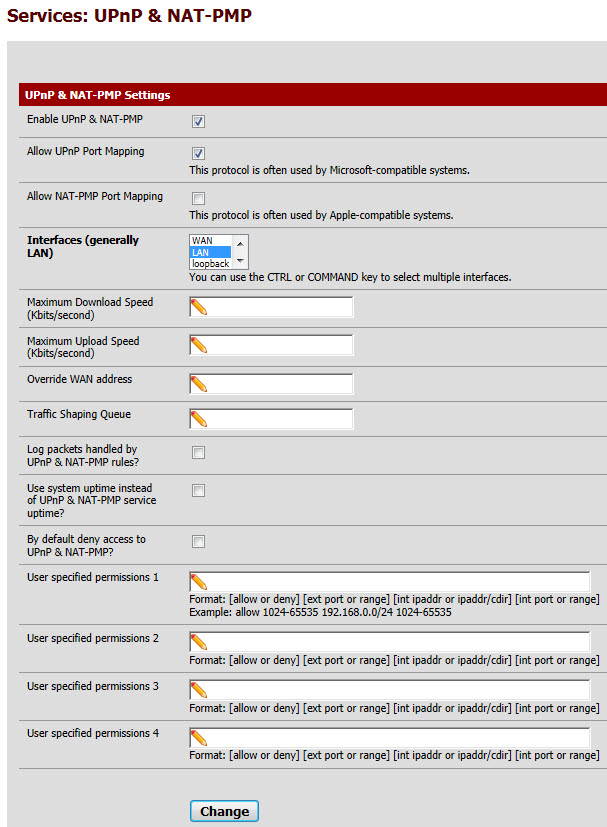
      7. in the web admin of pfsense, go to SERVICES->UPNP and configure as follows:
      8. upnp
      9. click CHANGE.
      10. you can now play 2 or more Xbox 360’s inside your LAN without a problem.
      11. To look at the UPNP status, go to STATUS->UPNP.  when your Xbox’s are online, you will see entries here for UPNP port mapping.
    2. Note:  This will also work fine for the SONY PLAYSTATION PS3.
      1. To configure/Enable UPNP for the PS3:
      2. Settings/Network Settings/Internet Connection Settings/Yes
      3. Custom (Setting Method)
      4. Go through all menus (to the right) and the last page is ENABLE UPNP.  Enable it.
      5. Test the connection and you should now have NAT TYPE 2.
    3. As far as the SONY PLAYSTATION VITA goes, I have not yet been able to get that to “NAT TYPE 2” — it does not as of firmware 2.02 on the Vita support UPNP, and I cannot use port mapping/port forwarding as that would interfere with the PS3 setup.

If you are able to get a Playstation Vita working with NAT TYPE 2 using PFSENSE I would appreciate knowing your exact setup.

UPDATE April 26, 2013:

Upgraded to PFSense 2.0.3.

My current configuration (Which is working perfectly) is as follows:

1) DHCP server ON inside PFSENSE.  Both XBOX’s assigned a static IP (VIA DHCP MAC ADDRESS RESERVATION) so that their internal IP’s stay fixed. (Note:  One of my XBOX’s is a newer black wireless model, the other is an older White model with the USB Microsoft Wireless adapter).  I use a high end MERAKI wireless access point to get them into my LAN.

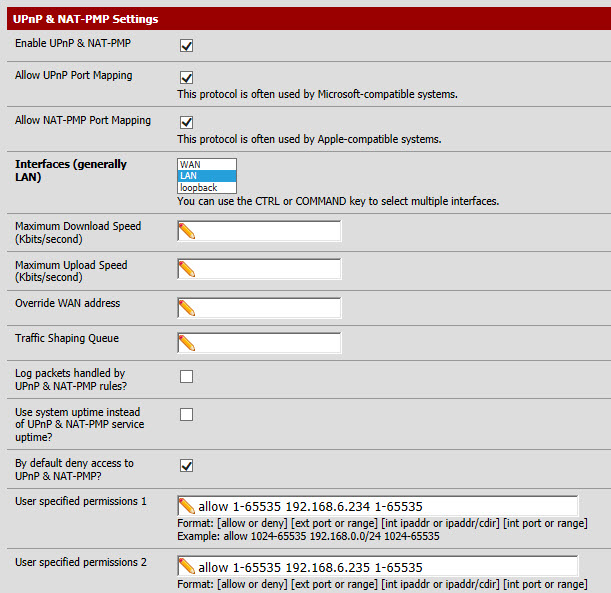
2) These are my UPNP Mappings (note my two XBOX’s are 192.168.6.234 and .234).

These settings work perfectly – OPEN NAT and my kids have played HOURS on this configuration.

upnp-04-2013


How to use Google Fonts under both SSL and non-SSL without SSL insecure messages

The fix for this is very simple and will work under all the common browsers.  This has been tested on IE9, Firefox 13, Safari and Chrome.

locate this line on your HTML page (or template):

<link href='http://fonts.googleapis.com/css?family=Dosis:400,700' rel='stylesheet' type='text/css'>

and change it to this:

<link href='//fonts.googleapis.com/css?family=Dosis:400,700' rel='stylesheet' type='text/css'>

This simple change will make your browser call the Google Font page in the applicable mode (HTTP vs HTTPS).

Enjoy!


NVIDIA Geforce 480 core clock drop to 405mhz v270.61 v275.33 CUDA

We participate in the BOINC CUDA project to use idle CPU and GPU time for scientific research purposes.

We recently updated to the newest NVIDIA drivers for Windows 7 x64 which are version 270.61.

After doing this we noticed the core clock on our NVIDIA Geforce 480 would drop from a standard or overclocked speed, down to 405mhz.  The core clock would stick there and the only way we can get it back is to reboot that machine.  Then after a few minutes again running the BOINC app, the core clock would drop to 405mhz again.  (We can see this because we use the MSI Afterburner 2.1 app, which has a nice real-time graph that shows current clock, memory and GPU utilizations among other things and also allows you to overclock the card.)

It turns out that there is some new “feature” (or bug) in the NVIDIA v. 207.61 drivers that is causing this issue.

Our solution was to uninstall the 270.61 drivers, restart and then install v266.58 drivers (which are the ones that preceeded 270.61).

After a reboot and more testing the core clock speed stay at the factory default speed (700mhz) or at our designated overclocked speed, without ever dropping down to 405mhz.

Apparently this is a widespread issue and users playing 3D based games also experience this issue as dropped frame or sluggish framerates while gaming… those users should also think about reverting to 266.58 until NVIDIA gets this sorted out.

We’ll have more information after we test the next version of NVIDIA’s drivers.


UPDATE 06/22/2011:  The same “clock drop” is also experienced on the most current NVIDIA 275.33 drivers.  Don’t use those if you plan on using CUDA.

ASUS G73 G73jh ATI 5870 GSOD Grey Screen of Death – FIX

One of the computers in our office is an ASUS G73jh which is a powerful laptop we use for testing sites and on-location visits to clients. We usually keep the very latest Windows 7 updates and ATI video card drivers (11.4) on the machine. Recently we noticed the machine locking up after a few minutes running 3D graphics. The only recovery is to hold down the power button and power cycle the computer. The issue was easily replicated using FURMARK or BURN IN TEST. After much research we determined this is the infamous GSOD or “Grey Screen of Death”.

This is what it looks like:
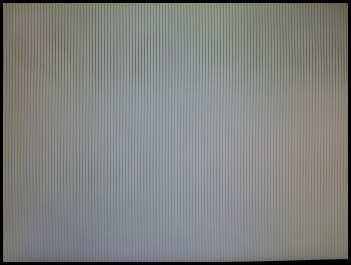
ATI 5870 GSOD Grey Screen of Death

ATI 5870 GSOD Grey Screen of Death

We tried everything to eliminate this issue that we could think of, even uninstalling the current video card drivers and going back to the ones on the ASUS site which are from 2009. Nothing would cure this issue, so we RMA’d the laptop back to ASUS. A week later we get the laptop back with “all tests passed, no problems” and the machine had been wiped back to the factory OS defaults for Windows 7 Home Premium.

At that point I reloaded the FURMARK and BURN IN TEST applications on the laptop, and guess what – it did not go into GSOD when running 3D. Now I immediately thought this is a driver issue with the video card, because I was trying to use the latest ATI Cataylist drivers, and this wiped laptop had a clean set of factory drivers. Not wanting to keep 2+ year old drivers on my laptop (which was purchased mid 2010), I set out to try and get to the bottom of the issue.

I found two forum sites with hundreds of pages of user posts on this exact issue. First one Here Second one here

The issue is that the video BIOS on the onboard 5870 video card is old and is not compatible with the latest ATI drivers, so what needs to happen is you have to do is flash update your video card and then install the latest video drivers from ATI (in my case they were version 11.4) from the ATI SITE here.

Here is the path I would recommend:

  1. download the modified, fixed video BIOS for the ATI 5870 from this post here
  2. Make sure your G73 has the latest system BIOS (current version is 213), if not, update your laptop to the latest system BIOS FIRST
  3. Extract the video BIOS files to a bootable USB stick and follow the directions on this page to flash the modified updated video bios
  4. At this point your G73 should have the latest video BIOS and system BIOS
  5. Boot the laptop. If you are not currently running the ATI Catalyst driver version 11.4, you should go and download the latest AMD Mobility Catalyst Driver from the ATI site. (current version is 11.4 as of today’s date).
  6. install the latest drivers and reboot, and your GSOD situation should be history.

Note: if you still experience some other form of glitching with your video card drivers on the G73, use this procedure to completely wipe the ATI drivers, then re-install the latest ones. Try using this procedure below to get a completely fresh install of the ATI drivers.

ATI DRIVER CLEAN START GUIDE

(Modified by The Amixa Web Guru. Original one by steviejones133)

  1. Uninstall the current AMD Mobility Catalyst Drivers by going to the control panel, uninstall programs and select everything. Remove. Do not use the EXPRESS removal. Use the one where you pick ALL the items to uninstall.
  2. Check in Device Manager that you are back to Standard VGA Drivers.
  3. If not back at VGA, uninstall/remove devices manually via device manager. This should get back to VGA.
  4. Reboot into safe mode (press F8 when you are at the BIOS to get to the Windows boot menu and pick SAFE MODE)
  5. Run Driver Sweeper in safe mode for Ati Display only (run as administrator by right clicking the icon – required) and CLEAN any ATI fragments.
  6. Quit Driver Sweeper.
  7. Re-run Driver Sweeper a second time (also as administrator), pick ATI again and let it scan once more to make sure all ATI fragments are gone
  8. Run CCleaner for both clean up and registry in safe mode.
  9. Repeat step 8.
  10. Restart normally to windows – the laptop will look bad due using only standard VGA drivers
  11. Re-run driver sweeper (admin)
  12. Re-run CCleaner
  13. At this point, all ATI driver fragments are gone.
  14. Go to the ATI site and download the latest AMD Mobility Catalyst Drivers
  15. Install the latest ATI drivers. Do not choose CUSTOM. Choose EXPRESS and let it complete.
1 2 3 4