Tag Archives: Microsoft Windows Server

Solution for Windows cross-subnet browsing issue in mid-2016

**NOTE: as of 12/2017 and the Fall Creator’s Update builds 1709 and later, Microsoft has again broken the functionality of the “Network” (Network Neighborhood) item inside Windows Explorer.  You will probably need to do both add the registry key below, as well as follow the directions in my new post, here.

=========

Hello all-

this is a follow-up to my original post in which I discussed how to setup cross-subnet browsing so that all computers come up in “Network” or “Network Neighborhood”.

For the last few months, my “Network” browse list has disappeared and would ONLY show computers from my LAN subnet.  My remote (VPN-to-VPN) network subnet disappeared from my “Network” computer list.

After >>MUCH<< research I have found the problem and will present the solution.

The problem is due to the Microsoft Windows Update (for both desktop and server OS’s) KB3161949  (read about it here).

Part of the effect of this update was to “harden” the NETBIOS service and prevent NETBIOS data from being sent between subnets.


THE SOLUTION:

Two ways of handling this.

  1. You can remove this specific hotfix
  2. You can add a registry setting to override it.

(YOUR CHOICE)

To REMOVE the hotfix:

On SERVERS:  Go to Control Panel, Uninstall a program, View Installed Updates… Remove 3161949.  You’ll need to reboot.  After rebooting, go check for windows updates again (MANUALLY)  3161949 will pop up.  Right click and HIDE UPDATE.

On Desktops:  Same process as above – HOWEVER – Depending on which version of windows, which OS Rollup you are on, 3161949 might not show up.  If you cannot remove 3161949, simply add the registry key below.

–OPTIONAL METHOD–

Involves a registry key addition, then you need to reboot the machine.

SUBKEY: HKEY_LOCAL_MACHINE\SYSTEM\CurrentControlSet\Services\NetBT\Parameters
Value Name: AllowNBToInternet
Type: Dword
Value: 1


** REMEMBER TO REBOOT after you do either the uninstall or registry key.

** It will take 5-60 minutes for the Network browse lists to refresh

*** MOST IMPORTANT ***

You MUST do this on your domain servers (Master Browsers) on each side of the subnet.  For example, I have for domain servers, two on each side.  I did this procedure on both, then rebooted all four domain servers.

Then I did this on my Windows 10 Pro workstation (via registry key) and rebooted.

When I checked my computer 30 minutes later, all machines were showing up in the browse list under “Network” in Windows 10.

** ADDITIONAL NOTE:  Just for the heck of it, you might as while put that registry key onto all your domain servers.  Even though I had uninstalled 3161949 from all 4 of my domain servers (and hidden that update), one of my DC’s re-applied that patch and rebooted, thereby messing up my Network list again.  So I just went and put that reg key onto all 4 DC’s just in case they get that update somehow in the future.

** NOTE: Do this at your own risk.  I’m not responsible for your network security.  You have to make the decision on what’s more important to you here.  Being able to see the entire cross-subnet network, or security.  I can’t speak as to how this increases or decreases your security risk.

Let me know if any questions…

WordPress 4.x auto updates under windows

If you want your WordPress install to do auto-updates (in a Windows Server based hosting setup), you need to do one simple step.


Edit the hosts file.

Put a local IP in there for the domain name of the site.

Save the changes.


Example:

10.5.5.5  www.whatever-the-site-is.com

Re-log into WordPress and go to dashboard-updates and in there it should tell you “future updates will be automatically applied”

Why is all of this needed?  WordPress uses PHP CRON and that is reliant on the server being able to find the local website.  Therefore it is necessary to put a hard-coded IP in the hosts file so the CRON job can “see” the wordpress site.  Without the hosts entry the website will resolve to the external IP of the site, and you will have an unreachable IP issue and auto-update won’t work.

Proper FTP setup via IIS using Passive FTP

Since PASSIVE FTP seems to be a relative standard (that I experience), and since most clients don’t understand or want to use “ACTIVE” FTP, here is the easy way to configure your firewall and FTP software on an IIS machine to permit PASSIVE FTP.

Firewall Setup

You’ll need two rules and one “one to one” NAT mapping (this may vary a bit due to your firewall software).

The one to one NAT mapping needs to map the external IP address to the internal IP of the server.  Such as “66.33.123.21” mapped to “10.1.1.21”

One rule to allow the world into TCP port 21, mapped to the specific server in question.  (Allow * from ANY to 10.1.1.21 TCP port 21).

Second rule, specifically for PASSIVE FTP.  Allow * from ANY to 10.1.1.21 on ports range 50000 to 50100.

FTP Server Setup

We normally use Filezilla Server (latest version, of course).

Add a user and setup the standard settings.

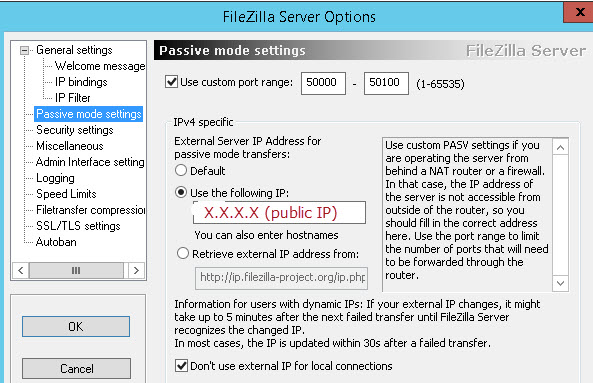
Passive settings are as follows (below).

Most importantly, the “X.X.X.X” area below is your PUBLIC IP that is mapped through your firewall.

Click OK and save the settings.

FTP1


FTP Client Settings

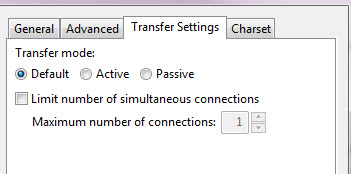
Nothing fancy here, just check to make sure the settings look like this:

FTP2

Throttling bandwidth on an IIS based site

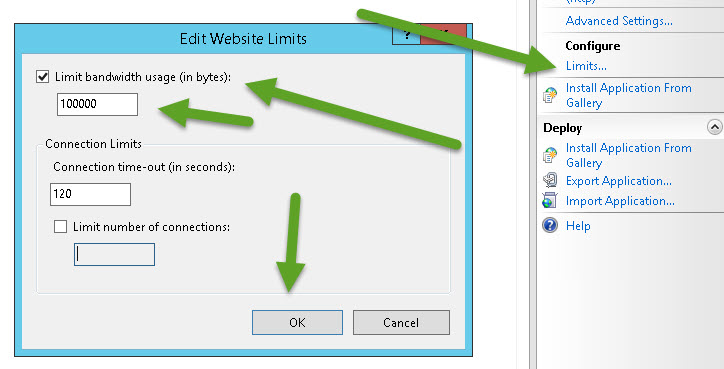
If you need to throttle (or limit) the amount of bandwidth a specific site on Microsoft Server — this is for you.  This should work with any Microsoft Server OS from 2008 to present. Open IIS. Go to the specific site in question (in the tree to left expand and click on the specific site name).

on the right side panel, click Configure — Limits.

Check “limit bandwidth usage” and type in a number.

Click OK.

limits

eXtplorer does not allow login under PHP 5.6 and IIS Windows Server

Have you deployed out eXtplorer and received this error:

PHP Deprecated:  Non-static method PEAR::isError() should not be called statically, assuming $this from incompatible context in X:\XXXXXX\WWW.AAAAA.com\www\libraries\JSON.php on line 828

it’s an easy fix.

edit the file

X:\XXXXXX\WWW.AAAAA.com\www\libraries\pear.php

edit line 247

change this:

function isError($data, $code = null)

to this:

static function isError($data, $code = null)

Permission denied error dealing with Classic ASP loadpicture

To solve the following error, which is generated by the loadpicture object

Microsoft VBScript runtime error ‘800a0046’
Permission denied: ‘loadpicture’

set myImg = loadpicture(“C:\aaa\asdf.jpg”)

==

The solution is to simply add this permission as full control

servername\IUSR

to the directory in which this object is going to work…

Quick change of Hyper-V UID – for Register in place VM

If you want to quickly create copies of one Hyper-V Virtual Machine, here is an easy process:

1) change the XML UID by editing the XML file within the Exported VM directory.
2) change the name to the new machine name (this is the XXXXX tag)
3) change the global_id
4) change the logical_id (to the new global ID)
5) save the file
6) rename the XML file to match the global ID
7) import – register in place (use the existing unique ID)
8) adjust any settings on the VM
9) start the VM

Inconsistent ping / inconsistent network connectivity on Hyper-V virtual machine

I recently came across this issue on one of my virtual server machines, where I just setup a brand new Windows Server W2K12R2 Update 1 virtual machine. It is currently in DHCP status soon to be set as a static IP.

With the client VM machine running (and while multiple other VM’s are running w/o any problems), I was experiencing the following:
1) inconsistent ping of the VM
2) inability to remote desktop into the machine (sometimes I could connect, sometimes I would not be able to)
3) DNS resolution issues with that VM

Here is my setup:
Windows Server 2012 R2, Update 1. Hyper-V 6.3.9600.xxxxx
Client: Windows Server 2012, R2, Update 1. Standard Server. Virtual Machine version 5, generation 2.

Network: High quality CAT6/Gigabit setup.

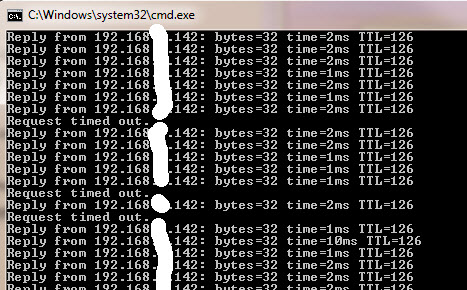
Here is what it looks like when I do a continuous ping of the virtual machine:

pings

After doing a LOT of troubleshooting / testing / trial & error, here is the fix:

This new VM has a “DYNAMIC” MAC address.  All the other VM clients on that server have STATIC MAC addresses.

I shut down the VM, adjusted the network settings (under ADVANCED) to a STATIC MAC.

Start the VM.

Login (via remote desktop while sitting on the Hyper-V server itself)

Do a continuous ping, and the issue is fixed!

Next, via Remote desktop into the hyper-v server and controlling the machine that way (not remote desktop connecting into the VM itself…) I switched the machine to a static IP, which was different than the DHCP assigned one.

Reboot machine (for the heck of it)

on my desktop, IPCONFIG /FLUSHDNS

(at this point depending on how your network is configured you may need to wait a bit for the DNS changes (IP change) to catch up so that your ping works…)

then try pinging the IP address (not machine name):  Works

try pinging the machine name: Works  (see above, you may need to wait a bit for your network to catch the DNS changes)

=

The above fix (changing to Static IP) alleviates the need to fiddle with the VM’s Hardware Acceleration settings, such as VMQ (Virtual Machine Queue) or the Enable IPsec task offloading.  On my Hyper-V server both of these are “CHECKED/ON”.


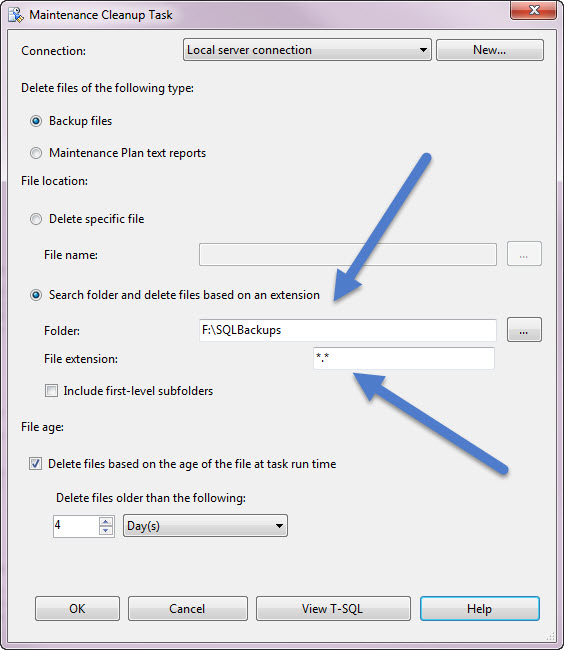
MS SQL Server MAINTENANCE CLEANUP TASK job failure and how to fix it!

If you get this maintenance plan error for MAINTENANCE CLEANUP TASK within your error logs and your maintenance jobs are under Microsoft SQL Server (MSSQL) I have an easy fix for you.

This is the error: 

Executing the query “EXECUTE master.dbo.xp_delete_file 0,N”,N”,N’2014…” failed with the following error: “Error executing extended stored procedure: Invalid Parameter”. Possible failure reasons: Problems with the query, “ResultSet” property not set correctly, parameters not set correctly, or connection not established correctly.


Make sure the following fields are completed (file path) and that you are using *.* in the extension.

SQL ISSUE

Quick and easy method to upgrade MySQL Community Edition – Windows Server

I recently crossed my fingers and went through the upgrade process to upgrade MySQL from 5.6.14 to 5.6.17 on my Windows server.  (also works for 5.5.x to current)


NOTE – UPDATED 5/27/2016:  If you are using the MYSQL Installer – Community (if that is in your Start -> program list, please use that to upgrade you instance.  That is much simpler than my process below.  The process below should now be considered a LEGACY process.


Don’t forget to run

mysql_upgrade -u root -p

to allow MySQL to upgrade all the tables to the new standard.


Through trial and error, I have found the easiest process to do this.

  1. stop the existing service via services
  2. command prompt (as administrator)
  3. change to the MySQL directory, BIN, and then type in mysqld –remove  (to remove the service)
    1. If the above command does not work, try using SC DELETE MYSQL    (put the exact service name in place of MYSQL).  That should do the trick.
    2. go into the service manage and refresh and ensure the service is removed.
  4. go to the control panel and uninstall everything to do with MySQL (presuming this is on a dedicated MySQL box)
  5. make sure your data is moved to a directory on the root like “MYSQLDATA”
  6. delete every folder under programdata and program files pertaining to MySQL
  7. reboot the machine
  8. log into machine
  9. make sure .NET Framework 4.0 is installed
  10. download and run the MySQL Community 5.6.17 (or later) x32 MSI full installer
  11. do a fresh install
  12. Server type:  Server  (for production deployments)
  13. point things to the correct directories (e.g. your existing data directory, etc.)
  14. use the same root password as before (on the old install)
  15. add any extra admin users
  16. complete the install
  17. make sure the service is complete
  18. That’s it!

hope that helps someone else out there.  I took the couple of hours to sort this all out for you!

1 2 3 4