Inconsistent ping / inconsistent network connectivity on Hyper-V virtual machine
I recently came across this issue on one of my virtual server machines, where I just setup a brand new Windows Server W2K12R2 Update 1 virtual machine. It is currently in DHCP status soon to be set as a static IP.
With the client VM machine running (and while multiple other VM’s are running w/o any problems), I was experiencing the following:
1) inconsistent ping of the VM
2) inability to remote desktop into the machine (sometimes I could connect, sometimes I would not be able to)
3) DNS resolution issues with that VM
Here is my setup:
Windows Server 2012 R2, Update 1. Hyper-V 6.3.9600.xxxxx
Client: Windows Server 2012, R2, Update 1. Standard Server. Virtual Machine version 5, generation 2.
Network: High quality CAT6/Gigabit setup.
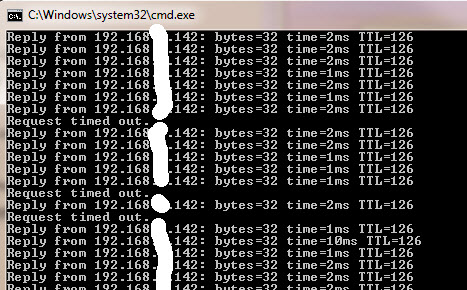
Here is what it looks like when I do a continuous ping of the virtual machine:
After doing a LOT of troubleshooting / testing / trial & error, here is the fix:
This new VM has a “DYNAMIC” MAC address. All the other VM clients on that server have STATIC MAC addresses.
I shut down the VM, adjusted the network settings (under ADVANCED) to a STATIC MAC.
Start the VM.
Login (via remote desktop while sitting on the Hyper-V server itself)
Do a continuous ping, and the issue is fixed!
Next, via Remote desktop into the hyper-v server and controlling the machine that way (not remote desktop connecting into the VM itself…) I switched the machine to a static IP, which was different than the DHCP assigned one.
Reboot machine (for the heck of it)
on my desktop, IPCONFIG /FLUSHDNS
(at this point depending on how your network is configured you may need to wait a bit for the DNS changes (IP change) to catch up so that your ping works…)
then try pinging the IP address (not machine name): Works
try pinging the machine name: Works (see above, you may need to wait a bit for your network to catch the DNS changes)
=
The above fix (changing to Static IP) alleviates the need to fiddle with the VM’s Hardware Acceleration settings, such as VMQ (Virtual Machine Queue) or the Enable IPsec task offloading. On my Hyper-V server both of these are “CHECKED/ON”.