Author Archives: The Amixa Web Guru

How to get IIS 7.5 web server to pass the BEAST PCI vulnerability compliance scans

If your e-commerce website keeps flunking PCI vulnerability complaince scans with the following error:

BEAST (Browser Exploit Against SSL/TLS) Vulnerability, CVE-2011-3389

and you are running Microsoft Server 2008 R2, I can help you.

If you aren’t on Windows Server 2008 R2, there is no known way to pass this test short of upgrading your server to W2K8R2 and doing the following steps.

This is the exact vulnerability as reported (in our case, by Trustkeeper):

BEAST (Browser Exploit Against SSL/TLS) Vulnerability The SSL protocol encrypts data by using CBC mode with chained initialization vectors. This allows an attacker, which is has gotten access to an HTTPS session via man-in-the-middle (MITM) attacks or other means, to obtain plain text HTTP headers via a blockwise chosen-boundary attack (BCBA) in conjunction with Javascript code that uses the HTML5 WebSocket API, the Java URLConnection API, or the Silverlight WebClient API. This vulnerability is more commonly referred to as Browser Exploit Against SSL/TLS or “BEAST”.

CVE: CVE-2011-3389

NVD: CVE-2011-3389

Bugtraq: 49778

CVSSv2: AV:N/AC:M/Au:N/C:P/I:N/A:N(4.30)

This is the remediation (as stated by Trustkeeper):

Affected users should disable all block-based cipher suites in the server’s SSL configuration and only support RC4 ciphers, which are not vulnerable to fully address this vulnerability. This vulnerability was addressed in TLS version 1.1/1.2, however, support for these newer TLS versions is not widely supported at the time of this writing, making it difficult to disable earlier versions.

Additionally, affected users can also configure SSL to prefer RC4 ciphers over block-based ciphers to limit, but not eliminate, exposure. Affected users that implement prioritization techniques for mitigation as described above should appeal this vulnerability and include details of the SSL configuration.

Here is the evidence (as stated by TrustKeeper):

Service: http
Evidence:
Cipher Suite: SSLv3 : DES-CBC3-SHA
Cipher Suite: SSLv3 : RC4-SHA
Cipher Suite: SSLv3 : RC4-MD5
Cipher Suite: TLSv1 : AES256-SHA
Cipher Suite: TLSv1 : AES128-SHA
Cipher Suite: TLSv1 : DES-CBC3-SHA
Cipher Suite: TLSv1 : RC4-SHA
Cipher Suite: TLSv1 : RC4-MD5

That isn’t much help, of course.

Ok, here is how to solve this.  And you don’t even need REGEDIT!

  1. Make sure your website is on a Windows 2008 R2 server, with a valid SSL certificate.
  2. Download the following FREE – and FANTASTIC program to your web server.
    1. https://www.nartac.com/Products/IISCrypto/Default.aspx
  3. Run the program on your web server.  Please be logged in as full admin, and remote desktop is fine.
  4. Start by clicking the PCI button, then make all your settings look like below:
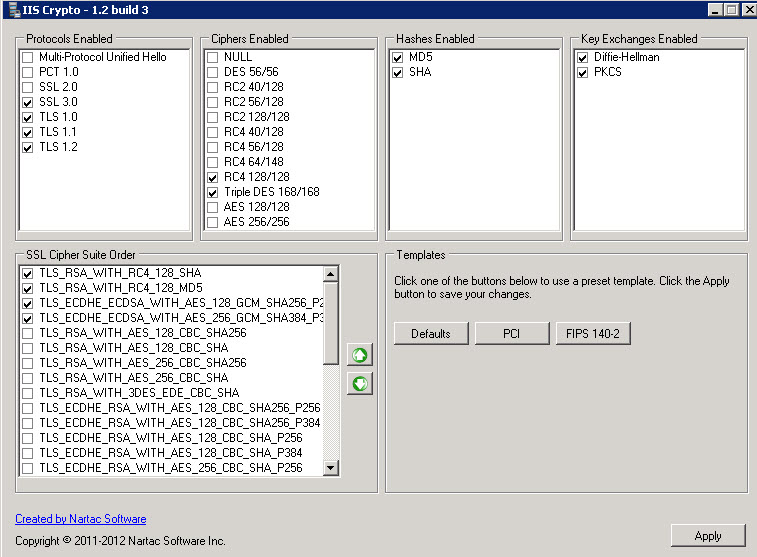
    1. pci
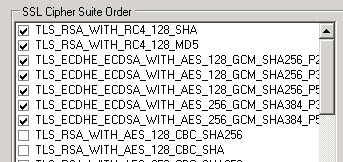
  5. In some cases you might have a few more listing under SSL Cipher Suite order.  Here is a screenshot from a second server (below).  The settings below are also perfectly fine:
    1. pci2
  6. In all cases – MAKE YOUR SETTINGS JUST LIKE ABOVE – and your site should always pass the BEAST test.
    1. IT IS CRITICAL that you have ONLY the CIPHERS selected in the above two screenshots, and the TOPMOST TWO in THIS SPECIFIC ORDER.
  7. apply the changes
  8. Restart the server.
  9. once the server is back up and running, go to the website below:
    1. https://www.ssllabs.com/ssltest/index.html
  10. Allow the test to complete.  The test will tell you if the site passes all the tests and is BEAST compliant, and it will give you a score for your website.  The website we tested scored 89 which is an “A”.

Hopefully this will help shortcut this process for some of you. I literally spent hours working this solution out.



How to permit Google Fonts through your Watchguard WebBlocker content filter proxy

Out of the box, the Watchguard Firewall WebBlocker content filter does not permit Google Fonts to download and be viewed through the proxy and into your network.  This creates a problem because a lot of websites now use embedded fonts to properly render the website.

To fix this, do the following:

  1. Log into the Watchguard Firewall
  2. Presuming you have already setup a Firewall proxy and are using the WebBlocker to filter content…
  3. Go to Firewall->Proxy Actions, and EDIT the current proxy you have custom defined.
  4. Go to HTTP RESPONSE->CONTENT TYPES
  5. ADD the following new actions (below).  You will need to add ALL FIVE to make this work properly.
  6. Save

Add the following actions:

googlefonts

How to permit ZIP files through your Watchguard WebBlocker content filter proxy

Out of the box, the Watchguard Firewall WebBlocker content filter does not permit ZIP files to be downloaded inside your network.

To fix this, do the following:

  1. Log into the Watchguard Firewall
  2. Presuming you have already setup a Firewall proxy and are using the WebBlocker to filter content…
  3. Go to Firewall->Proxy Actions, and EDIT the current proxy you have custom defined.
  4. Go to HTTP RESPONSE->CONTENT TYPES
  5. ADD a new action, (ALLOW OR AV SCAN), Pattern match, application/x-zip-compressed
  6. Save
  7. Retry downloading your ZIP file (you may need to close out of your web browser and open it, and try again but this should solve the ZIP file downloading).

How to permit YouTube videos and other videos to play through a Watchguard WebBlocker proxy

Out of the box, the Watchguard Firewall WebBlocker content filter does not permit YouTube (and other streaming videos) to play through the proxy and into your network.

To fix this, do the following:

  1. Log into the Watchguard Firewall
  2. Presuming you have already setup a Firewall proxy and are using the WebBlocker to filter content…
  3. Go to Firewall->Proxy Actions, and EDIT the current proxy you have custom defined.
  4. Go to HTTP RESPONSE->CONTENT TYPES
  5. ADD a new action, (ALLOW OR AV SCAN), Pattern match, video/*
  6. Save
  7. Retry playing your video (you may need to close out of your web browser and open it, and try another video, but this should solve the YouTube and other streaming video issues).

How to allow the YouTube app to play videos through a Watchguard WebBlocker firewall proxy

If you are having problems with iPhones or iPads (or any other device) playing through your Watchguard WebBlocker proxy (via your Watchguard firewall), the fix is very simple.

Presuming you have one of the latest firmwares (11.6.x as of today) and are using WebBlocker with a proxy combined with the content filtering…

Log into the Watchguard

Go to Firewall->Proxy Actions

Select and Edit the proxy setup you are using in your network.  (you must NOT be using a predefined one, you must make your own).

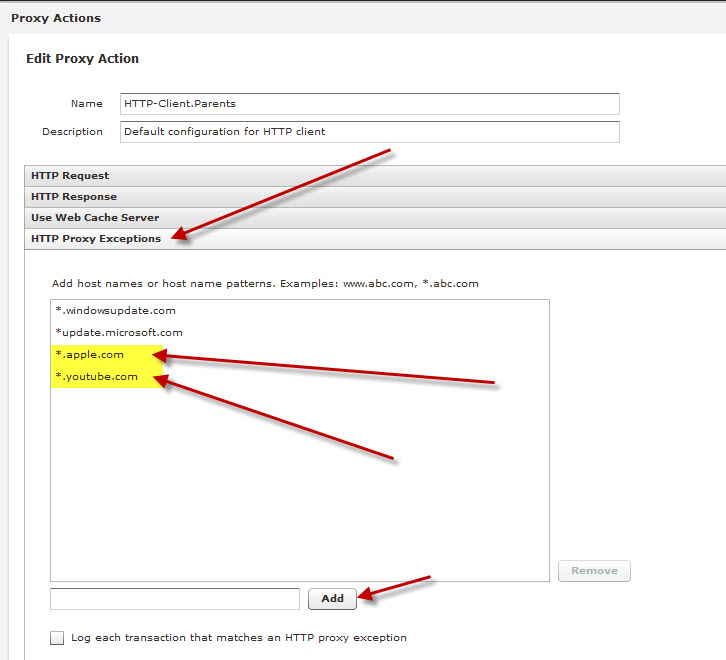
Go to HTTP Proxy Exceptions

add the following:

*.apple.com

*.youtube.com

so that your entries look like this:

proxy action

Save your changes.

Re-test your app and the application should play.

This worked perfectly on our network and our i-Devices.


How to migrate MYSQL to a new Windows server

Here is the easiest process that I know of for migrating (and upgrading) from one version of MYSQL running on Windows server, to a new Windows server.

  1. Setup the new Windows server, give it a fixed IP address (we’ll change that later to be at the same IP as the old server).
  2. Run all Windows updates
  3. Install IIS 7.5 (in our example, we were on W2K8 R2 Standard) and take all defaults.
  4. Go to Google and search for MICROSOFT PLATFORM INSTALLER, go to that Microsoft site, and run the installer.  The current version as of this post was 4.0RC
  5. in the MPI, search for PHP and install PHP.  Allow it to take any extras it chooses, hit next and install those items.
  6. Now that PHP is installed, launch the IIS 7.5 manager, stop the default site and setup a new website that we’ll use to park PHPMYADMIN on.
  7. Go download the latest version of PHPMYADMIN.
  8. extract it to your website directory into the /phpmyadmin/ directory.
  9. you should now be able to access the PHPMYADMIN site via http://localhost/phpmyadmin/
  10. Download and install the latest MSI installer download (of the x64 version if you have an x64 server)
  11. Install MYSQL
  12. Run the configuration wizard and complete the standard setup.  In our case we used a dedicated MYSQL server, set a new password for the admin account and pretty much took all defaults.
  13. At this pount we just need to migrate the data over from the old server to the new server.
  14. Make sure you have MYSQL Workbench installed to do this (under windows).  Current version is 5.2.30 CE.
  15. Under “Server Administration” you need to setup one connection for the old (current server) and one for the new one.
  16. Connect to the old server.
  17. Click Data Export.
  18. Export out ALL databases to one SQL file.  This may take some time depending on the speed of your internet connection.
  19. when this is complete, go check the file to make sure it is (relatively) large depending on the number of databases that you exported out.  MAKE SURE you export out the MYSQL database as well as all databases.
  20. Connect to the new server.
  21. Do a DATA IMPORT/RESTORE and load the SQL file you just exported
  22. Start the import.  Again, this may take some time to complete.
  23. When complete, the new machine is now a clone of the old machine.
  24. Shut down the old server.
  25. Change the IP on the new server to the IP of the old server.  Reboot (just to be sure).
  26. Once the new server is rebooted and it is at the “old IP” any of your sites that connect to MYSQL should now be working once again just as if they were connecting to the old server.

I hope this helps anyone who is in need of migrating/upgrading their Windows-based MYSQL install.


iPhone iPad “cannot verify server identity” SSL issue and resolution

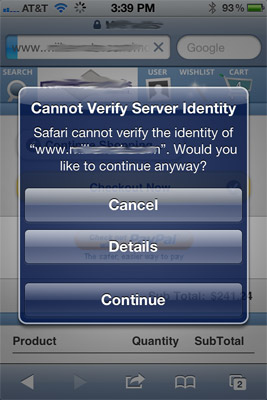
We recently came across an issue with one of our client sites that runs under ASPDOTNETSTOREFRONT where the site would appear function properly on normal desktop browsers (IE 9, FF, Safari, Chrome), but when the mobile site would run on an iPhone or iPad, and the mobile site would go into SSL mode, it would result in the following error message pop-up:

“Cannot verify server identity” – Safari cannot verify the identity of (your domain goes here).

The issue is that the supplementary Intermediate SSL certificates, in our case, from GoDaddy, are/were not installed correctly on the server.

To resolve this issue, re-download (if needed) the SSL file which includes your SSL cert and the intermediate SSL certs.

To Install an SSL in Microsoft IIS 5 & 6

  1. To install the Intermediate certificate, click Start , and then click Run….
  2. Type mmc, and then click OK. The Microsoft Management Console (Console 1) opens.
  3. From the File menu, click Add/Remove Snap-in… .
  4. In the Add/Remove Snap-in window, click Add.
  5. In the Add Standalone Snap-in window, select Certificates, and then click Add.
  6. In the Certificates snap-in window, select Computer Account, and then click Next.
  7. In the Select Computer window, select Local Computer, then click Finish.
  8. In the Add Standalone Snap-in window, click Close.
  9. In the Add/Remove Snap-ins window, click OK.
  10. In the Console 1 window, click + to expand the Certificates folder.
  11. Right-click Intermediate Certification Authorities, mouse-over All Tasks, and then click Import.
  12. In the Certificate Import Wizard, click Next.
  13. Click Browse to find the certificate file.
  14. In the Open window, select *.p7b for the Files of type.
  15. Select the appropriate intermediate certificate file, and then click Open.
  16. In the Certificate Import Wizard window, click Next.
  17. Select Place all certificates in the following store, and then click Browse.
  18. In the Select Certificate Store window, select Intermediate Certification Authorities, and then click OK.
  19. In the Certificate Import Wizard, click Next.
  20. Click Finish.
  21. Click OK.

At this point you need to RESTART IIS.

After you restart IIS, then your mobile browser should function properly.


How to use Google Fonts under both SSL and non-SSL without SSL insecure messages

The fix for this is very simple and will work under all the common browsers.  This has been tested on IE9, Firefox 13, Safari and Chrome.

locate this line on your HTML page (or template):

<link href='http://fonts.googleapis.com/css?family=Dosis:400,700' rel='stylesheet' type='text/css'>

and change it to this:

<link href='//fonts.googleapis.com/css?family=Dosis:400,700' rel='stylesheet' type='text/css'>

This simple change will make your browser call the Google Font page in the applicable mode (HTTP vs HTTPS).

Enjoy!


DotNetNuke 6 install onto Windows 2008 R2 Server

Here is the proper way to avoid getting the dreaded “System.Security.SecurityException: Request for the permission of type ‘System.Web.AspNetHostingPermission, System, Version=2.0.0.0, Culture=neutral, PublicKeyToken=b77a5c561934e089’ failed.” error while attempting to get DotNetNuke 6.x installed onto Windows Server 2008 R2.

  1. download and extract the DNN installer.  In my case, I downloaded DotNetNuke_Community_06.01.03_Install and extracted it into a temporary directory.
  2. Make sure you add feature .NET Framework 3.5.1 Features, and enable ASP.NET at the same time
  3. In my case, I am installing DNN to the root of a new subdomain, so I created a new folder in my website directory named for the domain name.
  4. Copy over the DNN files into your website directory
  5. Go to the IIS manager and setup a new website and point it to your directory
  6. Make sure you add default.aspx as the default document type
  7. Make sure you create a new dedicated application pool.  In my case I used DNN as the name of the application pool.
  8. on your WWW directory, grant the following permissions.  {machinename}\IUSR (full control), ASPNET (F.C.), Network Service (F.C.)
  9. Using SQL manager, create a new database for the site.  An empty database will suffice.  Create a login for the database.
  10. Update the SQL server connection strings in the web.config file to point to the database server and using your UN/PW from above.
  11. Now try accessing the site you’ve created and you will get this error:
    1. Description: The application attempted to perform an operation not allowed by the security policy.  To grant this application the required permission please contact your system administrator or change the application’s trust level in the configuration file.
      Exception Details: System.Security.SecurityException: Request for the permission of type ‘System.Web.AspNetHostingPermission, System, Version=2.0.0.0, Culture=neutral, PublicKeyToken=b77a5c561934e089’ failed.
    2. Application Error b77a5c561934e089
  12. To solve that, go to the Application pool and edit the Application Pool you created for this site, in my case it is DNN
    1. Click Advanced Settings
    2. Set Managed Pipeline Mode to CLASSIC
    3. Set Identity=Network Service.
    4. Click OK
    5. Click Recycle
    6. Go back to the IIS manager and do a restart of the IIS service on the webserver.
    7. Application Pool Advanced Settings
  13. Try to access your DNN site again now and it should work properly.
  14. Complete the DNN wizard and you should pass all tests (like permissions)
1 5 6 7 8 9 10